Brother International CP60X Sewing Guide - Page 8
Aligning the fabric with a needle plate marking, For stitches with a left needle position
 |
View all Brother International CP60X manuals
Add to My Manuals
Save this manual to your list of manuals |
Page 8 highlights
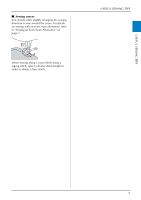
USEFUL SEWING TIPS ■ Aligning the fabric with a needle plate marking The markings on the needle plate show the distance from the needle position of a seam sewn with the straight stitch (left needle position). Sew while keeping the edge of the fabric aligned with a marking on the needle plate. The distance between the markings in the upper scale is 1/8 inch (3 mm) and the distance between the markings in the grid is 5 mm (3/16 inch). For stitches with a left needle position (Stitch width: 0.0 mm) a d b e d f c 1 Seam 2 Presser foot 3 Millimeters 4 Inches 5 Needle plate 6 16 mm (5/8 inch) 8
-
 1
1 -
2
-
 3
3 -
 4
4 -
 5
5 -
 6
6 -
 7
7 -
 8
8 -
 9
9 -
 10
10 -
 11
11 -
 12
12 -
 13
13 -
14
-
15
-
16
-
17
-
18
-
19
-
20
-
21
-
22
-
23
-
24
-
25
-
26
-
27
-
28
-
29
-
30
-
31
-
32
-
33
-
34
-
35
-
36
-
37
-
38
-
39
-
40
-
41
-
42
-
43
-
44
-
45
-
46
-
47
-
48
 |
 |

8
USEFUL SEWING TIPS
■
Aligning the fabric with a needle plate
marking
The markings on the needle plate show the
distance from the needle position of a seam
sewn with the straight stitch (left needle
position). Sew while keeping the edge of the
fabric aligned with a marking on the needle
plate. The distance between the markings in
the upper scale is 1/8 inch (3 mm) and the
distance between the markings in the grid is
5
mm (3/16 inch).
For stitches with a left needle position
(Stitch width: 0.0 mm)
d
d
c
f
a
b
e
1
Seam
2
Presser foot
3
Millimeters
4
Inches
5
Needle plate
6
16 mm (5/8 inch)