Brother International Innov-is 6000D Operation Manual for Premium Pack III Opt - Page 10
Removing the Border Embroidery Frame, Embroidering the Next Pattern, border embroidery frame.
 |
View all Brother International Innov-is 6000D manuals
Add to My Manuals
Save this manual to your list of manuals |
Page 10 highlights
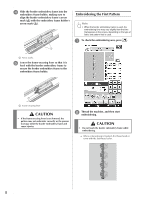
Removing the Border Embroidery Frame Note • Before removing the border embroidery frame from the embroidery unit, make sure that the embroidery unit carriage has moved to its initial position. a Raise the frame-securing lever and pull the border embroidery frame toward you. Embroidering the Next Pattern a Press both lock release buttons and slide the fabric to align the embroidering area of the next pattern, and rehoop the fabric in the border embroidery frame. Note • Adjust the position of the fabric so that the embroidering area for the next pattern is within the embroidering area of the embroidery sheet. CAUTION • If the thread has become tangled and the embroidery unit carriage does not move to its initial position, even after the thread is cut, turn off the machine, manually gently move the carriage, and then remove the border embroidery frame. • Only move the embroidery unit carriage when the machine is turned off. a Pattern embroidered first b Position of pattern to be embroidered next c Embroidering area of embroidery sheet b Attach the border embroidery frame to the embroidery unit, and then press . 9
-
 1
1 -
2
-
3
-
4
-
 5
5 -
 6
6 -
 7
7 -
 8
8 -
 9
9 -
 10
10 -
 11
11 -
 12
12 -
 13
13 -
 14
14 -
 15
15 -
16
-
17
-
18
-
19
-
20
-
21
-
22
-
23
-
24
-
25
-
26
-
27
-
28
-
29
-
30
-
31
-
32
-
33
-
34
-
35
-
36
-
37
 |
 |
