Brother International Innov-is 6000D Operation Manual for Premium Pack III Opt - Page 6
the lower center of the bottom pattern. When, you are finished, press
 |
View all Brother International Innov-is 6000D manuals
Add to My Manuals
Save this manual to your list of manuals |
Page 6 highlights
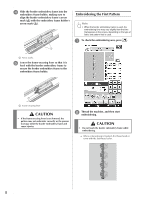
e If necessary, assign thread marks. Since the pattern will be repeatedly embroidered from the top to the bottom, add the thread mark to the lower center of the bottom pattern. When you are finished, press . Memo • Select the location where the thread mark is to be added according to the direction that the embroidery is repeated. → Touch and , or and to highlight the design for inserting thread marks. Note • Do not add thread marks to character patterns. • Add thread marks to patterns that do not have a point of alignment, such as rotated patterns or patterns that are spaced apart. Patterns that can be aligned visually can be embroidered cleanly without the thread mark. If the design direction is rotated, use the following suggestions. a First Pattern b Second Pattern c Thread mark 5
-
 1
1 -
 2
2 -
 3
3 -
 4
4 -
 5
5 -
 6
6 -
 7
7 -
 8
8 -
 9
9 -
 10
10 -
 11
11 -
 12
12 -
13
-
14
-
15
-
16
-
17
-
18
-
19
-
20
-
21
-
22
-
23
-
24
-
25
-
26
-
27
-
28
-
29
-
30
-
31
-
32
-
33
-
34
-
35
-
36
-
37
 |
 |
