Brother International Innov-is 6000D Operation Manual for Premium Pack III Opt - Page 14
Preparation (Camera Needle Position Setting), Press the Automatic Threading button.
 |
View all Brother International Innov-is 6000D manuals
Add to My Manuals
Save this manual to your list of manuals |
Page 14 highlights
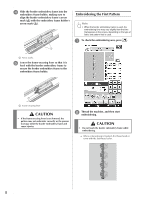
Preparation (Camera Needle Position Setting) When connecting patterns by using the camera, set the camera needle position. This operation is essential when you use this function for the first time. It is not necessary to perform this operation each time, but we recommend performing it when the needle is changed. Use the white stickers (solid) included with this Kit. a Prepare the needle to be used to connect patterns. b Hold your finger firmly on the LCD screen, and then turn on the machine. Note • Be careful not to touch the LCD screen prior to Step c below. • This function can be performed with or without embroidery unit attached to machine. If attached, message screens will appear regarding movement of embroidery unit. c Press the "Automatic Threading" button. d Follow the on-screen instructions to complete the procedure. 1. Raise needle bar to its highest position. Note • The "Needle Position" button cannot be used while setting the camera needle position. Turn the handwheel counterclockwise to move the needle bar. 2. Remove presser foot and replace needle with a new embroidery needle standard size 75/11 or 90/14. 3. Affix white sticker on needle dropping point area. → Camera needle position setting screen appears. a White sticker Note • Use a new sticker. The camera needle position cannot be set correctly if there is a hole in sticker or if it is dirty. If you have no new stickers, contact your nearest Brother dealer. 13
-
 1
1 -
2
-
3
-
4
-
5
-
6
-
7
-
8
-
 9
9 -
 10
10 -
 11
11 -
 12
12 -
 13
13 -
 14
14 -
 15
15 -
 16
16 -
 17
17 -
 18
18 -
 19
19 -
20
-
21
-
22
-
23
-
24
-
25
-
26
-
27
-
28
-
29
-
30
-
31
-
32
-
33
-
34
-
35
-
36
-
37
 |
 |
