Brother International Innov-is 6000D Operation Manual for Premium Pack III Opt - Page 8
Attaching the Border Embroidery Frame to the Embroidery Unit, Attaching the Border Embroidery
 |
View all Brother International Innov-is 6000D manuals
Add to My Manuals
Save this manual to your list of manuals |
Page 8 highlights
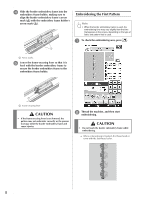
e Place the embroidery sheet in the upper frame, align the center mark (line) on the fabric with the guide line on the embroidery sheet, and then press down on the left and right locking levers until they click into place. f Remove the embroidery sheet, and then gently pull the four sides of the fabric to remove any excess slack. Be careful so that fabric is not stretched out of shape. Finally, check that the fabric is firmly within the hoop. Attaching the Border Embroidery Frame to the Embroidery Unit a Locking levers Memo • The fabric can also be positioned in the border embroidery frame by aligning the edge of the fabric with the inner markings on the upper frame. CAUTION • After firmly hooping the fabric in the border embroidery frame, attach the frame to the embroidery unit. Otherwise, the needle may break and cause injuries. • Before attaching the border embroidery frame to the embroidery unit, make sure that the needle and presser foot have been raised. Otherwise, the needle may break and cause injuries. Note • Before attaching the border embroidery frame, wind the bobbin with thread and install it. Note • If there is excess fabric after the center of the embroidering area is aligned with the center of the border embroidery frame, fold over the excess fabric, place it on top of the upper frame, and then press down on the levers. Be careful that the folded excess fabric is not caught in the embroidering area. a Make sure that the needle and presser foot have been raised. If the needle has not been raised, press the "Needle Position" button to raise it. If the presser foot has not been raised, press the "Presser Foot Lifter" button to raise it. b Make sure that the embroidery unit carriage has moved to its initial position. c Align the guide on the border embroidery frame with the right edge of the embroidery frame holder. a b a Embroidery frame holder b Guide on border embroidery frame 7
-
 1
1 -
2
-
 3
3 -
 4
4 -
 5
5 -
 6
6 -
 7
7 -
 8
8 -
 9
9 -
 10
10 -
 11
11 -
 12
12 -
 13
13 -
14
-
15
-
16
-
17
-
18
-
19
-
20
-
21
-
22
-
23
-
24
-
25
-
26
-
27
-
28
-
29
-
30
-
31
-
32
-
33
-
34
-
35
-
36
-
37
 |
 |
