Brother International MFC-9460CDN Advanced Users Manual - English - Page 79
Auto Registration, Black Start, Color Start, Use Calibration Data, Get Device Data Automatically - driver
 |
UPC - 012502625117
View all Brother International MFC-9460CDN manuals
Add to My Manuals
Save this manual to your list of manuals |
Page 79 highlights
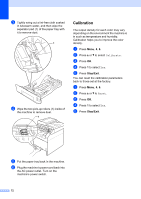
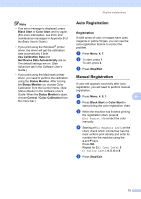
Note • If an error message is displayed, press Black Start or Color Start and try again. (For more information, see Error and maintenance messages in Appendix B of the Basic User's Guide.) • If you print using the Windows® printer driver, the driver will get the calibration data automatically if both Use Calibration Data and Get Device Data Automatically are on. The default settings are on. (See Advanced tab in the Software User's Guide.) • If you print using the Macintosh printer driver, you need to perform the calibration using the Status Monitor. After turning the Status Monitor on, choose Color Calibration from the Control menu. (See Status Monitor in the Software User's Guide. When the Status Monitor is open, choose Control / Color Calibration from the menu bar.) Routine maintenance Auto Registration A Registration A If solid areas of color or images have cyan, magenta or yellow fringes, you can use the auto-registration feature to correct the problem. a Press Menu, 4, 7. b To start, press 1. To exit, press 2. c Press Stop/Exit. Manual Registration A If color still appears incorrectly after autoregistration, you will need to perform manual registration. a Press Menu, 4, 8, 1. A b Press Black Start or Color Start to start printing the color registration chart. c When the machine has finished printing the registration chart, press 2 (Set Regist.) to correct the color manually. d Starting at 1 (1 Magenta Left) on the chart, check which colored bar has the most uniform print density and enter its number into the machine using the a and b keys. Press OK. Repeat for 2 (2 Cyan Left), 3 (3 Yellow Left), 4, 5, 6 to 9. e Press Stop/Exit. 73
-
 1
1 -
2
-
3
-
4
-
5
-
6
-
7
-
8
-
9
-
10
-
11
-
12
-
13
-
14
-
15
-
16
-
17
-
18
-
19
-
20
-
21
-
22
-
23
-
24
-
25
-
26
-
27
-
28
-
29
-
30
-
31
-
32
-
33
-
34
-
35
-
36
-
37
-
38
-
39
-
40
-
41
-
42
-
43
-
44
-
45
-
46
-
47
-
48
-
49
-
50
-
51
-
52
-
53
-
54
-
55
-
56
-
57
-
58
-
59
-
60
-
61
-
62
-
63
-
64
-
65
-
66
-
67
-
68
-
69
-
70
-
71
-
72
-
73
-
 74
74 -
 75
75 -
 76
76 -
 77
77 -
 78
78 -
 79
79 -
 80
80 -
 81
81 -
 82
82 -
 83
83 -
 84
84 -
85
-
86
-
87
-
88
-
89
-
90
-
91
-
92
-
93
-
94
-
95
-
96
-
97
-
98
-
99
-
100
-
101
 |
 |
