Brother International PR-620 PR620 Cap Frame User Manual - Multi
Brother International PR-620 Manual
 |
View all Brother International PR-620 manuals
Add to My Manuals
Save this manual to your list of manuals |
Brother International PR-620 manual content summary:
- Brother International PR-620 | PR620 Cap Frame User Manual - Multi - Page 1
Cap frame User's Guide Manuel d'instructions du cadre pour casquettes Manual de instrucciones del bastidor de gorras Table of Contents Cap frame and its accessories Preparing the mounting jig 1 I For the standard type 4 Attaching the cap frame 5 I Attaching the cap frame to the mounting jig and - Brother International PR-620 | PR620 Cap Frame User Manual - Multi - Page 2
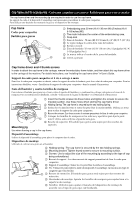
to attach the cap frame to the carriage, remove the embroidery frame holder, and then attach this cap frame driver to the carriage of the machine. For details instructions, see "Installing the cap frame driver" in User's Guide. Support du cadre pour casquettes et 4 vis à serrage à main Pour fixer - Brother International PR-620 | PR620 Cap Frame User Manual - Multi - Page 3
Preparing the mounting jig / Préparation du dispositif d'assemblage / Preparación del dispositivo de . Baje el tope y coloque el dispositivo de montaje en una superficie estable, como una mesa. 1 Use a Phillips screwdriver to loosen the two screws, and then lower the stopper in the direction of the - Brother International PR-620 | PR620 Cap Frame User Manual - Multi - Page 4
bracket 2 Mounting plate 3 Tighten thumb screw 2 4 Fixez solidement le support d'assemblage sur la surface, puis serrez la vis à serrage à main. 3 1 Support d'assemblage 2 Plaque d'assemblage 3 Serrez la vis à serrage à main 4 Sujete con firmeza la abrazadera de montaje en la superficie - Brother International PR-620 | PR620 Cap Frame User Manual - Multi - Page 5
Remarque G Vérifiez que le support d'assemblage est solidement fixé sur la plaque d'assemblage et que la vis à serrage à main est serrée fermement. G quitando. 6 Adjust the size of the mounting jig according to the type of cap being embroidered. 1 Low profile type (low fitting) 2 Standard type (pro - Brother International PR-620 | PR620 Cap Frame User Manual - Multi - Page 6
sólo ligeramente para aflojarlos. G Pull the mounting jig toward you, and then use the Phillips screwdriver to tighten the four screws (two on the left and two serrer les quatre vis (deux à gauche et deux à droite). La préparation du dispositif d'assemblage est terminée. G Tire el dispositivo de - Brother International PR-620 | PR620 Cap Frame User Manual - Multi - Page 7
clamped. Next, attach the cap frame to the cap frame driver on the machine. Placez la casquette sur le cadre fixé sur le dispositif d'assemblage et retirez le cadre et la casquette du dispositif. Puis, fixez le cadre pour casquettes sur le support correspondant de la machine. Ponga la gorra en el - Brother International PR-620 | PR620 Cap Frame User Manual - Multi - Page 8
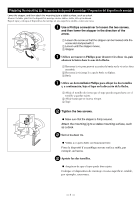
3 2 1 1 2 Release the snap lock on the cap frame down and then disengage the latch. Open the clamping frame. Also, open brim presser. 1 Snap lock released 3 Brim presser 2 Clamping frame opened 2 Déverrouillez la serrure à ressort du cadre pour casquettes, puis retirez le bouchon. Ouvrez le - Brother International PR-620 | PR620 Cap Frame User Manual - Multi - Page 9
4 Lift up (flip) the sweat guard on the inside of the cap, and then place the cap in the cap frame. Using both hands, hold both sides of the cap, and then align the edge of the lower frame with the base of the brim. 1 Edge of the lower frame 3 Base of the brim 2 Sweat guard 4 Relevez la bande - Brother International PR-620 | PR620 Cap Frame User Manual - Multi - Page 10
dispositivo de montaje. 1 Línea central de la gorra 2 Muesca del dispositivo de montaje 6 Place the sweat guard of the cap inside the notch in the cap frame. 1 Notch in cap frame 6 Placez la bande anti-transpiration de la casquette à l'intérieur de l'encoche du cadre pour casquettes. 1 Encoche du - Brother International PR-620 | PR620 Cap Frame User Manual - Multi - Page 11
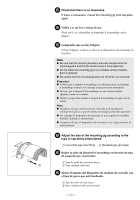
so that it conforms to the shape of the cap and so that the teeth of the clamping frame perfectly align with the base of the brim. 1 Teeth of clamping frame 2 Base of brim 3 Outside of clamping frame 4 Screws for the outside of the clamping frame G Desserrez les deux vis de l'extérieur du cadre - Brother International PR-620 | PR620 Cap Frame User Manual - Multi - Page 12
0 Close the lever of the snap lock. 1 Lever of the snap lock 0 Refermez le levier de la serrure à ressort. 1 Levier de la serrure à ressort 0 Cierre la palanca del cierre a presión. 1 1 Palanca del cierre a presión G If the cap fabric is thick and the clamping frame cannot be closed, or if the - Brother International PR-620 | PR620 Cap Frame User Manual - Multi - Page 13
1 b Use the clips to secure the cap. 1 Clips G Repeat steps a and b on the other side to remove any slack and secure the cap with the cap brim, and then lower the brim holder. 1 Brim holder 2 Notch G Make sure the notch comes out. c Tirez le support du bord au maximum. Puis, tournez le support - Brother International PR-620 | PR620 Cap Frame User Manual - Multi - Page 14
esto finaliza la colocación de la gorra en el bastidor. e Remove the cap frame from the mounting jig. Press both right and left holding springs on the mounting jig with both thumbs, and then pull off the embroidery frame, as shown in the illustration. 1 1 Holding spring e Retirez le cadre pour - Brother International PR-620 | PR620 Cap Frame User Manual - Multi - Page 15
de bordar The cap frame driver is required in order to attach the cap frame to the embroidery machine. Before attaching the cap frame to the machine, attach the cap frame driver to the carriage. (For details instructions, see "Installing the cap frame driver" in User's Guide.) Le support du cadre - Brother International PR-620 | PR620 Cap Frame User Manual - Multi - Page 16
of the cap frame driver with the ring of the cap frame. While sliding the cap frame to the left and right, align the notch in the cap frame with the guiding plate on the cap frame driver, and then snap the frame into place. 1 Guiding Plate on cap frame driver 2 Notch on cap frame 3 Holding spring - Brother International PR-620 | PR620 Cap Frame User Manual - Multi - Page 17
shown in the illustration, turn the embroidering position to the side when removing the cap frame so the brim of the cap does not hit the embroidery machine. G Be careful that the cap frame does not hit any nearby parts, such as the presser foot. Comme illustré, tournez la position de broderie lat - Brother International PR-620 | PR620 Cap Frame User Manual - Multi - Page 18
2 After removing the brim holder, unlock the snap lock of the cap frame, remove the clips, and then remove the cap. 1 1 Brim holder 3 Clips 2 Snap lock 2 Après avoir retiré le support du bord, déverrouillez la serrure 2 à ressort du cadre pour casquettes, retirez les agrafes, puis retirez la - Brother International PR-620 | PR620 Cap Frame User Manual - Multi - Page 19
- Brother International PR-620 | PR620 Cap Frame User Manual - Multi - Page 20
ENGLISH FRANÇAIS ESPAÑOL 884-T01 XC8943-051 Printed in Taiwan
-
 1
1 -
 2
2 -
 3
3 -
 4
4 -
 5
5 -
 6
6 -
 7
7 -
8
-
9
-
10
-
11
-
12
-
13
-
14
-
15
-
16
-
17
-
18
-
19
-
20
 |
 |

Table of Contents
Cap frame and its accessories
Preparing the mounting jig
..................................................................
1
■
For the standard type
....................................................................................
4
Attaching the cap frame
........................................................................
5
■
Attaching the cap frame to the mounting jig and putting a cap into the
frame
. ............................................................................................................
5
■
Attaching the cap frame to the embroidery machine
...................................
13
■
Removing the cap frame
.............................................................................
15
Table des matières
Cadre pour casquettes et accessoires
Préparation du dispositif d’assemblage
...........................................................
1
■
Pour le type standard
..................................................................................................
4
Fixation du cadre pour casquettes
....................................................................
5
■
Fixation du cadre pour casquettes sur le dispositif d’assemblage et mise en place
de la casquette sur le cadre
.........................................................................................
5
■
Fixation du cadre pour casquettes sur la machine à broder
......................................
13
■
Retrait du cadre pour casquettes
...............................................................................
15
Contenido
Bastidor para gorras y sus accesorios
Preparación del dispositivo de montaje
....................................................
1
■
Para el tipo estándar
.......................................................................................
4
Colocación del bastidor para gorras
.........................................................
5
■
Colocación del bastidor para gorras en el dispositivo de montaje y
colocación de una gorra en el bastidor
...........................................................
5
■
Colocación del bastidor para gorras en la máquina de bordar
......................
13
■
Extracción del bastidor para gorras
...............................................................
15
Cap frame User’s Guide
Manuel d’instructions du cadre pour casquettes
Manual de instrucciones del bastidor de gorras