Brother International PR-620 PR620 Cap Frame User Manual - Multi - Page 4
ing surface, and then tighten the thumb screw.
 |
View all Brother International PR-620 manuals
Add to My Manuals
Save this manual to your list of manuals |
Page 4 highlights
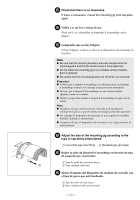
3 Loosen the thumb screw for the mounting jig, and then open the mounting bracket so that it is wider than the thickness of the mounting plate. G The mounting bracket can be mounted onto a plate with a thickness from 9 mm (3/8 inch) to 38 mm (1-1/2 inches). 3 Desserrez la vis à serrage à main du dispositif d'assemblage et ouvrez le support d'assemblage pour qu'il soit supérieur à l'épaisseur de la plaque d'assemblage. G Le support d'assemblage peut être installé sur une plaque d'une épaisseur de 9 mm (3/8") à 38 mm (1-1/2"). 3 Afloje el tornillo de mariposa del dispositivo de montaje y, a continuación, abra la abrazadera de montaje de manera que quede más ancha que el grosor de la placa de montaje. G La abrazadera de montaje puede montarse en una placa de un grosor desde 9 mm (3/8 pulgadas) a 38 mm (1-1/2 pulgadas). 4 Securely clamp the mounting bracket onto the mounting surface, and then tighten the thumb screw. 1 1 Mounting bracket 2 Mounting plate 3 Tighten thumb screw 2 4 Fixez solidement le support d'assemblage sur la surface, puis serrez la vis à serrage à main. 3 1 Support d'assemblage 2 Plaque d'assemblage 3 Serrez la vis à serrage à main 4 Sujete con firmeza la abrazadera de montaje en la superficie y apriete los tornillos de mariposa. 1 Abrazadera de montaje 2 Placa de montaje 3 Tornillo de mariposa apretado - 2 -
-
 1
1 -
 2
2 -
 3
3 -
 4
4 -
 5
5 -
 6
6 -
 7
7 -
 8
8 -
 9
9 -
 10
10 -
11
-
12
-
13
-
14
-
15
-
16
-
17
-
18
-
19
-
20
 |
 |
