Brother International PR-620 PR620 Cap Frame User Manual - Multi - Page 3
Preparing the mounting jig
 |
View all Brother International PR-620 manuals
Add to My Manuals
Save this manual to your list of manuals |
Page 3 highlights
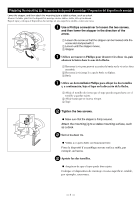
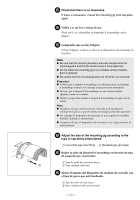
Preparing the mounting jig / Préparation du dispositif d'assemblage / Preparación del dispositivo de montaje Lower the stopper, and then attach the mounting jig to a stable surface, such as a desk. Abaissez la butée, puis fixez le dispositif de montage sur une surface stable, telle qu'un bureau. Baje el tope y coloque el dispositivo de montaje en una superficie estable, como una mesa. 1 Use a Phillips screwdriver to loosen the two screws, and then lower the stopper in the direction of the arrow. 1 Loosen the screw so that the stopper can be hooked onto the screw and clamped with it. 2 Loosen until the stopper moves. 3 Stopper 1 Utilisez un tournevis Phillips pour desserrer les deux vis, puis abaissez la butée dans le sens de la flèche. 1 Desserrez la vis pour pouvoir accrocher la butée sur la vis et les fixer ensemble. 2 Desserrez la vis jusqu'à ce que la butée se déplace. 3 Butée 1 Utilice un destornillador Phillips para aflojar los dos tornillos y, a continuación, baje el tope en la dirección de la flecha. 1 Afloje el tornillo de forma que el tope pueda engancharse en el tornillo y quedar sujeto. 2 Afloje hasta que se mueva el tope. 3 Tope 2 Tighten the two screws. G Make sure that the stopper is firmly secured. Attach the mounting jig to a stable mounting surface, such as a desk. 2 Serrez les deux vis. G Veillez à ce que la butée soit fermement fixée. Fixez le dispositif d'assemblage sur une surface stable, par exemple, un bureau. 2 Apriete los dos tornillos. G Asegúrese de que el tope queda bien sujeto. Coloque el dispositivo de montaje en una superficie estable, por ejemplo, una mesa. - 1 -
-
 1
1 -
 2
2 -
 3
3 -
 4
4 -
 5
5 -
 6
6 -
 7
7 -
 8
8 -
 9
9 -
10
-
11
-
12
-
13
-
14
-
15
-
16
-
17
-
18
-
19
-
20
 |
 |
