Brother International PR-620 PR620 Cap Frame User Manual - Multi - Page 16
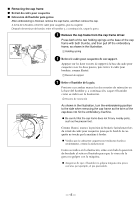
to the left and right, align the notch in the cap frame
 |
View all Brother International PR-620 manuals
Add to My Manuals
Save this manual to your list of manuals |
Page 16 highlights
2 1 After turning the cap frame so that the embroidering surface faces upward, align the ring of the cap frame driver with the ring of the cap frame. While sliding the cap frame to the left and right, align the notch in the cap frame with the guiding plate on the cap frame driver, and then snap the frame into place. 1 Guiding Plate on cap frame driver 2 Notch on cap frame 3 Holding spring The cap frame is secured with the two holding springs one on the right and one on the left. This completes the installation of the cap frame, and the cap is ready to be embroidered. Après avoir tourné le cadre pour casquettes pour que la surface à 3 broder se trouve vers le haut, alignez le cercle du support du cadre pour casquettes sur celui du cadre pour casquettes. Tout en faisant glisser le cadre pour casquettes vers la gauche et la droite, alignez l'encoche du cadre pour casquettes sur la plaque de guidage du support du cadre pour casquettes, puis mettez le cadre en place. 1 Plaque de guidage du support du cadre pour casquettes 2 Encoche du cadre pour casquettes 3 Ressort de support Le cadre pour casquettes est fixé avec les deux ressorts de support, l'un à droite, l'autre à gauche. L'installation du cadre pour casquettes est terminée et la casquette est prête à être brodée. Después de girar el bastidor para gorras de manera que la superficie de bordado quede hacia arriba, haga coincidir el aro de la guía del bastidor con el aro del bastidor. Mientras mueve el bastidor para gorras hacia la derecha y hacia la izquierda, haga coincidir la muesca del bastidor con la placa de referencia en la guía del bastidor y, a continuación, coloque el bastidor. 1 Placa de referencia en la guía del bastidor 2 Muesca del bastidor 3 Resorte de retención El bastidor se fija con los dos resortes de retención, uno a la derecha y otro a la izquierda. Con esto finaliza la colocación del bastidor para gorras y ya se puede bordar la gorra. - 14 -
-
 1
1 -
2
-
3
-
4
-
5
-
6
-
7
-
8
-
9
-
10
-
 11
11 -
 12
12 -
 13
13 -
 14
14 -
 15
15 -
 16
16 -
 17
17 -
 18
18 -
 19
19 -
 20
20
 |
 |
