Brother International PR-620 PR620 Cap Frame User Manual - Multi - Page 5
Check that there is no looseness., Adjust the size of the mounting jig according to the, type of cap
 |
View all Brother International PR-620 manuals
Add to My Manuals
Save this manual to your list of manuals |
Page 5 highlights
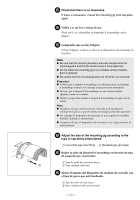
1 2 5 Check that there is no looseness. If there is looseness, mount the mounting jig onto the plate again. 5 Veillez à ce qu'il n'y ait pas de jeu. Si tel est le cas, réinstallez le dispositif d'assemblage sur la plaque. 5 Compruebe que no hay holgura. Si hay holgura, vuelva a colocar el dispositivo de montaje en la placa. Note G Be sure that the mounting bracket is securely clamped onto the mounting place and that the thumb screw is firmly tightened. G Do not attach the mounting jig to an unstable surface (flexible, bent or warped). G Be careful that the mounting jig does not fall when it is removed. Remarque G Vérifiez que le support d'assemblage est solidement fixé sur la plaque d'assemblage et que la vis à serrage à main est serrée fermement. G Ne fixez pas le dispositif d'assemblage sur une surface instable (flexible, tordue ou courbée). G Veillez à ne pas faire tomber le dispositif d'assemblage lorsque vous le retirez. Nota G Asegúrese de que está firmemente colocada la abrazadera de montaje en la placa y que el tornillo de mariposa está bien apretado. G No coloque el dispositivo de montaje en una superficie inestable (flexible, doblada o deformada). G Asegúrese de que el dispositivo de montaje no se caiga mientras lo está quitando. 6 Adjust the size of the mounting jig according to the type of cap being embroidered. 1 Low profile type (low fitting) 2 Standard type (pro style) 6 Réglez la taille du dispositif d'assemblage en fonction du type de casquette que vous brodez. 1 Type de profil bas (insertion basse) 2 Type standard (style pro) 6 Ajuste el tamaño del dispositivo de montaje de acuerdo con el tipo de gorra que esté bordando. 1 Tipo discreto (encaje bajo) 2 Tipo estándar (estilo profesional) - 3 -
-
 1
1 -
 2
2 -
 3
3 -
 4
4 -
 5
5 -
 6
6 -
 7
7 -
 8
8 -
 9
9 -
 10
10 -
 11
11 -
12
-
13
-
14
-
15
-
16
-
17
-
18
-
19
-
20
 |
 |
