Canon FAX-JX210P User's Guide - Page 46
USER SETTINGS, REPORT SETTINGS, Description, Settings
 |
View all Canon FAX-JX210P manuals
Add to My Manuals
Save this manual to your list of manuals |
Page 46 highlights
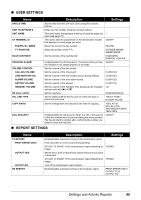
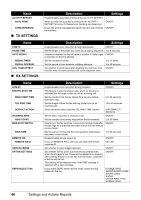
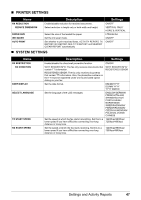
„ USER SETTINGS Name Description Settings DATE & TIME UNIT TELEPHONE # UNIT NAME TX TERMINAL ID FAX/TEL No. MARK TTI POSITION SCAN CONTRAST OFFHOOK ALARM VOLUME CONTROL CALLING VOLUME LINE MONITOR VOL ALARM VOLUME KEYPAD VOLUME HANDSET VOLUME RX CALL LEVEL TEL LINE TYPE COPY RATIO DIAL SECURITY Set the date and time (24-hour clock) using the numeric buttons. Enter your fax number using the numeric buttons. This is the name that appears at the top of each fax page you send (see page 15). This option sets the parameters for the identification header that appears on every page you send. Select the icon for the fax number. Select the position of the TTI. Set the density of the reproduction. Enable/disable the off hook alarm. The alarm alerts you that the Handset is not seated properly in its cradle. Set the volume of the fax sounds. Set the volume of the ring sound. Set the volume of the line monitor (sound during dialing). Set the volume of the error alarm sound. Set the volume of the keypad. Set the volume of the Handset. This setting can be changed during a call, with [{] or [}]. Set the ring tone. Set the dialing method the fax uses to match the type of phone line you have. Set the enlargement and reduction and ratio for copying. Enable/disable the dial security. When it is ON, it will ask you to dial the number twice to prevent dialing the wrong number. The fax will dial the number after confirming the number you dialed in twice are matched. - - - ON/OFF FAX/TEL OUTSIDE IMAGE/ INSIDE IMAGE STANDARD/ DARKER/ LIGHTER ON/OFF - 0 (off)/1/2/3 0 (off)/1/2/3 0 (off)/1/2/3 0 (off)/1/2/3 1/2 STANDARD/HIGH TOUCH TONE/ ROTARY PULSE 100% AS IS/ 94% A4JLTR/ 50% MIN/200% MAX/ 183%/156% ON/OFF „ REPORT SETTINGS Name TX REPORT PRINT ERROR ONLY: OUTPUT YES: OUTPUT NO: RX REPORT Description Settings Enable/disable automatic printing of the transmission report. Print only when an error occurs during sending. - ATTACH TX IMAGE: Print a transmission report attaching its YES/NO image. Set the fax to print a transmission report every time you send a document. ATTACH TX IMAGE: Print a transmission report attaching its YES/NO image. Turn off the transmission report feature. - Enable/disable automatic printing of the reception report. PRINT ERROR ONLY/ OUTPUT YES/ OUTPUT NO Settings and Activity Reports 45
-
 1
1 -
2
-
3
-
4
-
5
-
6
-
7
-
8
-
9
-
10
-
11
-
12
-
13
-
14
-
15
-
16
-
17
-
18
-
19
-
20
-
21
-
22
-
23
-
24
-
25
-
26
-
27
-
28
-
29
-
30
-
31
-
32
-
33
-
34
-
35
-
36
-
37
-
38
-
39
-
40
-
 41
41 -
 42
42 -
 43
43 -
 44
44 -
 45
45 -
 46
46 -
 47
47 -
 48
48 -
 49
49 -
 50
50 -
 51
51 -
52
-
53
-
54
-
55
-
56
-
57
-
58
-
59
-
60
-
61
-
62
-
63
-
64
-
65
-
66
-
67
-
68
-
69
-
70
-
71
-
72
-
73
-
74
-
75
-
76
-
77
-
78
-
79
-
80
-
81
-
82
-
83
-
84
-
85
-
86
 |
 |
