Canon PIXMA MP140 MP140 series Quick Start Guide - Page 26
Aligning the Print Head, Make sure that the machine is
 |
View all Canon PIXMA MP140 manuals
Add to My Manuals
Save this manual to your list of manuals |
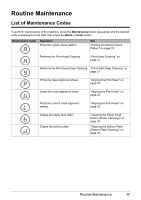
Page 26 highlights
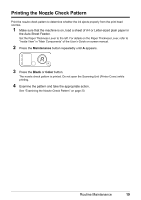
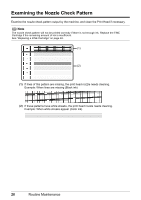
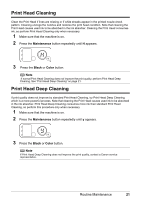
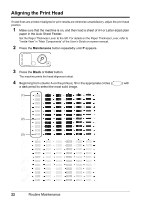
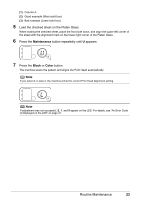
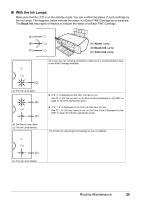
Aligning the Print Head If ruled lines are printed misaligned or print results are otherwise unsatisfactory, adjust the print head position. 1 Make sure that the machine is on, and then load a sheet of A4 or Letter-sized plain paper in the Auto Sheet Feeder. Set the Paper Thickness Lever to the left. For details on the Paper Thickness Lever, refer to "Inside View" in "Main Components" of the User's Guide on-screen manual. 2 Press the Maintenance button repeatedly until P appears. 3 Press the Black or Color button. The machine prints the head alignment sheet. 4 Beginning from column A on the printout, fill in the appropriate circles ( a dark pencil to select the most solid image. (1) ) with (2) (3) 22 Routine Maintenance
-
 1
1 -
2
-
3
-
4
-
5
-
6
-
7
-
8
-
9
-
10
-
11
-
12
-
13
-
14
-
15
-
16
-
17
-
18
-
19
-
20
-
 21
21 -
 22
22 -
 23
23 -
 24
24 -
 25
25 -
 26
26 -
 27
27 -
 28
28 -
 29
29 -
 30
30 -
 31
31 -
32
-
33
-
34
-
35
-
36
-
37
-
38
-
39
-
40
-
41
-
42
-
43
-
44
-
45
-
46
-
47
-
48
-
49
-
50
-
51
-
52
-
53
-
54
-
55
-
56
-
57
-
58
-
59
-
60
-
61
-
62
-
63
-
64
-
65
-
66
-
67
-
68
-
69
-
70
-
71
-
72
 |
 |

22
Routine Maintenance
Aligning the Print Head
If ruled lines are printed misaligned or print results are otherwise unsatisfactory, adjust the print head
position.
1
Make sure that the machine is on, and then load a sheet of A4 or Letter-sized plain
paper in the Auto Sheet Feeder.
Set the Paper Thickness Lever to the left. For details on the Paper Thickness Lever, refer to
“Inside View” in “Main Components” of the
User’s Guide
on-screen manual.
2
Press the
Maintenance
button repeatedly until
P
appears.
3
Press the
Black
or
Color
button.
The machine prints the head alignment sheet.
4
Beginning from column A on the printout, fill in the appropriate circles (
) with
a dark pencil to select the most solid image.
(1)
(2)
(3)