Canon PIXMA MX892 Guide for Printer Setup for Network - Page 5
Standard setup
 |
View all Canon PIXMA MX892 manuals
Add to My Manuals
Save this manual to your list of manuals |
Page 5 highlights
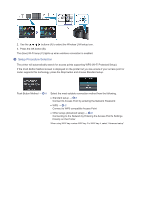
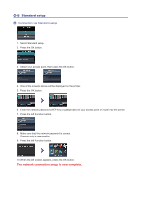
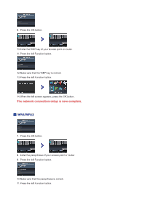
d-B Standard setup d Connection via Standard setup 1. Select Standard setup. 2. Press the OK button. 3. Select your access point, then press the OK button. 4. One of the screens above will be displayed on the printer. 5. Press the OK button. 6. Enter the network password (WEP key or passphrase) of your access point or router into the printer. 7. Press the left Function button. 8. Make sure that the network password is correct. Character entry is case-sensitive. 9. Press the left Function button. 10.When the left screen appears, press the OK button. The network connection setup is now complete.
-
 1
1 -
 2
2 -
 3
3 -
 4
4 -
 5
5 -
 6
6 -
 7
7 -
 8
8 -
 9
9 -
 10
10 -
 11
11 -
12
-
13
-
14
-
15
-
16
-
17
-
18
-
19
-
20
-
21
-
22
 |
 |

d
-B
Standard setup
d
Connection via Standard setup
1. Select Standard setup.
2. Press the OK button.
3. Select your access point, then press the OK button.
4. One of the screens above will be displayed on the printer.
5. Press the OK button.
6. Enter the network password (WEP key or passphrase) of your access point or router into the printer.
7. Press the left Function button.
8. Make sure that the network password is correct.
Character entry is case-sensitive.
9. Press the left Function button.
10.When the left screen appears, press the OK button.
The network connection setup is now complete.