Canon PowerShot A470 PowerShot A470 Camera User Guide - Page 75
Shoot.
 |
View all Canon PowerShot A470 manuals
Add to My Manuals
Save this manual to your list of manuals |
Page 75 highlights
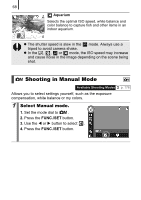
Various Shooting Methods 73 2 Shoot. • Pressing the shutter button halfway automatically sets the exposure, focus and white balance settings. • Pressing the shutter button fully starts recording video and sound simultaneously. • During shooting, the recording time and [z Rec] appear on the LCD monitor. • Pressing the shutter button fully again stops recording. Recording will stop automatically under the following circumstances. - When the maximum recording time or maximum size elapses - When the built-in memory or memory card becomes full z You are recommended to use a memory card that has been formatted in your camera to shoot movies (p. 122). The memory card supplied with the camera may be used without further formatting. z Be careful of the following while recording. - Do not touch the microphone (p. 38). - Do not press any buttons other than the shutter, or button. The sound that buttons make will be recorded in the movie. - The camera will automatically adjust the exposure and white balance to suit the shooting conditions during recording. Please note, however, that the sounds made by the camera automatically adjusting the exposure may also be recorded. z The focus and optical zoom settings remain fixed for subsequent frames at the values selected for the first frame. z Adjust the zoom before shooting. The factor of the combined optical zoom and digital zoom display on the LCD monitor. When the factor displays in blue, the image will deteriorate. z Only in and in the Standard mode, the digital zoom can be used during shooting. z QuickTime is required to play back movies (Data type: AVI/ Compression method: Motion JPEG) on a computer (Only Windows 2000).
-
 1
1 -
2
-
3
-
4
-
5
-
6
-
7
-
8
-
9
-
10
-
11
-
12
-
13
-
14
-
15
-
16
-
17
-
18
-
19
-
20
-
21
-
22
-
23
-
24
-
25
-
26
-
27
-
28
-
29
-
30
-
31
-
32
-
33
-
34
-
35
-
36
-
37
-
38
-
39
-
40
-
41
-
42
-
43
-
44
-
45
-
46
-
47
-
48
-
49
-
50
-
51
-
52
-
53
-
54
-
55
-
56
-
57
-
58
-
59
-
60
-
61
-
62
-
63
-
64
-
65
-
66
-
67
-
68
-
69
-
 70
70 -
 71
71 -
 72
72 -
 73
73 -
 74
74 -
 75
75 -
 76
76 -
 77
77 -
 78
78 -
 79
79 -
 80
80 -
81
-
82
-
83
-
84
-
85
-
86
-
87
-
88
-
89
-
90
-
91
-
92
-
93
-
94
-
95
-
96
-
97
-
98
-
99
-
100
-
101
-
102
-
103
-
104
-
105
-
106
-
107
-
108
-
109
-
110
-
111
-
112
-
113
-
114
-
115
-
116
-
117
-
118
-
119
-
120
-
121
-
122
-
123
-
124
-
125
-
126
-
127
-
128
-
129
-
130
-
131
-
132
-
133
-
134
-
135
-
136
-
137
-
138
-
139
-
140
-
141
-
142
-
143
-
144
-
145
-
146
-
147
-
148
-
149
-
150
-
151
-
152
-
153
-
154
-
155
-
156
-
157
-
158
-
159
-
160
-
161
-
162
-
163
-
164
-
165
-
166
-
167
-
168
-
169
-
170
-
171
-
172
-
173
-
174
-
175
-
176
-
177
-
178
-
179
-
180
-
181
-
182
-
183
-
184
 |
 |
