Canon PowerShot S1 IS PowerShot S1 IS Camera User Guide - Page 28
Using the LCD Monitor, Using the Viewfinder - review
 |
View all Canon PowerShot S1 IS manuals
Add to My Manuals
Save this manual to your list of manuals |
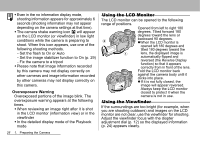
Page 28 highlights
Š Even in the no information display mode, shooting information appears for approximately 6 seconds (shooting information may not appear depending on the camera settings at that time). Š The camera shake warning icon will appear on the LCD monitor (or viewfinder) in low light conditions while the camera is preparing to shoot. When this icon appears, use one of the following shooting methods. - Set the flash to On or Auto - Set the image stabilizer function to On (p. 29) - Fix the camera to a tripod Š Please note that image information recorded by this camera may not display correctly on other cameras and image information recorded by other cameras may not display correctly on this camera. Overexposure Warning Overexposed portions of the image blink. The overexposure warning appears at the following times. Š When reviewing an image right after it is shot in the LCD monitor (information view) or in the viewfinder Š In the detailed display mode of the Playback mode 26 1. Preparing the Camera Using the LCD Monitor The LCD monitor can be opened to the following range of positions. Opened from left to right 180 degrees. Tilted forward 180 degrees toward the lens or b backward 90 degrees. zWhen the LCD monitor is opened left 180 degrees and tilted 180 degrees toward the a lens, the displayed image is automatically flipped and reversed (the Reverse Display function) so that it appears correctly from in front of the lens. Fold the LCD monitor back against the camera body until it clicks into place. zIf it is not fully closed, the image will appear reversed. Always keep the LCD monitor closed to protect it when the camera is not in use. Using the Viewfinder If the surroundings are too bright (for example, when you are shooting outdoors) and images on the LCD monitor are not clear, use the viewfinder for shooting. Adjust the viewfinder focus with the diopter adjustment dial (p. 12) so the displayed information (p. 24) appears clearly.
-
 1
1 -
2
-
3
-
4
-
5
-
6
-
7
-
8
-
9
-
10
-
11
-
12
-
13
-
14
-
15
-
16
-
17
-
18
-
19
-
20
-
21
-
22
-
 23
23 -
 24
24 -
 25
25 -
 26
26 -
 27
27 -
 28
28 -
 29
29 -
 30
30 -
 31
31 -
 32
32 -
 33
33 -
34
-
35
-
36
-
37
-
38
-
39
-
40
-
41
-
42
-
43
-
44
-
45
-
46
-
47
-
48
-
49
-
50
-
51
-
52
-
53
-
54
-
55
-
56
-
57
-
58
-
59
-
60
-
61
-
62
-
63
-
64
-
65
-
66
-
67
-
68
-
69
-
70
-
71
-
72
-
73
-
74
-
75
-
76
-
77
-
78
-
79
-
80
-
81
-
82
-
83
-
84
-
85
-
86
-
87
-
88
-
89
-
90
-
91
-
92
-
93
-
94
-
95
-
96
-
97
-
98
-
99
-
100
-
101
-
102
-
103
-
104
-
105
-
106
-
107
-
108
-
109
-
110
-
111
-
112
-
113
-
114
-
115
-
116
-
117
-
118
-
119
-
120
-
121
-
122
-
123
-
124
-
125
-
126
-
127
-
128
-
129
-
130
-
131
-
132
-
133
-
134
-
135
-
136
-
137
-
138
-
139
-
140
-
141
-
142
-
143
-
144
-
145
-
146
-
147
-
148
-
149
-
150
-
151
-
152
-
153
-
154
-
155
-
156
-
157
-
158
-
159
-
160
-
161
-
162
-
163
-
164
-
165
-
166
-
167
 |
 |
