Canon PowerShot S1 IS PowerShot S1 IS Camera User Guide - Page 29
Auto Mode
 |
View all Canon PowerShot S1 IS manuals
Add to My Manuals
Save this manual to your list of manuals |
Page 29 highlights
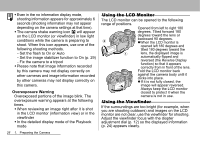
Auto Mode 2. Shooting-The Basics a a Wide angle b c Seen from the lens side Standard shooting aTurn the mode lever to (Shooting). bSet the mode dial to . cIf you are using the LCD monitor, open it. z The LCD monitor can also be rotated. When the LCD monitor is tilted 180 degrees, the displayed image is automatically flipped and reversed (the Reverse Display function) so that it appears correctly from in from of the lens (you can disable the Reverse Display function (p. 65)). AF Frame b Telephoto aAim the camera at the subject. bUse the zoom to achieve the desired composition in the LCD monitor (or viewfinder). z Turning the zoom lever toward magnifies the subject (telephoto). Turning the zoom lever toward decreases the size of the subject (wide angle). The speed at which the magnification change is determined by the way the zoom lever is turned. Turning the zoom lever in one swift movement completely to the right/left enables fast zooming. For slow zooming, slowly turn the zoom lever halfway. z The angle of view can be adjusted within the 38 to 380 mm range, in 35mm film equivalent. 2. Shooting-The Basics 27
-
 1
1 -
2
-
3
-
4
-
5
-
6
-
7
-
8
-
9
-
10
-
11
-
12
-
13
-
14
-
15
-
16
-
17
-
18
-
19
-
20
-
21
-
22
-
23
-
 24
24 -
 25
25 -
 26
26 -
 27
27 -
 28
28 -
 29
29 -
 30
30 -
 31
31 -
 32
32 -
 33
33 -
 34
34 -
35
-
36
-
37
-
38
-
39
-
40
-
41
-
42
-
43
-
44
-
45
-
46
-
47
-
48
-
49
-
50
-
51
-
52
-
53
-
54
-
55
-
56
-
57
-
58
-
59
-
60
-
61
-
62
-
63
-
64
-
65
-
66
-
67
-
68
-
69
-
70
-
71
-
72
-
73
-
74
-
75
-
76
-
77
-
78
-
79
-
80
-
81
-
82
-
83
-
84
-
85
-
86
-
87
-
88
-
89
-
90
-
91
-
92
-
93
-
94
-
95
-
96
-
97
-
98
-
99
-
100
-
101
-
102
-
103
-
104
-
105
-
106
-
107
-
108
-
109
-
110
-
111
-
112
-
113
-
114
-
115
-
116
-
117
-
118
-
119
-
120
-
121
-
122
-
123
-
124
-
125
-
126
-
127
-
128
-
129
-
130
-
131
-
132
-
133
-
134
-
135
-
136
-
137
-
138
-
139
-
140
-
141
-
142
-
143
-
144
-
145
-
146
-
147
-
148
-
149
-
150
-
151
-
152
-
153
-
154
-
155
-
156
-
157
-
158
-
159
-
160
-
161
-
162
-
163
-
164
-
165
-
166
-
167
 |
 |
