Canon PowerShot S410 PowerShot S500/410, DIGITAL IXUS 500/430 Camera User Guid - Page 55
Shooting in Auto Mode
 |
View all Canon PowerShot S410 manuals
Add to My Manuals
Save this manual to your list of manuals |
Page 55 highlights
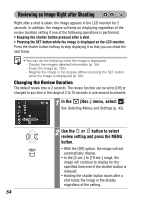
Shooting Shooting in Auto Mode In this mode, all you have to do is press the shutter button and let the camera do everything else. 1 Slide the mode switch to and turn the mode dial to . Shooting 2 Aim the camera at the subject. 3 Use the zoom lever to achieve the desired composition (relative subject size in the viewfinder) (p. 40). 4 Press the shutter button halfway (p. 41). • Two beeps will sound when the camera has finished metering, and the upper indicator beside the viewfinder will light green or orange. If the LCD monitor is on, the AF frame will appear green. • If the subject is difficult to focus on, the lower indicator beside the viewfinder will blink yellow and the beep will sound one time. 5 Press the shutter button fully (p. 42). • You will hear the sound of the shutter when the shutter activates. • The picture appears for two seconds on the LCD monitor. •See Functions Available in Each Shooting Mode (p. 160). • With the Review function, you can change the length of time images show on the LCD monitor after shooting, or set it so they do not show at all (p. 54). 53
-
 1
1 -
2
-
3
-
4
-
5
-
6
-
7
-
8
-
9
-
10
-
11
-
12
-
13
-
14
-
15
-
16
-
17
-
18
-
19
-
20
-
21
-
22
-
23
-
24
-
25
-
26
-
27
-
28
-
29
-
30
-
31
-
32
-
33
-
34
-
35
-
36
-
37
-
38
-
39
-
40
-
41
-
42
-
43
-
44
-
45
-
46
-
47
-
48
-
49
-
 50
50 -
 51
51 -
 52
52 -
 53
53 -
 54
54 -
 55
55 -
 56
56 -
 57
57 -
 58
58 -
 59
59 -
 60
60 -
61
-
62
-
63
-
64
-
65
-
66
-
67
-
68
-
69
-
70
-
71
-
72
-
73
-
74
-
75
-
76
-
77
-
78
-
79
-
80
-
81
-
82
-
83
-
84
-
85
-
86
-
87
-
88
-
89
-
90
-
91
-
92
-
93
-
94
-
95
-
96
-
97
-
98
-
99
-
100
-
101
-
102
-
103
-
104
-
105
-
106
-
107
-
108
-
109
-
110
-
111
-
112
-
113
-
114
-
115
-
116
-
117
-
118
-
119
-
120
-
121
-
122
-
123
-
124
-
125
-
126
-
127
-
128
-
129
-
130
-
131
-
132
-
133
-
134
-
135
-
136
-
137
-
138
-
139
-
140
-
141
-
142
-
143
-
144
-
145
-
146
-
147
-
148
-
149
-
150
-
151
-
152
-
153
-
154
-
155
-
156
-
157
-
158
-
159
-
160
-
161
-
162
-
163
 |
 |
