Canon VB-M640VE Camera Management Tool User Manual - Page 28
Date and Time, To set [Use DHCP]
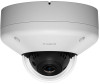 |
View all Canon VB-M640VE manuals
Add to My Manuals
Save this manual to your list of manuals |
Page 28 highlights
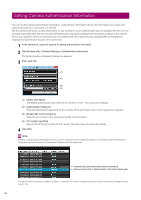
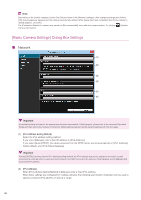
(2) [Confirm Password] Enter the same password as above for confirmation. Important • To ensure system security, be sure to change the administrator password. Do not forget the new password. • If you have forgotten the administrator password, please refer to the camera's Operation Guide and then restore the camera to the factory default settings. Note that this will reset all camera settings to factory default settings except for the date and time. • If the Admin Viewer or Admin Tools are connected, disconnect them before changing the password. Date and Time (1) (2) (3) (4) (5) (6) (1) [Setting Method] Select the setting method for the date and time. (2) [Date], [Time] Configure the settings as follows in accordance with the [Setting Method] setting. When [Set manually] is selected Set the desired date and time. Set the time in 24-hour format in order. When [Set manually] is selected and [Synchronize with computer time] is selected Synchronizes the date and time with the computer that is currently accessing the camera. [Time Zone] is not selected automatically so set it separately if necessary. When [Synchronize with NTP server] is selected Select the setting method in [Auto-Setting of NTP Server]. When [Synchronize with NTP broadcast] is selected Receives NTP broadcasts sent from the NTP server and synchronizes the time with them. The camera's NTP broadcast mode does not support IPv6. (3) [Auto-Setting of NTP Server] [Disable] Enter the IP address or host name of the NTP server in [NTP Server]. [Use DHCP] The NTP server address is automatically acquired from the DHCP server (IPv4). To set [Use DHCP], you need to change [Network] > [IPv4 Address Setting Method] to [Auto (DHCP)] (P. 26). 28
-
 1
1 -
2
-
3
-
4
-
5
-
6
-
7
-
8
-
9
-
10
-
11
-
12
-
13
-
14
-
15
-
16
-
17
-
18
-
19
-
20
-
21
-
22
-
 23
23 -
 24
24 -
 25
25 -
 26
26 -
 27
27 -
 28
28 -
 29
29 -
 30
30 -
 31
31 -
 32
32 -
 33
33 -
34
-
35
-
36
-
37
-
38
-
39
-
40
-
41
-
42
-
43
-
44
-
45
-
46
-
47
-
48
-
49
-
50
-
51
-
52
-
53
-
54
-
55
-
56
-
57
-
58
-
59
-
60
-
61
-
62
-
63
-
64
-
65
-
66
-
67
-
68
-
69
-
70
-
71
-
72
 |
 |
