Canon VB-M740E Camera Management Tool User Manual - Page 31
Launch the Setting Admin Viewer, Adding a Camera as a Trusted Site
 |
View all Canon VB-M740E manuals
Add to My Manuals
Save this manual to your list of manuals |
Page 31 highlights
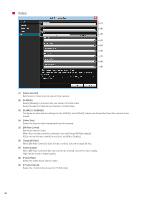
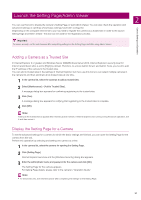
Camera Settings and Operation Launch the Setting Page/Admin Viewer 2 You can use this tool to display the camera's Setting Page or start Admin Viewer. You can also check the operation and advanced settings of cameras whose basic settings have been configured. Depending on the computer environment, you may need to register the camera as a trusted site in order to the launch Setting Page and Admin Viewer. This tool can be used for the registration process. Important To ensure security, exit the web browser after completing settings on the Setting Page and after using Admin Viewer. Adding a Camera as a Trusted Site In Internet Explorer 9 or greater and Windows Server 2008/Windows Server 2012, Internet Explorer's security level for Internet and intranet sites is set to [High] by default. Therefore, to access Admin Viewer and Admin Tools, you need to add the IP address of the camera to the trusted sites. You can add to trusted sites in the settings of Internet Explorer, but if you use this tool you can select multiple cameras in the camera list and then add them all as trusted sites at one time. 1 In the camera list, select the cameras to add as trusted sites. 2 Select [Maintenance] > [Add to Trusted Sites]. A message dialog box appears for confirming registering to the trusted sites. 3 Click [Yes]. A message dialog box appears for notifying that registering to the trusted sites is complete. 4 Click [OK]. Note Adding to the trusted sites is applied after Internet Explorer restarts. If Internet Explorer was running during the above operation, exit it and then restart it. Display the Setting Page for a Camera To set the advanced settings for a camera for which the basic settings are finished, you can open the Setting Page for the camera from this tool. Perform this operation by selecting and setting one camera at a time. 1 In the camera list, select the camera for opening the Setting Page. 2 Click [Setting Page]. Internet Explorer launches and the [Windows Security] dialog box appears. 3 Enter the administrator name and password for the camera and click [OK]. The Setting Page for the camera appears. For Setting Page details, please refer to the camera's "Operation Guide". Note • To ensure security, exit Internet Explorer after completing the settings on the Setting Page. 31
-
 1
1 -
2
-
3
-
4
-
5
-
6
-
7
-
8
-
9
-
10
-
11
-
12
-
13
-
14
-
15
-
16
-
17
-
18
-
19
-
20
-
21
-
22
-
23
-
24
-
25
-
 26
26 -
 27
27 -
 28
28 -
 29
29 -
 30
30 -
 31
31 -
 32
32 -
 33
33 -
 34
34 -
 35
35 -
 36
36 -
37
-
38
-
39
-
40
-
41
-
42
-
43
-
44
-
45
-
46
-
47
-
48
-
49
-
50
-
51
-
52
-
53
-
54
-
55
-
56
-
57
-
58
-
59
-
60
-
61
-
62
-
63
-
64
-
65
-
66
-
67
-
68
-
69
-
70
-
71
-
72
 |
 |
