Cobra XRS 9965 XRS9965_70G_MANL - Page 6
Getting Started - manual
 |
View all Cobra XRS 9965 manuals
Add to My Manuals
Save this manual to your list of manuals |
Page 6 highlights
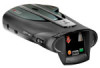
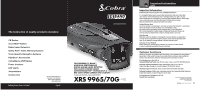
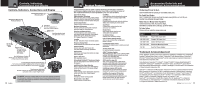
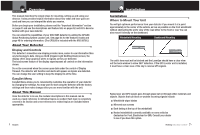
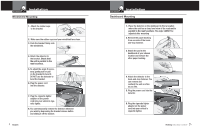
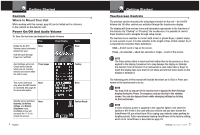
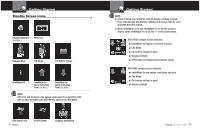
Getting Started Controls Intro Operation Customer Assistance Warranty • Where to Mount Your Unit While working with this manual, page A2 can be folded out for reference to the controls on the detector unit. Secondary Icons Power On/Off And Audio Volume • To Turn On the Unit and Adjust the Audio Volume Notice Rotate the On-Off / Volume control clockwise (away from you). Unit will cycle through Power On / Self Test. Tone None Visual Display Voice None Alert Settings will scroll. Check marks indicate which are set. (Factory defaults are shown when the unit is new.) Three beeps Testing This screen will show only when the GPS Locator is connected. See page 36 for more information. None None Standby screen will show Highway, Car Battery Voltage, and Display Brightness icons. IntelliMute arrow will surround the "i" if it is turned On and set. None 6 English System Ready Your Detector Getting Started Touchscreen Controls Intro Operation Customer Assistance Warranty • The previous section describes the only physical switch on the unit - the On/Off/ Volume dial. All other controls are activated through the touchscreen display. SecondTaryhIceonsdisplay will show various icons and information appropriate to the functions of the detector. By "Clicking" or "Pressing" the touchscreen, it is possible to control those functions and to navigate through setup menus. The touchscreen is sensitive to contact with a bare or gloved finger, a plastic stylus, or even a pencil or pen. It is also sensitive to the length of time of that contact. So, it is importanNtotitceo remember these definitions: Click - A brief touch or tap on the screen. Press - An extended - about two seconds or longer - touch of the screen. NOTE The Press action refers to touch and hold rather than to the pressure or force applied to the display. Excessive force may damage the display or dislodge the detector from its bracket. If an instrument is used rather than a finger to touch the display, take care that it is not sharp and will not leave marks on the display or damage it. The following parts of this manual will include directions as to Click or Press and where on the touchscreen to do so. NOTE You may click on any part of the touchscreen to bypass the Alert Settings display during the Power On sequence and go directly to the standby screen. You can also bypass timers while changing settings by clicking on the touchscreen. NOTE In some vehicles, power is supplied to the cigarette lighter even while the ignition is Off. If this is the case with your vehicle and you have turned the SmartPower Off, you should turn Off or unplug your detector when parking for lengthy periods. Cobra recommends leaving SmartPower at the factory setting, which is On. SmartPower is described on page 24. Nothing Comes Close to a Cobra® 7
-
 1
1 -
 2
2 -
 3
3 -
 4
4 -
 5
5 -
 6
6 -
 7
7 -
 8
8 -
 9
9 -
 10
10 -
 11
11 -
 12
12 -
13
-
14
-
15
-
16
-
17
-
18
-
19
-
20
-
21
-
22
-
23
-
24
-
25
-
26
-
27
 |
 |