Craftsman 21194 Operation Manual - Page 32
ToSlideCut
 |
View all Craftsman 21194 manuals
Add to My Manuals
Save this manual to your list of manuals |
Page 32 highlights
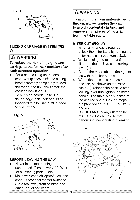
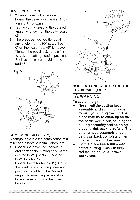
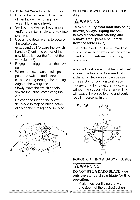
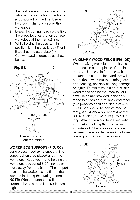
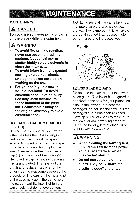
ToSlideCutWide Boards (Fig. Z) 1. Unlock the carriage lock handle (1) and allow the cutting head assembly to move freely. 2. Set both the desired bevel angle and/or the miter angle and lock into position. 3. Use a hold down clamp to secure the workpiece. 4. Grasp and pull forward the switch handle (2) until the center of the saw blade is over the front of the workpiece (3). 5. Engage the trigger to turn the saw on. 6. When the saw reaches full speed, push the switch handle down, slowly, cutting through the leading edge of the workpiece. 7. Slowly move the switch handle toward the fence, completing the cut. 8. Release the trigger and allow the blade to stop spinning before allowing the cutting head to raise. CUTTING BOWED MATERIAL (FIG. AA) i_ WARNING 1 To avoid injury from materials being thrown, always unplug the saw to avoid accidental starting and remove small pieces of material from the table cavity. The table insert may be removed for this purpose, but always reattach table insert prior to performing a cutting operation. A bowed workpiece must be positioned against the fence and secured with a clamping device as shown before cutting. Do not position workpiece incorrectly or try to cut the workpiece without the support of the fence. This will cause the blade to bind and could result in personal injury. Fig. AA Fig. Z 2 3 ROUGH CUTTING A DADO (FIG. BB) i,_ WARNING} DO NOT USE A DADO BLADE, use only the standard saw blade for this operation. 1. Mark lines identifying the width and depth of the desired cut on 32
-
 1
1 -
2
-
3
-
4
-
5
-
6
-
7
-
8
-
9
-
10
-
11
-
12
-
13
-
14
-
15
-
16
-
17
-
18
-
19
-
20
-
21
-
22
-
23
-
24
-
25
-
26
-
 27
27 -
 28
28 -
 29
29 -
 30
30 -
 31
31 -
 32
32 -
 33
33 -
 34
34 -
 35
35 -
 36
36 -
 37
37 -
38
-
39
-
40
-
41
-
42
-
43
-
44
 |
 |
