Cub Cadet CC 600 Operation Manual - Page 9
Controls & Operation
 |
View all Cub Cadet CC 600 manuals
Add to My Manuals
Save this manual to your list of manuals |
Page 9 highlights
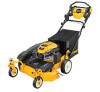
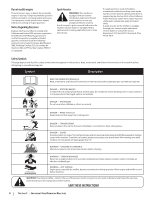
Controls & Operation Premium Drive Control Lockout Lever ON/OFF Switch † Electric Starter Push Key † Grass Catcher † Side Discharge Chute 3 Blade Control Single Lever Cutting Height Adjustment Lever † Recoil Starter Rear Wheel Cutting Height Adjustment Lever † Deck Wash Mulch Plug † If Equipped Caster Wheel Cutting Height Adjustment † Figure 3-1 Lawn Mower controls and features are illustrated in Figure 3-1 and described on the following pages. WARNING! Read and follow all safety rules and instructions in this manual, including the entire Operation section, before attempting to operate this machine. Failure to comply with all safety rules and instructions may result in personal injury. IMPORTANT: Your mower features a two step process to engage the blade: Lockout Lever The lockout lever is attached to the blade control on the upper handle of the mower. Press down on it prior to engaging the blade control. Blade Control The blade control is attached to the upper handle of the mower. After pressing down on the lockout lever, depress and squeeze it against the upper handle to engage the blade. Release it to stop the blade. WARNING: The blade control is a safety device. Never attempt to bypass its operations. Premium Drive Control The premium drive control is located on the upper handle and is used to engage the drive. Pushing the control forward will engage the drive. The farther the control is pushed forward, the faster the mower will propel. Once pressure is released from the control it will return to the neutral position and the drive will be disengaged. Cutting Height Adjustment Lever There are two cutting height adjustment configurations. Single Lever (If Equipped) The cutting height adjustment lever is located above the rear left wheel. To adjust the cutting height, refer to Cutting Height Adjustment on page 8. Rear Wheel/ Caster Wheels (If Equipped) The rear wheel cutting height adjustment lever is located above the rear left wheel. The caster wheels adjust by moving the wheel bolts to the desired position. To adjust the cutting height, refer to Cutting Height Adjustment on page 8. Grass Catcher (If Equipped) The grass catcher, located at the rear of the mower, is used to bag the grass clippings for disposal. Once the bag is full, remove it up through the handles using the grass catcher handle and empty it. Mulch Plug The mulch plug is used for mulching purposes. Instead of collecting the grass clippings in a grass catcher or using the side discharge chute, some mower models have the option of recirculating the clippings back to the lawn. This is called mulching. Side Discharge Chute Your mower is shipped as a mulcher. To discharge the grass clippings to the side, follow the instructions on page 7 in the Assembly & Set-Up section to attach the side discharge chute. WARNING: Keep hands and feet away from the chute area on cutting deck. Refer to warning label on the unit. Deck Wash Your mower's deck is equipped with a fast attach deck wash nozzle on its surface as part of its deck wash system. Use the deck wash to rinse grass clippings from the deck's underside. 9
-
 1
1 -
2
-
3
-
 4
4 -
 5
5 -
 6
6 -
 7
7 -
 8
8 -
 9
9 -
 10
10 -
 11
11 -
 12
12 -
 13
13 -
 14
14 -
15
-
16
-
17
-
18
-
19
-
20
-
21
-
22
-
23
-
24
-
25
-
26
-
27
-
28
-
29
-
30
-
31
-
32
 |
 |
