DIRECTV R16-300 User Guide - Page 74
RF Coaxial Connection Good Quality, Connecting Your DIRECTV Plus DVR to Your Telephone Line,
 |
View all DIRECTV R16-300 manuals
Add to My Manuals
Save this manual to your list of manuals |
Page 74 highlights
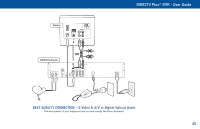
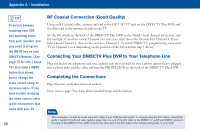
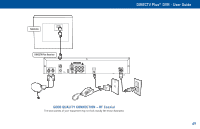
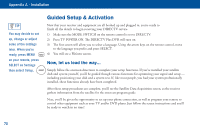
Appendix A - Installation TIP To switch between watching your VCR and watching video from your receiver, you may need to program the INPUT key on your DIRECTV Remote. (See page 72 for info.) Some TVs also have a MENU button that allows you to change the video source using an onscreen menu. If you have trouble changing the video source, refer to the instructions that came with your TV. 68 RF Coaxial Connection (Good Quality) Using an RF coaxial cable, connect one end to the OUT TO TV jack on the DIRECTV Plus DVR and the other end to the antenna in jack on the TV. Set the 3/4 switch on the back of the DIRECTV Plus DVR to the "blank" local channel for in your area. For example, if you have a local Channel 3 in your area, then move the 3/4 switch to Channel 4. If you have a local Channel 4, then set the switch to Channel 3. To watch DIRECTV programming, tune your TV to Channel 3 or 4 (depending on the position of the 3/4 switch in step 3 above). Connecting Your DIRECTV Plus DVR to Your Telephone Line Plug one end of the telephone cord into a phone jack on your wall (or into a phone splitter that is plugged into a phone jack) and the other end into the PHONE JACK on the back of the DIRECTV Plus DVR. Completing the Connections Plug all power cords into electrical sockets. Now, turn to page 70 to learn about Guided Setup and Activation. Note This connection can also be made using A/V cables if your VCR has A/V inputs. To connect using the A/V cables, connect the audio L (white), R (red) and video (yellow) plugs from one end of the A/V cable to the AUDIO 1 L and R and VIDEO 1 jacks on the back of the DIRECTV Plus DVR. Connect the other end of the A/V cable to the corresponding jacks on your VCR.
-
 1
1 -
2
-
3
-
4
-
5
-
6
-
7
-
8
-
9
-
10
-
11
-
12
-
13
-
14
-
15
-
16
-
17
-
18
-
19
-
20
-
21
-
22
-
23
-
24
-
25
-
26
-
27
-
28
-
29
-
30
-
31
-
32
-
33
-
34
-
35
-
36
-
37
-
38
-
39
-
40
-
41
-
42
-
43
-
44
-
45
-
46
-
47
-
48
-
49
-
50
-
51
-
52
-
53
-
54
-
55
-
56
-
57
-
58
-
59
-
60
-
61
-
62
-
63
-
64
-
65
-
66
-
67
-
68
-
 69
69 -
 70
70 -
 71
71 -
 72
72 -
 73
73 -
 74
74 -
 75
75 -
 76
76 -
 77
77 -
 78
78 -
 79
79 -
80
-
81
-
82
-
83
-
84
-
85
-
86
 |
 |
