Dacor HGPR30 Installation Instruction - 30" Pro Gas Range - Page 11
Reinstalling the Oven Door, Installing the Burner Knobs
 |
View all Dacor HGPR30 manuals
Add to My Manuals
Save this manual to your list of manuals |
Page 11 highlights
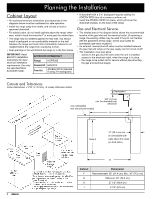
Installation Instructions Reinstalling the Oven Door WARNING To avoid personal injury or property damage: • Make sure that the notch on the bottom of each oven door hinge locks inside the receptacle before opening the door. • Lock the hinges by flipping the top of the receptacle latch toward the door immediately after the door is installed. The mating mechanism that holds the door in place is the door hinge with a notch that locks into the oven receptacle. Ensure the notches seat inside the receptacle. Installing the Burner Knobs WARNING Incorrectly installing the burner-control knobs may lead to griddle damage from excessive heat. The knobs for the right-side burners have the MAX GRIDDLE setting. NOTE: A D-shaped key on the back of each knob mates with the D-shaped valve stem to ensure proper installation and function The range has three types of burner-control knobs: WARM 200° 300° 400° 500° BROIL CLEAN Oven / Broil Knob A Oven Hinge Receptacle Max Griddle Burner Knob Icons B Door Hinge Notch on bottom of hinge Door Installation and Hinge Details 1. Grasping each side of the oven door below the handle, tilt the top out about 15° from vertical. 2. Slide the door hinges into the oven receptacles. 3. Pushing on the bottom corner of the door, insert the hinges so the notch on the bottom of each hinge seats in the receptacle. 4. Lay the door flat open. 5. With a slotted screwdriver, flip both hinge tops outward. 6. Slowly close and open the door to verify it is properly latched. 7. Remove all packaging from the oven chamber(s). Left Burner Knob Icons C C C A B B 9
-
 1
1 -
2
-
3
-
4
-
5
-
 6
6 -
 7
7 -
 8
8 -
 9
9 -
 10
10 -
 11
11 -
 12
12 -
 13
13 -
 14
14 -
 15
15 -
 16
16
 |
 |
