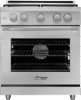
Dacor HGPR30 Installation Instruction - 30" Pro Gas Range - Page 2
Table of Contents, Customer Assurance Information - hgpr30s ng
 |
View all Dacor HGPR30 manuals
Add to My Manuals
Save this manual to your list of manuals |
Page 2 highlights
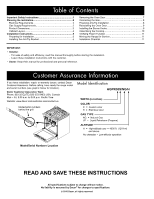
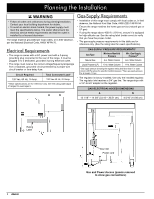
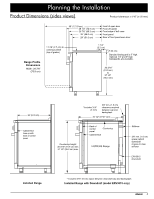
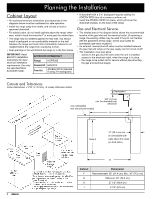
Table of Contents Important Safety Instructions 1 Planning the Installation 2 Electrical Requirements 2 Gas-Supply Requirements 2 Product Dimensions 3 Cabinet Layout 4 Installation Instructions 5 Preparing for Installation 5 Installing the Anti-Tip Bracket 5 Removing the Oven Door 7 Connecting the Gas 8 Finalizing Anti-Tip Installation 8 Reinstalling the Oven Door 9 Installing the Burner Knobs 9 Assembling the Cooktop 10 Verifying Proper Function 11 Moving the Range for Service 11 Installation Checklist 11 IMPORTANT: • Installer: -- For sake of safety and efficiency, read this manual thoroughly before starting the installation. -- Leave these installation instructions with the customer. • Owner: Keep theis manual for professional and personal reference. Customer Assurance Information If you have installation, repair, or warranty issues, contact Dacor Customer Assurance. Before calling, have ready the range model and serial numbers (see graphic below for location). Dacor Customer Assurance Team Phone: 833-35-ELITE (833-353-5483) USA, Canada Mon - Fri, 5:00 a.m. to 5:00 p.m. Pacific Time Website: www.dacor.com/customer-care/contact-us Model/serial numbers behind the grill Model Identification HGPR30S/NG/H WIDTH (in inches) COLOR C = Custom color S = Stainless steel GAS TYPE NG = Natural Gas LP = Liquid Petroleum (Propane) ALTITUDE H = High-altitude use - 4000 ft. (1219 m) and above No character = Low-altitude operation Model/Serial Numbers Location READ AND SAVE THESE INSTRUCTIONS All specifications subject to change without notice. No liability is assumed by Dacor® for changes to specifications. © 2018 Dacor, all rights reserved.
-
 1
1 -
 2
2 -
 3
3 -
 4
4 -
 5
5 -
 6
6 -
 7
7 -
 8
8 -
9
-
10
-
11
-
12
-
13
-
14
-
15
-
16
 |
 |
