Dacor HGPR30 Installation Instruction - 30" Pro Gas Range - Page 9
Removing the Oven Door
 |
View all Dacor HGPR30 manuals
Add to My Manuals
Save this manual to your list of manuals |
Page 9 highlights
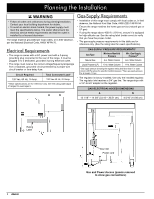
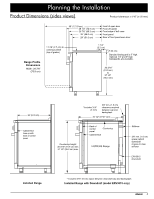
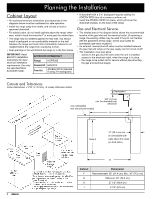
Installation Instructions 5. Place the bracket against the wall in the mounting location. Using a 1/8" bit, drill four 1-5/8" deep pilot holes perpendicular to the screw-seating surfaces shown below. Attach the bracket to the wall as shown with the included #12 x 1-3/4 screws. Catch Drywall Wall Stud Base Plate Retaining Arm 3. Close the oven door three-quarters shut (see below). 4. Grasp each side of the door just below the handle, and pull the door away from the oven. SCREW SIZE TABLE Sub-Floor Type/Floor Covering Thickness Concrete or wood sub-floor, no floor covering Concrete/wood sub-floor, floor covering up to 1/4" thick Screw #8 x 1* Concrete/wood sub-floor, floor covering over 1/4", up to 1/2" thick #8 x 1 1/4 * Wood sub-floor, floor covering over 1/2", up to 1 3/16" thick #12 x 1 3/4 * Concrete under floor covering over 1/2" thick Wood sub-floor, floor covering over 1-3/16" thick Not included** *Included with range; **Determine required depth based on information in Step 3 and purchase from local hardware store. Removing the Oven Door Removing the oven door makes sliding the range into place easier. WARNING • Do not try to disengage the hinge catches while the door is off. The hinge springs could release, causing personal injury. • Do not lift the oven door by the handle. NOTE: If using a backguard, install it before sliding the range into place. (See Pg. 5.) 1. Open the door so it lies flat. 2. With needle-nose pliers and a slotted screwdriver, flip the catch over the retaining arm on each hinge. 7
-
 1
1 -
2
-
3
-
 4
4 -
 5
5 -
 6
6 -
 7
7 -
 8
8 -
 9
9 -
 10
10 -
 11
11 -
 12
12 -
 13
13 -
 14
14 -
15
-
16
 |
 |
