Dell 1125 Mono Laser User's Guide
Dell 1125 Mono Laser Manual
 |
View all Dell 1125 Mono Laser manuals
Add to My Manuals
Save this manual to your list of manuals |
Dell 1125 Mono Laser manual content summary:
- Dell 1125 Mono Laser | User's Guide - Page 1
Guide About Your Multi-Funtion Printer Setting Up Your Printer Paper Handling Printing Copying Scanning Model MFP 1125 Faxing Understanding the Software Maintenance Troubleshooting or loss of data and tells you how to avoid the problem. CAUTION: A CAUTION indicates a potential for property damage, - Dell 1125 Mono Laser | User's Guide - Page 2
Page Dell™ Multi-Function Printer 1125 User's Guide Order Toner Cartridges Order Toner Cartridges Dell™ toner either potential damage to hardware or loss of data and tells you how to avoid the problem. CAUTION: A CAUTION indicates a potential for property damage, personal injury, or death. - Dell 1125 Mono Laser | User's Guide - Page 3
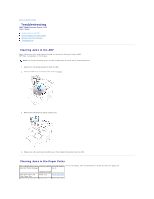
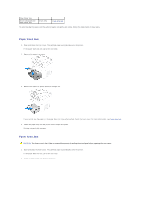
Dell™ Multi-Function Printer 1125 User's Guide Clearing Jams in the ADF Clearing Jams in the Paper Paths Clearing LCD Error Messages Troubleshooting Clearing Jams in the ADF When a document jams while passing through the Automatic Document Feeder (ADF), ADF Paper Jam appears on the display - Dell 1125 Mono Laser | User's Guide - Page 4
Clear Paper Jam Drum area paper jam Clear Paper Jam Drum area Drum Area Jam To avoid tearing the paper, pull the jammed paper out gently and slowly. Follow the steps below to clear jams. Paper Feed Jam 1. Open and close the front cover. The jammed paper automatically exits the printer. If the - Dell 1125 Mono Laser | User's Guide - Page 5
does not move when pulled, open the rear cover. 4. Pull the jammed paper out directly upward, to avoid tearing the paper on the rear paper guide parts. 5. Close the rear cover. 6. Open and close the front cover. Printing automatically resumes. Drum Area Jam 1. Open the front cover and lightly pull - Dell 1125 Mono Laser | User's Guide - Page 6
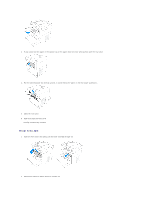
the steps outlined in Clearing Jams in the Paper Paths. l Follow the procedures in Loading Print Media in the Paper Tray. Ensure that the adjustable guides are correctly positioned. l Do not overload the paper tray. Ensure that the paper is below the paper capacity mark on the inside wall of the - Dell 1125 Mono Laser | User's Guide - Page 7
. Troubleshooting The Problems Condition Suggested solutions Paper in the output tray is misaligned or falls out from the output tray. l Please check the media packaging for the correct preferred printing side or turn the paper in the input tray over. For more information, see the instructions - Dell 1125 Mono Laser | User's Guide - Page 8
correctly. l Ensure that the paper guides are against both sides of the envelopes. Printing Problems Condition The printer does not print. contain blank pages. Some parts, such as the controller or Contact a service representative. the board, may be defective. The setting in the software - Dell 1125 Mono Laser | User's Guide - Page 9
or brand of paper. l The toner cartridge may be defective. See Vertical repetitive defects. l If these steps do not correct the problems, contact a service representative. l If black vertical streaks appear on the page, the drum inside the toner cartridge has probably been scratched. Install a new - Dell 1125 Mono Laser | User's Guide - Page 10
l Ensure that the paper or other material is loaded correctly and the guides are not too tight or too loose against the paper stack. Curl See Replacing the Toner Cartridge. l If the problem persists, the printer may require repair. Contact a service representative. Curl If the printed paper is - Dell 1125 Mono Laser | User's Guide - Page 11
Speak with the other machine operator and ask her/him to sort out the problem. There may not be enough memory to store the document. If the display the paper in the tray with a fresh supply. If necessary, check/adjust the paper guides. l Ensure that the paper is the proper paper weight. 75 g/m2 (20 - Dell 1125 Mono Laser | User's Guide - Page 12
computer. Check that the USB cable is properly connected. Common Windows Problems Condition File in Use message appears during installation. Error Writing to LPTx : Refer to Microsoft Windows XP/Vista User's Guide that came with your PC for further information on Windows error messages. Back to - Dell 1125 Mono Laser | User's Guide - Page 13
Dell™ Multi-Function Printer 1125 User's Guide Physical Specifications Printer Specifications Scanner Specifications Copier Printing: 64 dBA (sound power) Scanning: 50 dBA 2 x 16 character LCD supporting 50 characters and scroll capability 80 degree viewing cone with backlight Windows XP, Windows - Dell 1125 Mono Laser | User's Guide - Page 14
Resolution Scan Modes Scan Resolution ADF Scanning Scan Speed Scan Size Warm-up/calibrate Time Zoom Scanner Glass Capacity Scan Features Scan Software Scan Support Supported File Types Description CIS 600 dpi Mono, grayscale, Full Color, 256 color 75, 150, 200, 300, 600 dpi 30 page capacity 11 ppm - Dell 1125 Mono Laser | User's Guide - Page 15
in this User's Guide. NOTE: Please load problems, requiring repairs. These repairs are not covered by the Dell warranty or service agreements. Print Media Sizes and Support 127 mm to 216 x 356 mm) NOTE: Please follow the instructions on the paper packaging for a preferred printing side. Printing on - Dell 1125 Mono Laser | User's Guide - Page 16
media. Selecting the appropriate print media for your printer helps you avoid printing problems. Paper For the best print quality, use 75 g/m2 (20 lb) guidelines when evaluating new paper stock. NOTE: Please follow the instructions on the paper packaging for a preferred printing side. Printing - Dell 1125 Mono Laser | User's Guide - Page 17
paper tray, can contribute to paper curling prior to printing and can cause feeding problems. Smoothness The degree of smoothness of paper directly affects print quality. If the paper Proper paper loading helps prevent jams and ensures trouble-free printing. To help avoid jams or poor print quality: - Dell 1125 Mono Laser | User's Guide - Page 18
l Remember to change the paper size setting when you use a source that does not support auto size sensing l Do not remove trays while a job is printing or Busy is , or releasing hazardous emissions. l To avoid print quality problems, avoid getting fingerprints on the transparencies. l Before loading - Dell 1125 Mono Laser | User's Guide - Page 19
side. The end of the envelope with the stamp area enters the bypass tray first. See Using the Bypass Tray for instructions on loading envelopes. l Adjust the width guide to fit the width of the envelopes. l A combination of high humidity (over 60%) and the high printing temperatures may seal the - Dell 1125 Mono Laser | User's Guide - Page 20
print media feeding problems and uneven print , select the next larger size. Print Media Sizes and Support Print Media Size Dimensions Paper Tray Bypass Tray A4 8.27 127 mm to 216 x 356 mm) NOTE: Please follow the instructions on the paper packaging for a preferred printing side. Printing on - Dell 1125 Mono Laser | User's Guide - Page 21
Print Media Paper Tray Bypass Tray Standard Output Tray Paper Y Y Y Card Stock N Y Y Transparencies N Y N Labels N Y Y Dual-web and Integrated Labels N Y Y Envelopes N Y Y Print Media Types and Weights Print Media Paper Type Xerographic or business paper Card stock- - Dell 1125 Mono Laser | User's Guide - Page 22
Maintenance Dell™ Multi-Function Printer 1125 User's Guide Clearing the Memory Cleaning Your Multi-Function toner cartridge when cleaning inside the printer. Oil from your fingers may cause print quality problems. Cleaning the Exterior Clean the printer cabinet with a soft, damp, lint-free cloth. - Dell 1125 Mono Laser | User's Guide - Page 23
the Interior Paper, toner, and dust particles can accumulate inside the printer and cause print quality problems, such as smearing or toner specks. Clean inside the printer to prevent these problems. 1. Power the printer off and unplug the power cord. CAUTION: Allow a reasonable amount of time for - Dell 1125 Mono Laser | User's Guide - Page 24
CAUTION: Do not touch the transfer roller inside the printer. Oil from your fingers may cause print quality problems. 6. Insert the drum cartridge into the printer, using the guiding slots to correctly position the drum. Slide the drum cartridge into the printer until it clicks into place. 7. Close - Dell 1125 Mono Laser | User's Guide - Page 25
4. Close the document cover. Maintaining the Toner Cartridge Storing the Toner Cartridge Store the toner cartridge in the original packaging until you are ready to install it. Do not store the toner cartridge in: l Temperatures greater than 40°C (104°F) l An environment with extreme changes in - Dell 1125 Mono Laser | User's Guide - Page 26
the toner cartridge into the drum cartridge in the direction shown until it clicks into place. 6. Insert the drum cartridge into the printer, using the guiding slots to correctly position the drum. Slide the drum cartridge into the printer until it clicks into place. - Dell 1125 Mono Laser | User's Guide - Page 27
7. Close the front cover. Ensure that the cover closes securely. Maintaining the Drum Cartridge The drum cartridge has a standard life of approximately 20,000 pages. If the print quality appears reduced (e.g. steaks, spots, or fading) the drum cartridge may require cleaning or replacing. Printing a - Dell 1125 Mono Laser | User's Guide - Page 28
to select Yes and press Select (P). 5. The LDC shows Cleaning Drum. Toner particles on the drum surface are affixed to the paper. 6. If the problem persists, repeat steps 1 through 4 until toner particles are not affixed to the paper. Replacing the Drum Cartridge When the drum passes 20,000 pages - Dell 1125 Mono Laser | User's Guide - Page 29
the toner cartridge into the drum cartridge in the direction shown until it clicks into place. 5. Insert the drum cartridge into the printer, using the guiding slots to correctly position the drum. Slide the drum cartridge into the printer until it clicks into place. - Dell 1125 Mono Laser | User's Guide - Page 30
information and procedures to replace worn or malfunctioning parts. CAUTION: It is strongly recommended that these items are installed by a trained service professional. To purchase replacement parts, contact Dell™ Replacing the Paper Tray If the paper tray jams constantly, fails to register - Dell 1125 Mono Laser | User's Guide - Page 31
2. Position one hand on the top of the printer and then with your other hand, pull firmly from the right side of the paper tray in the direction of the arrow. 3. Insert the replacement paper tray in the direction shown until an audible click is heard. 4. Replace the paper and paper tray cover. - Dell 1125 Mono Laser | User's Guide - Page 32
Toner cartridge Part number 1,000 page toner XP092 2,000 page toner XP407 Drum TU031 Toner cartridges are available through the Dell Toners Reorder Program icon installed on the desktop as part of the initial software installation. Double-click the icon to display the Order Supplies window. - Dell 1125 Mono Laser | User's Guide - Page 33
Output Tray The Paper Tray and Paper Output Tray are supplied separately and must be installed prior to operation. See the following installation guides. Paper Tray Installation 1. Remove all packaging from the paper tray and discard. 2. Remove the paper tray cover. 3. Align the tabs on the paper - Dell 1125 Mono Laser | User's Guide - Page 34
with the slots on the printer and push at an angle in the direction of the arrow. Lower the support into place. Connecting Your Printer Connecting the Telephone and Fax Lines 1. Plug one end of a telephone line cord into the FAX socket ( ). 2. To connect a telephone - Dell 1125 Mono Laser | User's Guide - Page 35
Connecting the Printer Cable The printer supports connection as a local printer serving a local computer. Connecting the Printer Locally A local printer is a printer connected to your computer using a USB cable. NOTE: USB cables - Dell 1125 Mono Laser | User's Guide - Page 36
Back to Contents Page - Dell 1125 Mono Laser | User's Guide - Page 37
Back to Contents Page Paper Handling Dell™ Multi-Function Printer 1125 User's Guide Loading Print Media in the Paper Tray Using the Bypass Tray Setting the Paper Size Setting the Paper Type This chapter provides information on how - Dell 1125 Mono Laser | User's Guide - Page 38
indicated by the paper limit marks on the inside of the tray. NOTE: Overloading the paper tray may cause paper jams. 4. Adjust the paper length guide in the direction of the arrow until it rests lightly against the paper stack. NOTE: Improper adjustment of paper - Dell 1125 Mono Laser | User's Guide - Page 39
standard paper size(e.g. Envelopes): 1. Insert the paper stack into the paper tray with the side to be printed on facing down. 2. Adjust the paper width guide and move it towards the stack of paper until it lightly touches the side of the stack. NOTE: Improper adjustment of paper - Dell 1125 Mono Laser | User's Guide - Page 40
edge at the front. If you experience problems with paper feed, turn the paper around. 83 in. (index) cards, and other custom-sized materials are supported by this printer. The minimum size is 3.0 by 5.0 in. can affect print quality. 2. Adjust the width guides to match the width of the print media. - Dell 1125 Mono Laser | User's Guide - Page 41
press Select (P). 4. Press () to select the paper size you are using and press Select (P). 5. Press (V) to return to Standby mode. NOTE: Fax mode only supports A4, LTR (letter), and LGL (legal) paper sizes. Setting the Paper Type After loading paper in the paper tray or the bypass tray, set the - Dell 1125 Mono Laser | User's Guide - Page 42
- Dell 1125 Mono Laser | User's Guide - Page 43
Back to Contents Page Printing Dell™ Multi-Function Printer 1125 User's Guide About Sharing the Printer on a Network Setting Up the Locally Shared Printer Printing a Document Printer Settings Printing Multiple Pages on One Sheet of Paper Printing a - Dell 1125 Mono Laser | User's Guide - Page 44
required for printing from various Windows® applications. The exact steps for printing a document vary depending on the application program used. See your software application's User's Guide for the exact printing procedure. - Dell 1125 Mono Laser | User's Guide - Page 45
1. Open the document to print. 2. Select Print from the File drop down menu. The Print window is displayed. NOTE: Print windows differ between applications. The basic print settings are selected within the print window. These settings include the number of copies and print range. 3. Select the - Dell 1125 Mono Laser | User's Guide - Page 46
any remaining settings using the printer driver. The settings you change remain in effect only while you are using the current program. See the following guide to make permanent, or default, changes. 1. Click the Start button in the task bar, click Printers and Faxes. 2. Point to the Dell MFP 1125 - Dell 1125 Mono Laser | User's Guide - Page 47
. Portrait prints across the width of the page, in letter format. Landscape prints across the length of the page, in spreadsheet format. Layout Options Manual Duplex Printing If you want to rotate the page 180-degrees, click the Rotate 180 check box. Layout Options enable you to select advanced - Dell 1125 Mono Laser | User's Guide - Page 48
Graphics Tab Use the following graphic options to adjust the print quality for your specific printing needs. Click the Graphics tab to display the properties shown below. The following table describes the properties and functions on the Graphics tab. Property Description Resolution Only Default - Dell 1125 Mono Laser | User's Guide - Page 49
forms and letterhead paper . The following table describes the available Overlays tab options. See Using Overlays for more detailed instructions. Property Description Overlays Function Select Overlay Function from the drop down menu. Properties Displays Overlay Properties. Delete Delete - Dell 1125 Mono Laser | User's Guide - Page 50
window frame and then clicking the item you need help with. This information is not as detailed as the Help pages and is intended as a guide only. Printing Multiple Pages on One Sheet of Paper You can select the number of pages to print on a single sheet of paper. To print - Dell 1125 Mono Laser | User's Guide - Page 51
3. The available range is 25 through 400%. Values less than 100 reduce the image and values greater than 100 magnify the image. In the example above, the document is reduced by 50%. The preview on the right of the screen reflects the selected change. 4. Select the Center check box to center an - Dell 1125 Mono Laser | User's Guide - Page 52
type. To perform duplex printing: 1. From your software application, access the printer properties. 2. From the Layout tab, select Long Edge or Short Edge from the Manually Duplex Printing panel. - Dell 1125 Mono Laser | User's Guide - Page 53
3. Click the Paper tab and select the paper source, size, and type. 4. Click OK to return to the software print screen. 5. Click OK to print the document. 6. Your printer prints the odd pages of the document then the LCD shows Put Papers Back Press Select. 7. Replace the printed pages in the paper - Dell 1125 Mono Laser | User's Guide - Page 54
The following table describes the available Text String watermark options. Property Description Watermark Text Enter the text to appear as the watermark. Example is used in the window above, although any text string up to 62 characters is acceptable. Font Select the watermark font from the drop - Dell 1125 Mono Laser | User's Guide - Page 55
NOTE: No delete confirmation message is displayed, and the watermark is unrecoverable. Using Overlays What is an Overlay? An overlay is text and/or images stored in the computer hard disk drive (HDD) as a special file format that can be printed on any document. Overlays are often used to take the - Dell 1125 Mono Laser | User's Guide - Page 56
1. Create or open the document you want to print with an overlay. 2. From your software application, access the printer properties. 3. From the Overlays tab, select the One Overlay from the Overlay Function drop down menu. 4. Select the overlay you want to print from the Overlay Select box. NOTE: If - Dell 1125 Mono Laser | User's Guide - Page 57
or gray scale images, use the scanner glass instead of the ADF. When you use the ADF: l The ADF only supports A4, Letter, and Legal size documents as indicated on the width guide. l Do not attempt to feed the following types of documents: ¡ Carbon-paper or carbon-backed paper ¡ Coated paper ¡ Onion - Dell 1125 Mono Laser | User's Guide - Page 58
document in the ADF: 1. Place the document(s) face up on the ADF with the top edge of the documents in first. 2. Adjust the document width guide to the correct document size. Ensure that the bottom of the document stack matches the paper size marked on the document input tray. For detailed - Dell 1125 Mono Laser | User's Guide - Page 59
For detailed guidelines for preparing an original document, see Preparing a Document. 3. Close the scanner cover. NOTE: If you are copying a page from a book or magazine, lift the cover until its hinges are caught by the stopper and then close the cover. If the book or magazine is thicker than 30 mm - Dell 1125 Mono Laser | User's Guide - Page 60
3. Enter the required value using the number keypad and press Select(P). Zoom You can reduce or enlarge the size of a copied image, from 25 percent to 400 percent when you copy original documents. Note that the zoom rate available is different depending on the document loading method. NOTE: When you - Dell 1125 Mono Laser | User's Guide - Page 61
the following steps to use Clone copying: NOTE: You cannot adjust the copy size using the Zoom menu while making a clone copy. See the following guide to use Clone copying: 1. Load the document to be copied on the scanner glass, and close the cover. 2. Press Scroll () to select Copy and press - Dell 1125 Mono Laser | User's Guide - Page 62
Copy Options. 6. Press Start (u) to begin copying. 7. The documents are scanned and the 2-Up copy(ies) is produced. Collation See the following guide to use Collation copying: 1. Load the document to be copied into the ADF. Ensure that the document is properly inserted. 2. Press Scroll () to - Dell 1125 Mono Laser | User's Guide - Page 63
Copying Using the Dell MFP Center The Dell MFP Center makes it easy for you to access all copy functions from one central location. 1. Load the document(s) face up, with the top edge of the document first into the ADF. OR Place a single document face down on the scanner glass. For more information - Dell 1125 Mono Laser | User's Guide - Page 64
Back to Contents Page Scanning Dell™ Multi-Function Printer 1125 User's Guide Scanning Overview Using Dell MFP Center Scanning From the Operator Panel Scanning Using the Windows Image Acquisition (WIA) Driver Scanning Using the TWAIN-Dell MFP - Dell 1125 Mono Laser | User's Guide - Page 65
application window opens and the scanned image is imported ready for use. Scanning Using the Windows Image Acquisition (WIA) Driver Your printer also supports the WIA-Dell MFP 1125 Scanner for scanning images. WIA is one of the standard components provided by Microsoft® Windows® and works with - Dell 1125 Mono Laser | User's Guide - Page 66
see how your preferences affect the picture. 5. Enter a picture name and select a file format and destination to save the picture. 6. Follow the on-screen instructions to edit the picture after it is copied to your computer. Scanning Using the TWAIN-Dell MFP 1125 Scanner Use the TWAIN-Dell MFP 1125 - Dell 1125 Mono Laser | User's Guide - Page 67
General Settings This section of the dialog window provides a description of the scanner source settings. Paper Select the scan media source from the drop-down list. l Scanner Glass: source is media placed on scanner glass. l Automatic Document Feeder: source is media placed in ADF. The options in - Dell 1125 Mono Laser | User's Guide - Page 68
l Description: Provides the ideal setting for scanning color photographs or art or to work with items for image editing, desktop publishing, and high-quality output. Results in a slower scan time and a larger file size because of the 200 dpi resolution. l Custom (Scanner Glass): Use to scan any - Dell 1125 Mono Laser | User's Guide - Page 69
Gamma and Sharpness Click the Gamma/Sharpness button to adjust gamma and sharpness settings. Gamma Settings Gamma changes will alter the way in which brightness is distributed across the light spectrum, resulting in differences in color perception. It is used by software to imitate color as closely - Dell 1125 Mono Laser | User's Guide - Page 70
Click the Hue/Saturation button to adjust gamma and sharpness settings. Saturation Settings The Saturation level represents how much black is present in a color. A fully saturated red, for example, would be pure red with no black. Changes to Saturation will affect the color output in a scanned - Dell 1125 Mono Laser | User's Guide - Page 71
Select a scan task and click Remove to delete the scan task from the preview area. Scan/Preview Area This area displays the item you are scanning or enables you to select the area to scan. Use the rectangle to select the area to scan. Drag the scan areas to change the size of the scan area. Place - Dell 1125 Mono Laser | User's Guide - Page 72
7. Press Scroll () to select the required scan color default: ¡ Black ¡ Color ¡ Gray 8. Press Select (P) to select the scan color default. 9. Press Scroll () to select Quality and press Select (P). 10. Press Scroll () to select the quality default: ¡ 1200 ¡ 600 ¡ 300 ¡ 150 ¡ 75 11. Press - Dell 1125 Mono Laser | User's Guide - Page 73
Back to Contents Page Faxing Dell™ Multi-Function Printer 1125 User's Guide Setting the Printer ID Using the Number Keypad to Enter Characters Setting up the Fax System Sending a Fax Sending a PC-Fax Receiving a Fax Automatic Dialing - Dell 1125 Mono Laser | User's Guide - Page 74
in the operator panel menu defines how all faxes are sent and received unless temporary changes are made using other menus. See the following guide to make changes to Fax Default settings. Setting Fax Default Options 1. Press Scroll () to select Fax and press Select (P). 2. Press Scroll () to - Dell 1125 Mono Laser | User's Guide - Page 75
on the (Default: 9) back of the printer. If you pick up the extension phone and hear a fax tone, enter the Receive Code. See Receiving Manually Using an Extension Telephone for more information about using the code. Sending a Fax It is possible to begin typing the number on the keypad without - Dell 1125 Mono Laser | User's Guide - Page 76
Fine resolution transmit at the highest resolution supported by the receiving device. See the following guide to temporarily adjust fax Resolution. 1. Press fax as normal (see Sending a Fax Automatically and Sending a Fax Manually). 6. Press Cancel (V) to return to the Standby mode. Adjusting the - Dell 1125 Mono Laser | User's Guide - Page 77
machine, it dials the number and sends the fax. NOTE: Press Cancel (V) to cancel the fax job at any time during transmission. Sending a Fax Manually 1. Load the document(s) face up with top edge first into the ADF (see Using the Automatic Document Feeder (ADF)) OR Place a single document face - Dell 1125 Mono Laser | User's Guide - Page 78
2. In the Printer Name field, select Dell MFP 1125 Fax. 3. Click the Properties button. The Properties screen appears. 4. Select Paper Size, Resolution, and Orientation. 5. Click OK to continue. 6. Enter the recipient's name. The Recipient's Information screen displays. 7. In the Recipient's Name - Dell 1125 Mono Laser | User's Guide - Page 79
OR 9. Click the Directory button to open the DELL MFP 1125 directory. The directory screen appears. The contact list on the left side of the screen represents the directory imported from the DELL MFP 1125. 10. Select a contact and press (>>) to move it to the Recipients List. 11. Click OK to - Dell 1125 Mono Laser | User's Guide - Page 80
removing data stored in the memory. Loading Paper for Receiving Faxes The instructions for loading paper in the paper tray are the same whether you are be set to 3 or less to insure all calls are answered. Receiving Manually Using an Extension Telephone This feature works best when you are using an - Dell 1125 Mono Laser | User's Guide - Page 81
You can store up to 99 frequently dialed numbers in one or two-digit speed dial locations (0 to 99). Storing a Number for Speed Dialing 1. Press Directory (&) on the operator panel. Press Scroll () to select Directory and press Select (P). OR Press Scroll () to select Fax and press Select (P). - Dell 1125 Mono Laser | User's Guide - Page 82
For more information on loading a document, see Loading an Original Document. 2. Press Scroll () to select Fax and press Select (P). 3. Adjust the document contrast and resolution to suit your fax needs. NOTE: For more information, see Adjusting the Document Contrast and Adjusting the Document - Dell 1125 Mono Laser | User's Guide - Page 83
1. Press Directory (&) on the operator panel. OR Press Scroll () to select Fax and press Select (P). Press Scroll () to select Directory and press Select (P). 2. Press Scroll () to select Edit and press Select (P). 3. Press Scroll () to select Edit Group and press Select (P). 4. Enter the - Dell 1125 Mono Laser | User's Guide - Page 84
3. Press Select (P) to access Search. 4. Press Scroll () to scroll through the memory until the name and number you want to dial display. You can search upwards or downwards through the entire memory in alphabetical order, from A to Z. While searching through the printer's memory, you can see that - Dell 1125 Mono Laser | User's Guide - Page 85
Press Scroll () to select Redial and press Select (P). When a document is loaded in the ADF, the printer automatically begins to send. 2. For the document loaded on the scanner glass, the display asks if you want to load another page. Select Yes to add. Otherwise, select No. Sending Broadcasting - Dell 1125 Mono Laser | User's Guide - Page 86
5. Press Scroll () to select Delay Fax and press Select (P). 6. Enter the number of the remote machine using the number keypad. To enter the number, you can use one, two, or three-digit speed dial or group dial numbers. 7. Press Select (P) to confirm the number on the display. The display asks you - Dell 1125 Mono Laser | User's Guide - Page 87
You may need to prevent your received faxes from being accessed by unauthorized people. You can turn on the secure fax mode using the Secure Receive option to restrict printing out received faxes when the printer is unattended. In the secure fax mode, all incoming faxes are stored in memory. When - Dell 1125 Mono Laser | User's Guide - Page 88
1. Press Scroll () to select Fax and press Select (P). 2. Press Scroll () to select Reports press Select (P). 3. Press Scroll () to display the report or list you want to print on the bottom line. l Directory: Directory list l Scheduled Jobs: Scheduled job information l Activity Report: Shows - Dell 1125 Mono Laser | User's Guide - Page 89
-receive feature. l Do not use the computer modem if your printer is sending or receiving a fax. l To fax via the computer modem, follow the instructions provided with your computer modem and fax application. You can capture images using your printer and Dell ScanDirect and send them using your fax - Dell 1125 Mono Laser | User's Guide - Page 90
NOTE: Start Menu must be set to its original, default settings to view the following procedures. Using Dell MFP Center Dell MFP Center is an application that enables you to fax items directly to recipients from your computer. Dell MFP Center runs as a separate application from: l Windows XP: Click - Dell 1125 Mono Laser | User's Guide - Page 91
, or text files. PaperPort provides improved scanning features and supports annotations on all image types. PaperPort's enhanced search feature are available for scanning documents on your printer. l User's Guide-HTML documentation provides detailed information about using your printer. l Dell - Dell 1125 Mono Laser | User's Guide - Page 92
install drivers depends on the operating system you are using. The following guide shows the Windows XP installation procedure. 1. Power on your computer. the printer to your computer at this time. A prompt will appear instructing when to make the connection. 2. Insert the Drivers and Utilities CD. - Dell 1125 Mono Laser | User's Guide - Page 93
6. There are two types of installation methods. See the following for a brief description. Typical Install: installs all the software needed for the DELL MFP 1125 (default). Advanced Install: allows for the selection of specific software to install. See the following. 7. Select a type of - Dell 1125 Mono Laser | User's Guide - Page 94
NOTE: The installation does not continue until the USB connection is detected. If the printer is not detected, the installation remains idle and the following screen displays. 8. Turn on the printer and connect it to the computer's USB port. The Found New Hardware Wizard displays. 9. Select Install - Dell 1125 Mono Laser | User's Guide - Page 95
10. Click the Test Page button to verify the installation process. If a test page is printed, the DELL MFP 1125 is installed successfully. 11. Click Finish. 12. Remove the Drivers and Utilities CD, and reboot the computer. Configuring the Fax Setup Wizard The Fax Setup Wizard enables you to set up, - Dell 1125 Mono Laser | User's Guide - Page 96
4. Enter pertinent information in the Company and Fax Number fields. The information provided is printed on top of every transmission. 5. Click Next. The Dialing Settings screen is displayed. The default dialing setting is No, a prefix digit is not required to dial. If a prefix digit is required, in - Dell 1125 Mono Laser | User's Guide - Page 97
should be used in conjunction with a dedicated fax line. Check No (Manually answer...) if the MFP shares a line with other devices. NOTE: If No is selected, any incoming faxes must be answered manually by pressing the user defined Receive Code on the operator panel (the default - Dell 1125 Mono Laser | User's Guide - Page 98
15. Click Test Fax to perform a test of the fax installation before saving the settings. A successful test displays the following message. An unsuccessful test returns the following screen. 16. After a successful test, click Save to save the settings. 17. Click OK. The fax is now ready for use. - Dell 1125 Mono Laser | User's Guide - Page 99
2. Click Next. The uninstallation proceeds and the Uninstallation screen displays. 3. Click Finish. Your software is uninstalled. Using the Dell MFP 1125 Status Monitor The Status Monitor is installed as part of the initial software installation from the Drivers and Utilities CD. After the - Dell 1125 Mono Laser | User's Guide - Page 100
MFP, and Drum count has exceeded life. See Clearing LCD Error Messages Shows the current toner level Displays the Service Tag number for use in correspondence with Dell support Displays HTML help for the Status Monitor Minimizes the Status Monitor to the task bar Displays the Order Toner Cartridge - Dell 1125 Mono Laser | User's Guide - Page 101
l To exit, click the Exit button at the bottom of the window. Directory Click New Contact to add a name and number to the directory list. Click New Group to create a group of contacts (for example, "Clients") and add contacts to the group. Click Edit to change contact or group information. Click - Dell 1125 Mono Laser | User's Guide - Page 102
Other Settings Click the Other Settings tab to configure such items as the ring time, receive mode, redial delay and attempts, auto reduction, and message confirmation. After making your changes, click Save Settings and Close to exit the Fax Settings dialog. Click Reset to fax defaults to restore - Dell 1125 Mono Laser | User's Guide - Page 103
Click OK, and Apply to save any changes. Back to Contents Page - Dell 1125 Mono Laser | User's Guide - Page 104
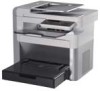
to Contents Page About Your Multi-Function Printer Dell™ Multi-Function Printer 1125 User's Guide Unpacking Your Multi-Function Printer Multi-Function Printer 1125 Menu Functions Changing the Display Language items in the box. If there is a missing item, contact Dell: Printer Chassis Owner's Manual - Dell 1125 Mono Laser | User's Guide - Page 105
Printer Settings Utility, Dell Status Monitor, Dell MFP Center, and an HTML User's Guide. NOTE: It is recommended you use an AWG #26 or lower gauge cord that pulling it. NOTE: Refer to the setup diagram for installation instructions. These are the main components of your printer. The following - Dell 1125 Mono Laser | User's Guide - Page 106
2. Operator Panel 3. Paper Output Tray 4. Manual Feeder 5. Paper Tray 6. Scanner Glass 7. Scanner Cover 8. Rear View Enables you to control the MFP. Holds document job output. Enables you to load print media - Dell 1125 Mono Laser | User's Guide - Page 107
NOTE: If the phone communication is serial in your country (such as Germany, Sweden, Denmark, Austria, Belgium, Italy, France, and Switzerland), you must remove the plug from the phone connector and insert the supplied terminator. Understanding The Operator Panel The operator panel is located at the - Dell 1125 Mono Laser | User's Guide - Page 108
Optical Character Recognition (OCR) Scan Color Color Gray Black Quality 75 dpi draft 600 dpi 150 dpi 1200 (V) dpi 300 dpi Original Size 8.5x11 in B5 2.25x3.25 in A5 3x5 in A6 3.5x5 in Legal 4x6 in 60x80 mm 5x7 in 9x13 cm 8x10 in 10x15 cm Hagaki 13x18 cm Exec 20x25 cm A4 - Dell 1125 Mono Laser | User's Guide - Page 109
Reset Drum Cnt Changing the Display Language To change the operator panel display language, follow these steps: 1. Press Scroll () to select Setup and press Select (P). 2. Press Scroll () to select Device Setup and press Select (P). 3. Press Scroll () to select Language and press Select (P). - Dell 1125 Mono Laser | User's Guide - Page 110
The printer supports both 12 and 24 hour time formats. To change the clock format: 1. and press Select (P). 6. Press Cancel (V) to return to the Standby mode. Ringer Sounds See the following guide to enable or disable the Ringer Volume. 1. Press Scroll () to select Setup and press Select (P). 2. - Dell 1125 Mono Laser | User's Guide - Page 111
2. Press Scroll () to select Device Setup and press Select (P). 3. Press Scroll () to select Toner Save and press Select (P). 4. Press Scroll () to select On or Off and press Select (P). 5. Press Cancel (V) to return to Standby mode. Back to Contents Page
-
 1
1 -
 2
2 -
 3
3 -
 4
4 -
 5
5 -
 6
6 -
 7
7 -
8
-
9
-
10
-
11
-
12
-
13
-
14
-
15
-
16
-
17
-
18
-
19
-
20
-
21
-
22
-
23
-
24
-
25
-
26
-
27
-
28
-
29
-
30
-
31
-
32
-
33
-
34
-
35
-
36
-
37
-
38
-
39
-
40
-
41
-
42
-
43
-
44
-
45
-
46
-
47
-
48
-
49
-
50
-
51
-
52
-
53
-
54
-
55
-
56
-
57
-
58
-
59
-
60
-
61
-
62
-
63
-
64
-
65
-
66
-
67
-
68
-
69
-
70
-
71
-
72
-
73
-
74
-
75
-
76
-
77
-
78
-
79
-
80
-
81
-
82
-
83
-
84
-
85
-
86
-
87
-
88
-
89
-
90
-
91
-
92
-
93
-
94
-
95
-
96
-
97
-
98
-
99
-
100
-
101
-
102
-
103
-
104
-
105
-
106
-
107
-
108
-
109
-
110
-
111
 |
 |
Dell™ Laser Multi
-Function Printer 1125 User's Guide
About Your Multi
-
Funtion Printer
Faxing
Setting Up Your Printer
Understanding the Software
Paper Handling
Maintenance
Printing
Troubleshooting
Copying
Specifications
Scanning
Model MFP 1125
Order Toner Cartridges
Dell™ toner cartridges are available only through Dell. You can order toner cartridges online at
www.dell.com/supplies
or by phone.
Notes, Notices, and Cautions
Information in this document is subject to change without notice.
© 2007 Dell Inc. All rights reserved.
Reproduction in any manner whatsoever without the written permission of Dell Inc.
is strictly forbidden.
Trademarks used in this text:
Dell
, the
DELL
logo, and
Dell Toner Management System
are trademarks of Dell Inc.;
Pentium
is a registered trademark of Intel Corporation;
Microsoft,
Windows, Windows Server, MS-DOS, Internet Explorer,
and
Windows Vista
are either trademarks or registered trademarks of Microsoft Corporation in the United States and/or other
countries.
ENERGY STAR
is a registered trademark of the U.S. Environmental Protection Agency. As an ENERGY STAR Partner, Dell Inc. has determined that this product meets the ENERGY
STAR guidelines for energy efficiency.
Other trademarks and trade names may be used in this document to refer to either the entities claiming the marks and names or their products. Dell Inc. disclaims any
proprietary interest in trademarks and trade names other than its own.
UNITED STATES GOVERNMENT RESTRICTED RIGHTS
This software and documentation are provided with RESTRICTED RIGHTS. Use, duplication or disclosure by the Government is subject to restrictions as set forth in subparagraph (c)
(1)(ii) of the Rights in Technical Data and Computer Software clause at DFARS.
252.227-7013 and in applicable FAR provisions: Dell Inc., One Dell Way, Round Rock, Texas, 78682, USA.
July 2007 Rev. A00
Canada
877-501-4803
Colombia
01800-9-155676
Mexico
866-851-1754
Puerto Rico
866-851-1760
Trinidad and Tobago
1-800-805-8035
United States
877-INK-2-YOU
NOTE:
If your country is not listed, contact your Dell distributor to order supplies.
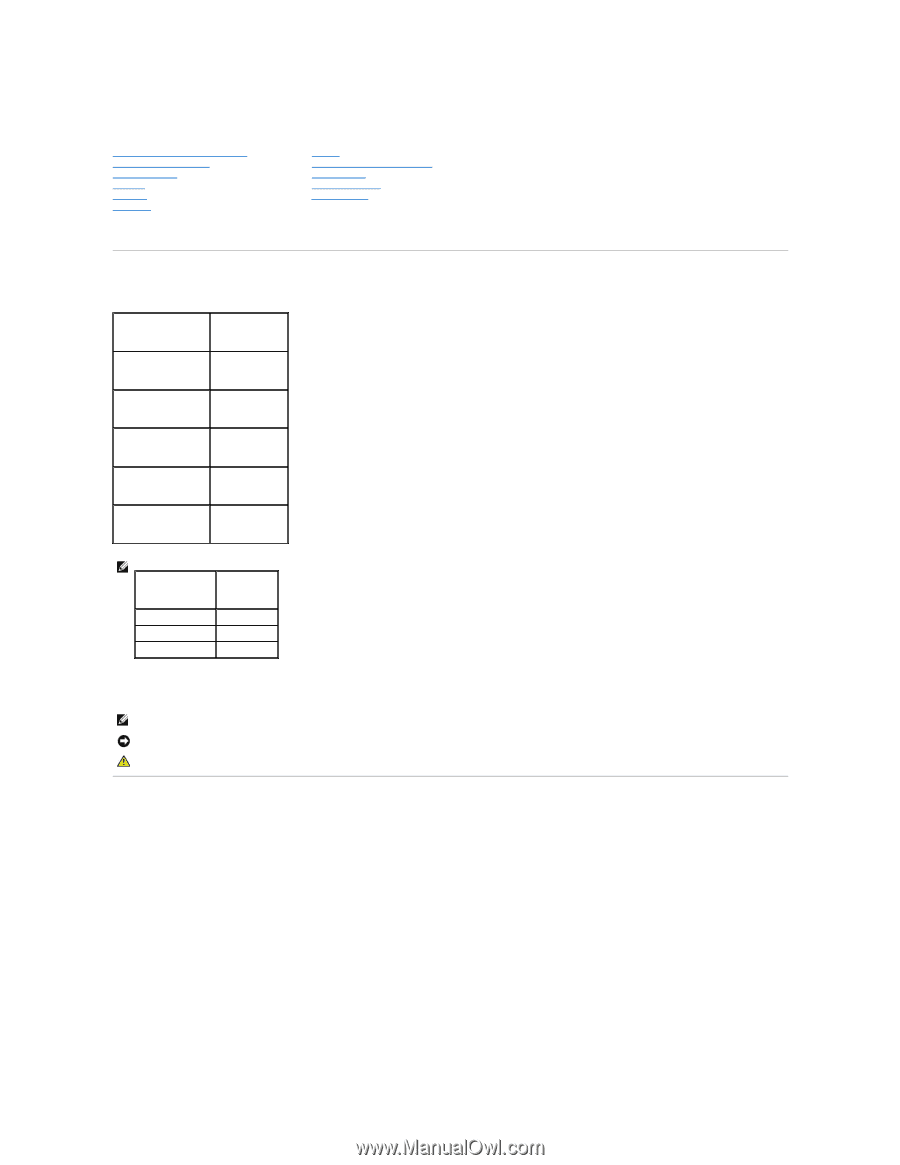
Toner cartridge
Part number
1,000 page toner
XP092
2,000 page toner
XP407
Drum
TU031
NOTE:
A NOTE indicates important information that helps you make better use of your computer.
NOTICE:
A NOTICE indicates either potential damage to hardware or loss of data and tells you how to avoid the problem.
CAUTION:
A CAUTION indicates a potential for property damage, personal injury, or death.