Dell 1125 Mono Laser User's Guide - Page 7
Paper Feeding Problems
 |
View all Dell 1125 Mono Laser manuals
Add to My Manuals
Save this manual to your list of manuals |
Page 7 highlights
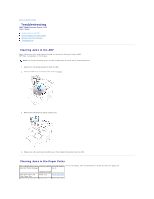
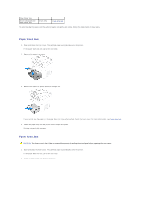
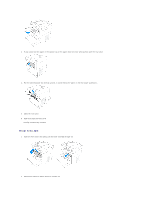
Cover Open Cover Open - Rear Cover Paper Size Error Paper jam Front cover is open. Rear Cover is open. Paper size mismatch. Paper jam in ADF. Close front cover. Close rear cover. Insert correct paper size. Clear jam (see Clearing Jams in the ADF). ADF area Scanner module error Scan Memory Full Fax TX Error Fax RX Error Unspecified scanner error. Scanning attempted while no memory available. No tone or comms error. Fax comms error. Restart printer. Wait for current print/fax job to complete and retry. Check connections and try again. Check connections and try again. Check telephone cable Dial Fail Memory Full Memory Full Fax Jobs Full Group No. is assigned This Speed Num is Assigned No. not Assigned Dial failed. Try again. Attempted to send a fax while the system is printing a job. Attempted to receive a fax while the system is doing a scan job with 1200dpi. Scanning is stopped and display shows whether or not operator want to start transmission of correctly scanned pages or abort transmission. Reception is stopped and transmitter may result in Comm. Error. Operator must release memory space by clearing printer error for further reception. Attempted to enter a new delay fax when the Release some fax jobs and retry. delay fax list is full. Attempted to add a new group when the number has already been assigned. Select an alternate number or delete and replace an existing number. Attempted to add a new speed dial no. when Select an alternate number or delete and replace an existing number. the number has already been assigned Attempted to input a speed dial number which Select an alternate number or create speed dial entry and retry. has not been assigned. Troubleshooting The following chart lists some conditions that may occur and the recommended solutions. Follow the suggested solutions until the problem is corrected. If the problem persists, contact Dell. Paper Feeding Problems Condition Suggested solutions Paper in the output tray is misaligned or falls out from the output tray. l Please check the media packaging for the correct preferred printing side or turn the paper in the input tray over. For more information, see the instructions on the media packaging. Paper is jammed during printing. l Clear the paper jam. See Clearing Jams in the Paper Paths. Paper sticks together. l Ensure that there is not too much paper in the paper tray. The paper tray can hold up to 250 sheets of paper, depending on the thickness of your paper. l Make sure that you are using the correct type of paper. See Recommended Paper. l Remove paper from the paper tray and flex or fan the paper. l Humid conditions may cause some paper to stick together. Multiple sheets of paper do not feed. l Different types of paper may be stacked in the paper tray. Load paper of only one type, size and weight. l If multiple sheets have caused a paper jam, clear the paper jam. See Clearing Jams in the Paper Paths. Paper does not feed into the printer. l Remove any obstructions from inside the printer. See Cleaning the Interior. l Paper has not been loaded correctly. Remove paper from the tray and reload it correctly. l There is too much paper in the paper tray. Remove excess paper from the tray. l The paper is too thick. Use only paper that meets the specifications required by the printer. See Recommended Paper. The paper keeps jamming. l Make sure that the correct paper size is selected. See Setting the Paper Size. l An incorrect type of paper is being used. Use only paper that meets the specifications required by the printer. See Recommended Paper. l There may be debris inside the printer. Open the front cover and remove the debris. Transparencies stick together in the paper exit. l Use only the transparencies specifically designed for a laser printer. Remove each transparency as it exits from the printer.
-
 1
1 -
 2
2 -
 3
3 -
 4
4 -
 5
5 -
 6
6 -
 7
7 -
 8
8 -
 9
9 -
 10
10 -
 11
11 -
 12
12 -
13
-
14
-
15
-
16
-
17
-
18
-
19
-
20
-
21
-
22
-
23
-
24
-
25
-
26
-
27
-
28
-
29
-
30
-
31
-
32
-
33
-
34
-
35
-
36
-
37
-
38
-
39
-
40
-
41
-
42
-
43
-
44
-
45
-
46
-
47
-
48
-
49
-
50
-
51
-
52
-
53
-
54
-
55
-
56
-
57
-
58
-
59
-
60
-
61
-
62
-
63
-
64
-
65
-
66
-
67
-
68
-
69
-
70
-
71
-
72
-
73
-
74
-
75
-
76
-
77
-
78
-
79
-
80
-
81
-
82
-
83
-
84
-
85
-
86
-
87
-
88
-
89
-
90
-
91
-
92
-
93
-
94
-
95
-
96
-
97
-
98
-
99
-
100
-
101
-
102
-
103
-
104
-
105
-
106
-
107
-
108
-
109
-
110
-
111
 |
 |
