Dell 1704FPV User Guide - Page 16
Pixel Clock, Auto Adjust
 |
View all Dell 1704FPV manuals
Add to My Manuals
Save this manual to your list of manuals |
Page 16 highlights
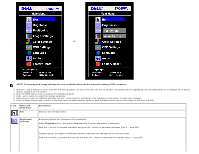
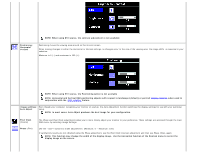
Positioning: Horizontal Vertical NOTE: When using DVI source, the contrast adjustment is not available Positioning moves the viewing area around on the monitor screen. When making changes to either the Horizontal or Vertical settings, no changes occur to the size of the viewing area, the image shifts in response to your selection. Minimum is 0 (-) and maximum is 100 (+). NOTE: When using DVI source, the Positioning option is not available NOTE: Horizontal and Vertical OSD positioning adjusts with respect to landscape (default) or portrait display rotation when used in conjunction with the OSD rotation feature. Image settings: Auto Adjust Even though your computer recognizes your monitor on startup, the Auto Adjustment function optimizes the display settings for use with your particular setup. NOTE: In most cases, Auto Adjust produces the best image for your configuration. Pixel Clock (Coarse) Phase (Fine) The Phase and Pixel Clock adjustments allow you to more closely adjust your monitor to your preference. These settings are accessed through the main OSD menu, by selecting Image Settings. Use the - and + buttons to make adjustments. (Minimum: 0 ~ Maximum: 100) If satisfactory results are not obtained using the Phase adjustment, use the Pixel Clock (course) adjustment and then use Phase (fine), again. NOTE: This function may change the width of the display image. Use the Horizontal function of the Position menu to center the display image on the screen.
-
 1
1 -
2
-
3
-
4
-
5
-
6
-
7
-
8
-
9
-
10
-
 11
11 -
 12
12 -
 13
13 -
 14
14 -
 15
15 -
 16
16 -
 17
17 -
 18
18 -
 19
19 -
 20
20 -
 21
21 -
22
-
23
-
24
-
25
-
26
-
27
-
28
-
29
-
30
-
31
-
32
-
33
-
34
-
35
-
36
-
37
-
38
-
39
-
40
-
41
-
42
-
43
-
44
-
45
-
46
-
47
-
48
-
49
-
50
-
51
-
52
-
53
-
54
-
55
-
56
-
57
 |
 |
