Dell 962 Owner's Manual - Page 59
Fax Console, Fax Service Management, Dell All-In-One Center, Console, Start, Control Panel - service manual
 |
View all Dell 962 manuals
Add to My Manuals
Save this manual to your list of manuals |
Page 59 highlights
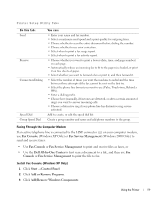
Print er Set up Util ity Ta bs On this tab: Send Receive Connection/Dialing Speed Dial Group Speed Dial You can: • Enter your name and fax number. • Select a maximum send speed and a print quality for outgoing faxes. • Choose whether to scan the entire document before dialing the number. • Choose whether to use error correction. • Select when to print a fax usage report. • Select when to print a fax activity report. • Choose whether you want to print a footer (date, time, and page number) on each page. • Automatically reduce an incoming fax to fit to the paper size loaded, or print it on two sheets of paper. • Select whether you want to forward a fax or print it, and then forward it. • Select the number of times you want the machine to redial and the time between those attempts if the fax cannot be sent on the first try. • Select the phone line format you want to use (Pulse, Touch-tone, Behind a PBX). • Enter a dialing prefix. • Choose how (manually, if fax tones are detected, or after a certain amount of rings) you want to answer incoming calls. • Choose a distinctive ring if your phone line has distinctive ring service activated. Add to, create, or edit the speed dial list. Create a group number and name and add phone numbers to the group. Faxing Through the Computer Modem If an active telephone line is connected to the LINE connector ( ) on your computer modem, use Fax Console (Windows XP Only) or Fax Service Management (Windows 2000 Only) to send and receive faxes: • Use Fax Console or Fax Service Management to print and receive files as faxes, or • Use the Dell All-In-One Center to first scan a document to a file, and then use Fax Console or Fax Service Management to print the file to fax. Install Fax Console (Windows XP Only) 1 Click Start → Control Panel. 2 Click Add or Remove Programs. 3 Click Add/Remove Windows Components. Using the Printer 59
-
 1
1 -
2
-
3
-
4
-
5
-
6
-
7
-
8
-
9
-
10
-
11
-
12
-
13
-
14
-
15
-
16
-
17
-
18
-
19
-
20
-
21
-
22
-
23
-
24
-
25
-
26
-
27
-
28
-
29
-
30
-
31
-
32
-
33
-
34
-
35
-
36
-
37
-
38
-
39
-
40
-
41
-
42
-
43
-
44
-
45
-
46
-
47
-
48
-
49
-
50
-
51
-
52
-
53
-
 54
54 -
 55
55 -
 56
56 -
 57
57 -
 58
58 -
 59
59 -
 60
60 -
 61
61 -
 62
62 -
 63
63 -
 64
64 -
65
-
66
-
67
-
68
-
69
-
70
-
71
-
72
-
73
-
74
-
75
-
76
-
77
-
78
-
79
-
80
-
81
-
82
-
83
-
84
-
85
-
86
-
87
-
88
-
89
-
90
-
91
-
92
-
93
-
94
-
95
-
96
-
97
-
98
-
99
-
100
-
101
-
102
-
103
-
104
-
105
-
106
-
107
-
108
-
109
-
110
-
111
-
112
-
113
-
114
-
115
-
116
-
117
-
118
-
119
-
120
-
121
-
122
 |
 |
