Dell 962 Owner's Manual - Page 60
Dell Photo AIO Printer 962, to Microsoft Windows XP - all in one photo printer windows 7
 |
View all Dell 962 manuals
Add to My Manuals
Save this manual to your list of manuals |
Page 60 highlights
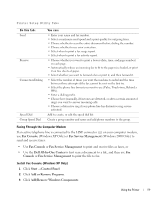
www.dell.com | support.dell.com 4 Click to select Fax Services. 5 Click Next. If prompted, insert the Microsoft Windows XP CD, and then click OK. Close the Welcome to Microsoft Windows XP window when it opens. 6 Click Finish. 7 Close the Add/Remove Programs window. Configure Fax Console (Windows XP Only) 1 Click Start → All Programs (or Programs) → Accessories → Communications → Fax → Fax Console. The Fax Configuration Wizard appears. 2 Click Next. 3 Enter any appropriate information, and then click Next. 4 Select your data/fax modem in the drop-down menu under Please select the fax device. 5 Select the Enable Receive check box. NOTE: Selecting the Enable Receive check box allows you to receive faxes but may cause the computer modem to answer all phone calls, in which case you may not receive voice mail. a Select Manual answer or specify the number of rings, and click Next. b Enter your TSID information, and click Next. c Enter your CSID information, and click Next. d Click to select Print it on. If you want to print all received faxes, Use the drop-down menu to the right of this field to select Dell Photo AIO Printer 962. e To create an archive copy of each fax, click to select Store a copy in a folder, and then use the Browse button to select the desired archive location. 6 Click Next, confirm your settings, and click Finish. Configure Fax Service Management (Windows 2000 Only) 1 Click Start → Programs → Accessories → Communications → Fax → Fax Service Management. The Fax Configuration Wizard appears. 2 Click Next. 3 Enter any appropriate information, and then click Next. 60 Using the Printer
-
 1
1 -
2
-
3
-
4
-
5
-
6
-
7
-
8
-
9
-
10
-
11
-
12
-
13
-
14
-
15
-
16
-
17
-
18
-
19
-
20
-
21
-
22
-
23
-
24
-
25
-
26
-
27
-
28
-
29
-
30
-
31
-
32
-
33
-
34
-
35
-
36
-
37
-
38
-
39
-
40
-
41
-
42
-
43
-
44
-
45
-
46
-
47
-
48
-
49
-
50
-
51
-
52
-
53
-
54
-
 55
55 -
 56
56 -
 57
57 -
 58
58 -
 59
59 -
 60
60 -
 61
61 -
 62
62 -
 63
63 -
 64
64 -
 65
65 -
66
-
67
-
68
-
69
-
70
-
71
-
72
-
73
-
74
-
75
-
76
-
77
-
78
-
79
-
80
-
81
-
82
-
83
-
84
-
85
-
86
-
87
-
88
-
89
-
90
-
91
-
92
-
93
-
94
-
95
-
96
-
97
-
98
-
99
-
100
-
101
-
102
-
103
-
104
-
105
-
106
-
107
-
108
-
109
-
110
-
111
-
112
-
113
-
114
-
115
-
116
-
117
-
118
-
119
-
120
-
121
-
122
 |
 |
