Dell Digital Jukebox Owner's Manual - Page 31
Transferring Music Tracks Using Dell DJ Explorer - for windows
 |
View all Dell Digital Jukebox manuals
Add to My Manuals
Save this manual to your list of manuals |
Page 31 highlights
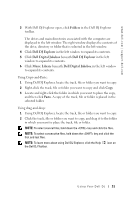
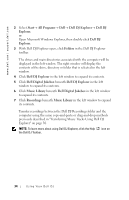
www.dell.com | support.dell.com 2 Click the Options button, then click the Synchronization tabbed page. 3 Select either the Complete Library Synchronization or Selected Playlist Synchronization option. If you select Selected Playlist Synchronization, then also select the box next to one or more playlists that you wish to have synchronized with your Dell DJ. Click OK when you have selected the playlists. NOTE: Synchronization is a one-way process. It will only copy files from the computer to the Dell DJ. It will not copy files from the Dell DJ to the computer. NOTICE: On the Synchronization tab, ensure that the option beneath "Protect Content on Device" is checked before starting Synchronization. This protects any existing files on your Dell DJ from being deleted during the synchronization process. 4 Click the Sync button to update your device with files from your computer. Select Help on the MusicMatch toolbar for more information. Transferring Music Tracks Using Dell DJ Explorer With Dell DJ Explorer, you can transfer music tracks using the copy-andpaste or drag-and-drop method. NOTE: When transferring music tracks to your Dell DJ, be sure to transfer them to the Music Library folder of your Dell DJ. If you transfer music files from your PC to the Data Library folder of your Dell DJ, these music tracks will not be playable on your Dell DJ. They are stored on your Dell DJ as a data files. Access the Music Library folder on your Dell DJ: 1 Connect your Dell DJ to your computer using the included USB cable. 2 Select Start→ All Programs→ Dell→ Dell DJ Explorer→ Dell DJ Explorer, or Open Microsoft Windows Explorer, then double-click Dell DJ Explorer. 30 Using Your Dell DJ
-
 1
1 -
2
-
3
-
4
-
5
-
6
-
7
-
8
-
9
-
10
-
11
-
12
-
13
-
14
-
15
-
16
-
17
-
18
-
19
-
20
-
21
-
22
-
23
-
24
-
25
-
 26
26 -
 27
27 -
 28
28 -
 29
29 -
 30
30 -
 31
31 -
 32
32 -
 33
33 -
 34
34 -
 35
35 -
 36
36 -
37
-
38
-
39
-
40
-
41
-
42
-
43
-
44
-
45
-
46
-
47
-
48
-
49
-
50
-
51
-
52
-
53
-
54
-
55
-
56
-
57
-
58
-
59
-
60
-
61
-
62
-
63
-
64
-
65
-
66
-
67
-
68
-
69
-
70
-
71
-
72
-
73
-
74
-
75
-
76
-
77
-
78
-
79
-
80
-
81
-
82
-
83
-
84
-
85
 |
 |