Dell Inspiron 13z Owner's Manual - Page 18
Replacing the Memory Module(s
 |
View all Dell Inspiron 13z manuals
Add to My Manuals
Save this manual to your list of manuals |
Page 18 highlights
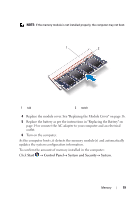
5 Remove the memory module from the memory-module connector. 1 3 2 1 memory-module connector 3 memory module 2 securing clips (2) Replacing the Memory Module(s) CAUTION: If you need to install memory modules in two connectors, install a memory module in the connector labeled DIMM A before you install a memory module in the connector labeled DIMM B. 1 Follow the instructions in "Before You Begin" on page 9. 2 Align the notch on the memory module with the tab in the memory module connector. 3 Slide the memory module firmly into the memory-module connector at a 45-degree angle, and press the memory module down on both sides until it clicks into place. If you do not hear the click, remove the memory module and reinstall it. 18 Memory
-
 1
1 -
2
-
3
-
4
-
5
-
6
-
7
-
8
-
9
-
10
-
11
-
12
-
 13
13 -
 14
14 -
 15
15 -
 16
16 -
 17
17 -
 18
18 -
 19
19 -
 20
20 -
 21
21 -
 22
22 -
 23
23 -
24
-
25
-
26
-
27
-
28
-
29
-
30
-
31
-
32
-
33
-
34
-
35
-
36
-
37
-
38
-
39
-
40
-
41
-
42
-
43
-
44
-
45
-
46
-
47
-
48
-
49
-
50
-
51
-
52
-
53
-
54
-
55
-
56
-
57
-
58
-
59
-
60
-
61
-
62
-
63
-
64
-
65
-
66
-
67
-
68
-
69
-
70
-
71
-
72
-
73
-
74
-
75
-
76
-
77
-
78
-
79
-
80
-
81
-
82
-
83
-
84
-
85
-
86
-
87
-
88
-
89
-
90
-
91
-
92
 |
 |

18
Memory
5
Remove the memory module from the memory-module connector.
Replacing the Memory Module(s)
CAUTION:
If you need to install memory modules in two connectors, install a
memory module in the connector labeled
DIMM A
before you install a memory
module in the connector labeled
DIMM B
.
1
Follow the instructions in "Before You Begin" on page 9.
2
Align the notch on the memory module with the tab in the memory
module connector.
3
Slide the memory module firmly into the memory-module connector at a
45-degree angle, and press the memory module down on both sides until it
clicks into place. If you do not hear the click, remove the memory module
and reinstall it.
1
memory-module connector
2
securing clips (2)
3
memory module
1
2
3