Dell Inspiron 13z Owner's Manual - Page 88
Changing Boot Sequence for the Current Boot, CD/DVD/CD-RW Drive, USB Storage Device, Network
 |
View all Dell Inspiron 13z manuals
Add to My Manuals
Save this manual to your list of manuals |
Page 88 highlights
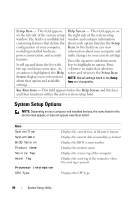
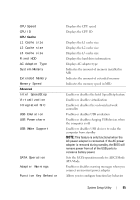
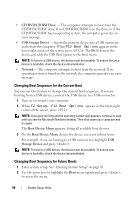
• CD/DVD/CD-RW Drive - The computer attempts to boot from the CD/DVD/CD-RW drive. If no CD/DVD/CD-RW is in the drive, or if the CD/DVD/CD-RW has no operating system, the computer generates an error message. • USB Storage Device - Insert the memory device into a USB connector and restart the computer. When F12 Boot Options appears in the lower-right corner of the screen, press . The BIOS detects the device and adds the USB flash option to the boot menu. NOTE: To boot to a USB device, the device must be bootable. To ensure that your device is bootable, check the device documentation. • Network - The computer attempts to boot from the network. If no operating system is found on the network, the computer generates an error message. Changing Boot Sequence for the Current Boot You can use this feature to change the current boot sequence. If you are booting from a USB device, connect the USB device to a USB connector. 1 Turn on (or restart) your computer. 2 When F2 Setup, F12 Boot Options appears in the lower-right corner of the screen, press . NOTE: If you wait too long and the operating system logo appears, continue to wait until you see the Microsoft Windows desktop. Then shut down your computer and try again. The Boot Device Menu appears, listing all available boot devices. 3 On the Boot Device Menu choose the device you want to boot from. For example, if you are booting to a USB memory key, highlight USB Storage Device and press . NOTE: To boot to a USB device, the device must be bootable. To ensure your device is bootable, check the device documentation. Changing Boot Sequence for Future Boots 1 Enter system setup. See "Entering System Setup" on page 83. 2 Use the arrow keys to highlight the Boot menu option and press to access the menu. 88 System Setup Utility
-
 1
1 -
2
-
3
-
4
-
5
-
6
-
7
-
8
-
9
-
10
-
11
-
12
-
13
-
14
-
15
-
16
-
17
-
18
-
19
-
20
-
21
-
22
-
23
-
24
-
25
-
26
-
27
-
28
-
29
-
30
-
31
-
32
-
33
-
34
-
35
-
36
-
37
-
38
-
39
-
40
-
41
-
42
-
43
-
44
-
45
-
46
-
47
-
48
-
49
-
50
-
51
-
52
-
53
-
54
-
55
-
56
-
57
-
58
-
59
-
60
-
61
-
62
-
63
-
64
-
65
-
66
-
67
-
68
-
69
-
70
-
71
-
72
-
73
-
74
-
75
-
76
-
77
-
78
-
79
-
80
-
81
-
82
-
 83
83 -
 84
84 -
 85
85 -
 86
86 -
 87
87 -
 88
88 -
 89
89 -
 90
90 -
 91
91 -
 92
92
 |
 |
