Dell Inspiron 3030 Small Desktop Owners Manual - Page 31
Installing the left-side cover, Front cover, Removing the front cover
 |
View all Dell Inspiron 3030 Small Desktop manuals
Add to My Manuals
Save this manual to your list of manuals |
Page 31 highlights
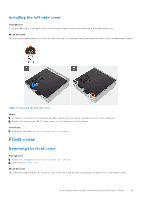
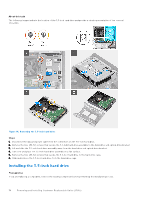
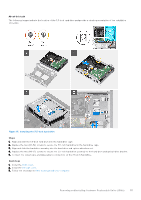
Installing the left-side cover Prerequisites If you are replacing a component, remove the existing component before performing the installation process. About this task The following images indicate the location of the left-side cover and provide a visual representation of the installation procedure. Figure 11. Installing the left-side cover Steps 1. Holding the left-side cover firmly on both sides, slide it into the chassis towards the front of the computer. 2. Replace the two screws (#6-32) that secure the left-side cover to the chassis. Next steps 1. Follow the procedure in After working inside your computer. Front cover Removing the front cover Prerequisites 1. Follow the procedure in Before working inside your computer. 2. Remove the left-side cover. About this task The following images indicate the location of the front cover and provide a visual representation of the removal procedure. Removing and installing Customer Replaceable Units (CRUs) 31
-
 1
1 -
2
-
3
-
4
-
5
-
6
-
7
-
8
-
9
-
10
-
11
-
12
-
13
-
14
-
15
-
16
-
17
-
18
-
19
-
20
-
21
-
22
-
23
-
24
-
25
-
 26
26 -
 27
27 -
 28
28 -
 29
29 -
 30
30 -
 31
31 -
 32
32 -
 33
33 -
 34
34 -
 35
35 -
 36
36 -
37
-
38
-
39
-
40
-
41
-
42
-
43
-
44
-
45
-
46
-
47
-
48
-
49
-
50
-
51
-
52
-
53
-
54
-
55
-
56
-
57
-
58
-
59
-
60
-
61
-
62
-
63
-
64
-
65
-
66
-
67
-
68
-
69
-
70
-
71
-
72
-
73
-
74
-
75
-
76
-
77
-
78
-
79
-
80
-
81
-
82
-
83
-
84
-
85
-
86
-
87
-
88
-
89
-
90
-
91
-
92
-
93
-
94
-
95
-
96
-
97
-
98
-
99
-
100
 |
 |
