Dell Inspiron 3030 Small Desktop Owners Manual - Page 66
Installing the SMA antenna kit
 |
View all Dell Inspiron 3030 Small Desktop manuals
Add to My Manuals
Save this manual to your list of manuals |
Page 66 highlights
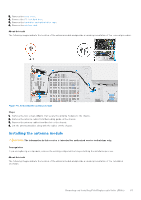
Figure 47. Installing the SMA antenna kit Steps 1. NOTE: Steps 1, 2, and 3 are required when installing the SMA antenna kit for the first time. Using a screw driver, push and remove the antenna cover from the chassis. 2. Remove the antenna cover from the screw driver and dispose the antenna cover. 3. Align the pins on the clip with the holes on the system board and press the clip to secure the clip to the system board. 4. Push the antennas into the slots on the back of the chassis. 5. Install the nut and washer to secure the antennas to the chassis. 6. Route the antenna cables through the routing guides on the system board. 7. Press the antenna cable into the clip on the system board. Next steps 1. Install the wireless card. 2. Install the hard-drive and optical-drive cage. 3. Install the 3.5-inch hard drive. 4. Install the front cover. 66 Removing and installing Field Replaceable Units (FRUs)
-
 1
1 -
2
-
3
-
4
-
5
-
6
-
7
-
8
-
9
-
10
-
11
-
12
-
13
-
14
-
15
-
16
-
17
-
18
-
19
-
20
-
21
-
22
-
23
-
24
-
25
-
26
-
27
-
28
-
29
-
30
-
31
-
32
-
33
-
34
-
35
-
36
-
37
-
38
-
39
-
40
-
41
-
42
-
43
-
44
-
45
-
46
-
47
-
48
-
49
-
50
-
51
-
52
-
53
-
54
-
55
-
56
-
57
-
58
-
59
-
60
-
 61
61 -
 62
62 -
 63
63 -
 64
64 -
 65
65 -
 66
66 -
 67
67 -
 68
68 -
 69
69 -
 70
70 -
 71
71 -
72
-
73
-
74
-
75
-
76
-
77
-
78
-
79
-
80
-
81
-
82
-
83
-
84
-
85
-
86
-
87
-
88
-
89
-
90
-
91
-
92
-
93
-
94
-
95
-
96
-
97
-
98
-
99
-
100
 |
 |
