Dell OptiPlex GX260N User Guide - Page 138
Adding a Second Hard Drive
 |
View all Dell OptiPlex GX260N manuals
Add to My Manuals
Save this manual to your list of manuals |
Page 138 highlights
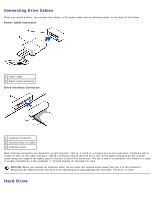
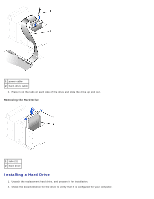
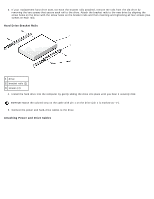
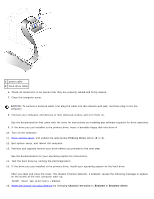
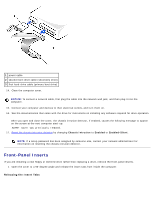
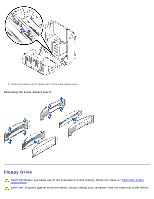
NOTE: If a setup password has been assigned by someone else, contact your network administrator for information on resetting the chassis intrusion detector. Adding a Second Hard Drive CAUTION: Before you begin any of the procedures in this section, follow the steps in "CAUTION: Safety Instructions." CAUTION: To guard against electrical shock, always unplug your computer from the electrical outlet before opening the cover. NOTICE: To avoid damage to the drive, do not set it on a hard surface. Instead, set the drive on a surface, such as a foam pad, that will sufficiently cushion it. 1. Check the documentation for the drive to verify that it is configured for your computer. 2. Perform an orderly computer shutdown using the operating system menu. 3. Turn off your computer and any devices. 4. Ground yourself by touching an unpainted metal surface on the chassis, such as the metal around the card-slot openings at the back of the computer, before touching anything inside your computer. While you work, periodically touch an unpainted metal surface on the computer chassis to dissipate any static electricity that might harm internal components. NOTICE: To disconnect a network cable, first unplug the cable from your computer, and then unplug it from the network wall jack. 5. Disconnect your computer and devices from their power sources. Also, disconnect any telephone or telecommunication lines from the computer. 6. Disconnect the computer power cable from the wall outlet, and then press the power button to ground the system board. 7. Open the computer cover. 8. Remove the two green plastic rails from the inside of the hard-drive bay by gently pulling the rails up and out of the bay. 9. Attach the rails to the hard drive using the two screws attached to the rails. Ensure that the rail tabs are positioned at the back of the hard drive. NOTICE: Do not install any drive into the lower hard-drive bay until you have removed the green drive rails from the inside of the hard-drive bay. 10. Remove the first hard drive from the upper bay and install it in the lower bay: a. Disconnect the power and the hard-drive cables from the back of the first hard drive. b. Press in the two green rail tabs and pull the first hard drive out of the upper bay. c. Gently slide the first hard drive into the lower bay until you hear a click. d. Reconnect the power and hard-drive cables to the back of the first hard drive. 11. Gently slide the new hard drive into the upper bay until you hear a click. Installing a Second Hard Drive
-
 1
1 -
2
-
3
-
4
-
5
-
6
-
7
-
8
-
9
-
10
-
11
-
12
-
13
-
14
-
15
-
16
-
17
-
18
-
19
-
20
-
21
-
22
-
23
-
24
-
25
-
26
-
27
-
28
-
29
-
30
-
31
-
32
-
33
-
34
-
35
-
36
-
37
-
38
-
39
-
40
-
41
-
42
-
43
-
44
-
45
-
46
-
47
-
48
-
49
-
50
-
51
-
52
-
53
-
54
-
55
-
56
-
57
-
58
-
59
-
60
-
61
-
62
-
63
-
64
-
65
-
66
-
67
-
68
-
69
-
70
-
71
-
72
-
73
-
74
-
75
-
76
-
77
-
78
-
79
-
80
-
81
-
82
-
83
-
84
-
85
-
86
-
87
-
88
-
89
-
90
-
91
-
92
-
93
-
94
-
95
-
96
-
97
-
98
-
99
-
100
-
101
-
102
-
103
-
104
-
105
-
106
-
107
-
108
-
109
-
110
-
111
-
112
-
113
-
114
-
115
-
116
-
117
-
118
-
119
-
120
-
121
-
122
-
123
-
124
-
125
-
126
-
127
-
128
-
129
-
130
-
131
-
132
-
 133
133 -
 134
134 -
 135
135 -
 136
136 -
 137
137 -
 138
138 -
 139
139 -
 140
140 -
 141
141 -
 142
142 -
 143
143 -
144
-
145
-
146
-
147
-
148
-
149
-
150
-
151
-
152
-
153
-
154
-
155
-
156
-
157
-
158
-
159
-
160
-
161
-
162
-
163
-
164
-
165
-
166
-
167
-
168
-
169
-
170
-
171
-
172
-
173
-
174
-
175
-
176
-
177
-
178
-
179
-
180
-
181
-
182
-
183
-
184
-
185
-
186
-
187
-
188
-
189
-
190
-
191
-
192
-
193
-
194
-
195
-
196
-
197
-
198
-
199
-
200
-
201
-
202
-
203
-
204
-
205
-
206
-
207
-
208
-
209
-
210
-
211
-
212
-
213
-
214
-
215
-
216
-
217
-
218
-
219
-
220
-
221
-
222
-
223
-
224
-
225
-
226
-
227
-
228
-
229
-
230
-
231
-
232
-
233
-
234
-
235
 |
 |
