Dell OptiPlex GX260N User Guide - Page 92
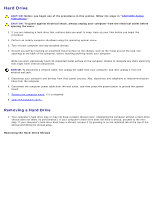
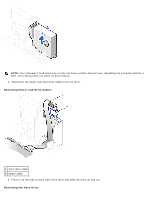
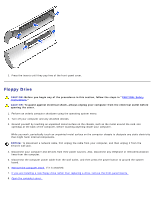
Removing the Hard-Drive Shroud
 |
View all Dell OptiPlex GX260N manuals
Add to My Manuals
Save this manual to your list of manuals |
Page 92 highlights
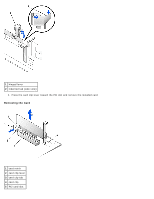
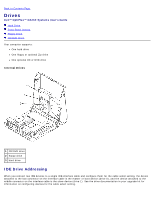
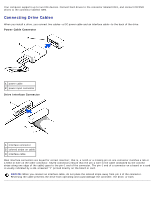
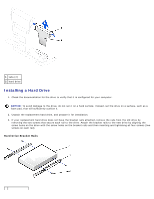
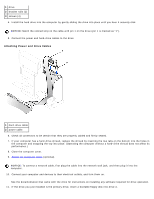
Hard Drive CAUTION: Before you begin any of the procedures in this section, follow the steps in "CAUTION: Safety Instructions." CAUTION: To guard against electrical shock, always unplug your computer from the electrical outlet before opening the cover. 1. If you are replacing a hard drive that contains data you want to keep, back up your files before you begin this procedure. 2. Perform an orderly computer shutdown using the operating system menu. 3. Turn off your computer and any attached devices. 4. Ground yourself by touching an unpainted metal surface on the chassis, such as the metal around the card-slot openings at the back of the computer, before touching anything inside your computer. While you work, periodically touch an unpainted metal surface on the computer chassis to dissipate any static electricity that might harm internal components. NOTICE: To disconnect a network cable, first unplug the cable from your computer, and then unplug it from the network wall jack. 5. Disconnect your computer and devices from their power sources. Also, disconnect any telephone or telecommunication lines from the computer. 6. Disconnect the computer power cable from the wall outlet, and then press the power button to ground the system board. 7. Remove the computer stand, if it is attached. 8. Open the computer cover. Removing a Hard Drive 1. Your computer's hard drive may or may not have a plastic shroud cover. (Operating the computer without a hard-drive shroud does not affect its performance.) If your computer's hard drive does not have a shroud, proceed to the next step. If your computer's hard drive does have a shroud, remove it by pressing in on the indented tab at the top of the shroud and lifting the shroud away. Removing the Hard-Drive Shroud
-
 1
1 -
2
-
3
-
4
-
5
-
6
-
7
-
8
-
9
-
10
-
11
-
12
-
13
-
14
-
15
-
16
-
17
-
18
-
19
-
20
-
21
-
22
-
23
-
24
-
25
-
26
-
27
-
28
-
29
-
30
-
31
-
32
-
33
-
34
-
35
-
36
-
37
-
38
-
39
-
40
-
41
-
42
-
43
-
44
-
45
-
46
-
47
-
48
-
49
-
50
-
51
-
52
-
53
-
54
-
55
-
56
-
57
-
58
-
59
-
60
-
61
-
62
-
63
-
64
-
65
-
66
-
67
-
68
-
69
-
70
-
71
-
72
-
73
-
74
-
75
-
76
-
77
-
78
-
79
-
80
-
81
-
82
-
83
-
84
-
85
-
86
-
 87
87 -
 88
88 -
 89
89 -
 90
90 -
 91
91 -
 92
92 -
 93
93 -
 94
94 -
 95
95 -
 96
96 -
 97
97 -
98
-
99
-
100
-
101
-
102
-
103
-
104
-
105
-
106
-
107
-
108
-
109
-
110
-
111
-
112
-
113
-
114
-
115
-
116
-
117
-
118
-
119
-
120
-
121
-
122
-
123
-
124
-
125
-
126
-
127
-
128
-
129
-
130
-
131
-
132
-
133
-
134
-
135
-
136
-
137
-
138
-
139
-
140
-
141
-
142
-
143
-
144
-
145
-
146
-
147
-
148
-
149
-
150
-
151
-
152
-
153
-
154
-
155
-
156
-
157
-
158
-
159
-
160
-
161
-
162
-
163
-
164
-
165
-
166
-
167
-
168
-
169
-
170
-
171
-
172
-
173
-
174
-
175
-
176
-
177
-
178
-
179
-
180
-
181
-
182
-
183
-
184
-
185
-
186
-
187
-
188
-
189
-
190
-
191
-
192
-
193
-
194
-
195
-
196
-
197
-
198
-
199
-
200
-
201
-
202
-
203
-
204
-
205
-
206
-
207
-
208
-
209
-
210
-
211
-
212
-
213
-
214
-
215
-
216
-
217
-
218
-
219
-
220
-
221
-
222
-
223
-
224
-
225
-
226
-
227
-
228
-
229
-
230
-
231
-
232
-
233
-
234
-
235
 |
 |