Dell PowerEdge 2200 Service Manual - Page 59
System Board Assembly,
 |
View all Dell PowerEdge 2200 manuals
Add to My Manuals
Save this manual to your list of manuals |
Page 59 highlights
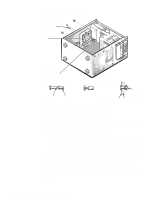
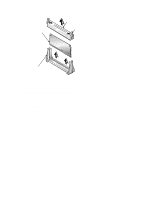
System Board Assembly The system board assembly consists of the system board and a mounting plate. The system board is held to the mounting plate with screws and mounting clips. system board cables mounting screws (4) system board/mounting plate assembly Figure 4-17. System Board Assembly Removal 1. Disconnect all cables from their connectors at the back of the computer. Be sure to record where each cable is attached. 2. If there are no expansion cards installed, go to step 4. Otherwise, lay the computer on its right side so you can access the expansion cards. 3. Disconnect any cables connected to expansion cards and remove any expansion cards; then place the computer in an upright position. 4. Remove the four screws from the system board/mounting plate assembly (see Figure 4-17). Removing and Replacing Parts 4-17
-
 1
1 -
2
-
3
-
4
-
5
-
6
-
7
-
8
-
9
-
10
-
11
-
12
-
13
-
14
-
15
-
16
-
17
-
18
-
19
-
20
-
21
-
22
-
23
-
24
-
25
-
26
-
27
-
28
-
29
-
30
-
31
-
32
-
33
-
34
-
35
-
36
-
37
-
38
-
39
-
40
-
41
-
42
-
43
-
44
-
45
-
46
-
47
-
48
-
49
-
50
-
51
-
52
-
53
-
 54
54 -
 55
55 -
 56
56 -
 57
57 -
 58
58 -
 59
59 -
 60
60 -
 61
61 -
 62
62 -
 63
63 -
 64
64 -
65
-
66
-
67
-
68
-
69
-
70
-
71
-
72
-
73
-
74
-
75
-
76
-
77
-
78
-
79
-
80
-
81
-
82
 |
 |
