Dell PowerEdge 2200 Service Manual - Page 60
Microprocessor Module, Removing the System Board Assembly From, the Chassis
 |
View all Dell PowerEdge 2200 manuals
Add to My Manuals
Save this manual to your list of manuals |
Page 60 highlights
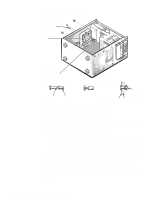
5. Remove the system board assembly from the chassis as follows: a. Slide the system board assembly about a half-inch toward the front of the computer to free the assembly from the tabs (see Figure 4-18). system-board mounting plate tabs (2) front of computer Figure 4-18. Removing the System Board Assembly From the Chassis b. Raise the top of the system board assembly up enough to allow access to the system board cables. c. Disconnect the power cables, control panel cable, diskette drive interface cable, hard-disk drive access indicator cable, system cooling-fan cables, and SCSI interface cable. 6. Lift the system board assembly away from the computer chassis. Microprocessor Module To remove a microprocessor module, follow these steps: 1. Write down or print out the system configuration information in the EISA Configuration Utility. 2. Remove the system board assembly. 3. Remove the microprocessor module. WARNING: The microprocessor module can get extremely hot during system operations. Be sure it has had sufficient time to cool before touching it. a. Remove the two screws securing the microprocessor module (see Figure 4-19). 4-18 Dell PowerEdge 2200 Systems Service Manual
-
 1
1 -
2
-
3
-
4
-
5
-
6
-
7
-
8
-
9
-
10
-
11
-
12
-
13
-
14
-
15
-
16
-
17
-
18
-
19
-
20
-
21
-
22
-
23
-
24
-
25
-
26
-
27
-
28
-
29
-
30
-
31
-
32
-
33
-
34
-
35
-
36
-
37
-
38
-
39
-
40
-
41
-
42
-
43
-
44
-
45
-
46
-
47
-
48
-
49
-
50
-
51
-
52
-
53
-
54
-
 55
55 -
 56
56 -
 57
57 -
 58
58 -
 59
59 -
 60
60 -
 61
61 -
 62
62 -
 63
63 -
 64
64 -
 65
65 -
66
-
67
-
68
-
69
-
70
-
71
-
72
-
73
-
74
-
75
-
76
-
77
-
78
-
79
-
80
-
81
-
82
 |
 |
