Dell PowerEdge 2200 Service Manual - Page 65
System Battery, System Battery Removal
 |
View all Dell PowerEdge 2200 manuals
Add to My Manuals
Save this manual to your list of manuals |
Page 65 highlights
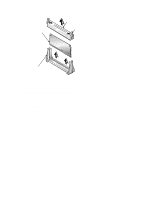
5. Remove the microprocessor retention bracket by pressing outward on the clips holding it to the system board until the microprocessor retention bracket can be removed (see Figures 4-23 and 4-24). 6. Repeat steps 4 and 5 to remove the second microprocessor retention bracket. System Battery battery BATTERY socket Figure 4-25. System Battery Removal WARNING: There is a danger of the new battery exploding if incorrectly installed. Replace the battery only with the same or equivalent type recommended by the manufacturer. Discard used batteries according to the manufacturer's instructions. To remove the system battery, follow these steps: 1. If possible, enter the System Setup program, and make a printed copy of the System Setup screens (see Appendix A). 2. Lay the computer on its right side. 3. Remove any expansion cards installed in the PCI expansion-card slots. Be sure to record the location of any cables attached to the PCI cards being removed. 4. Remove the battery. Carefully pry the battery out of its socket with your fingers or with a blunt, nonconducting object, such as a plastic screwdriver. To replace the system battery, orient the new battery with the "+" facing up. Insert the battery into its socket and snap it into place. Compare the system configuration information with the copy of the system configuration settings you made in step 1. Restore any system configuration information lost while replacing the battery. Removing and Replacing Parts 4-23
-
 1
1 -
2
-
3
-
4
-
5
-
6
-
7
-
8
-
9
-
10
-
11
-
12
-
13
-
14
-
15
-
16
-
17
-
18
-
19
-
20
-
21
-
22
-
23
-
24
-
25
-
26
-
27
-
28
-
29
-
30
-
31
-
32
-
33
-
34
-
35
-
36
-
37
-
38
-
39
-
40
-
41
-
42
-
43
-
44
-
45
-
46
-
47
-
48
-
49
-
50
-
51
-
52
-
53
-
54
-
55
-
56
-
57
-
58
-
59
-
 60
60 -
 61
61 -
 62
62 -
 63
63 -
 64
64 -
 65
65 -
 66
66 -
 67
67 -
 68
68 -
 69
69 -
 70
70 -
71
-
72
-
73
-
74
-
75
-
76
-
77
-
78
-
79
-
80
-
81
-
82
 |
 |
