Dell PowerEdge 2200 Service Manual - Page 64
Microprocessor Retention Bracket, Retention Bracket Screw Removal
 |
View all Dell PowerEdge 2200 manuals
Add to My Manuals
Save this manual to your list of manuals |
Page 64 highlights
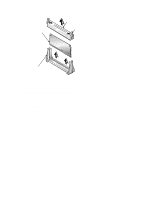
Microprocessor Retention Bracket microprocessor retention bracket system board Figure 4-23. Microprocessor Retention Bracket Removal 1. Remove the system board assembly. 2. Remove any terminator card, if necessary (see the previous procedure). 3. Remove any microprocessor module, if necessary. 4. Remove the four screws that secure the microprocessor retention bracket from the system board/mounting plate assembly. clips (2 per bracket) microprocessor retention bracket screws (4 per bracket) Figure 4-24. Retention Bracket Screw Removal 4-22 Dell PowerEdge 2200 Systems Service Manual
-
 1
1 -
2
-
3
-
4
-
5
-
6
-
7
-
8
-
9
-
10
-
11
-
12
-
13
-
14
-
15
-
16
-
17
-
18
-
19
-
20
-
21
-
22
-
23
-
24
-
25
-
26
-
27
-
28
-
29
-
30
-
31
-
32
-
33
-
34
-
35
-
36
-
37
-
38
-
39
-
40
-
41
-
42
-
43
-
44
-
45
-
46
-
47
-
48
-
49
-
50
-
51
-
52
-
53
-
54
-
55
-
56
-
57
-
58
-
 59
59 -
 60
60 -
 61
61 -
 62
62 -
 63
63 -
 64
64 -
 65
65 -
 66
66 -
 67
67 -
 68
68 -
 69
69 -
70
-
71
-
72
-
73
-
74
-
75
-
76
-
77
-
78
-
79
-
80
-
81
-
82
 |
 |

4-22
Dell PowerEdge 2200 Systems Service Manual
Microprocessor Retention Bracket
Figure 4-23.
Microprocessor Retention Bracket Removal
1.
Remove the system board assembly.
2.
Remove any terminator card, if necessary (see the previous procedure).
3.
Remove any microprocessor module, if necessary.
4.
Remove the four screws that secure the microprocessor retention
bracket from the system board/mounting plate assembly.
Figure 4-24.
Retention Bracket Screw Removal
system board
microprocessor
retention bracket
clips (2 per bracket)
microprocessor retention
bracket screws (4 per
bracket)