Dell PowerVault MD3200i Deployment Guide - Page 40
Automatic Discovery, Manual Discovery, Remove, Blink Array, Stop Blinking, Set Password, Confirm New
 |
View all Dell PowerVault MD3200i manuals
Add to My Manuals
Save this manual to your list of manuals |
Page 40 highlights
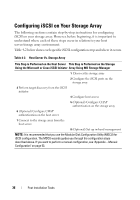
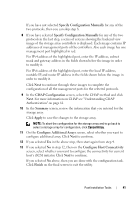
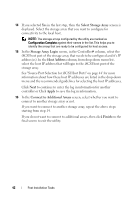
• Automatic Discovery-Automatic discovery queries the local sub-network for all iSCSI-based storage arrays and may take several minutes to complete. • Manual Discovery-Manual discovery allows you to locate iSCSI-based storage arrays that are outside of the local sub-network. Manual discovery requires selecting whether your storage array has a single controller (simplex) or dual controllers (duplex) and whether to use IPv4 or IPv6 protocol for communicating with the management port of the storage array. 5 The next screen presents a list of the iSCSI-based storage arrays that were discovered based on the discovery process selected in step 3. If you select Automatic Discovery, the screen displays a list of all the iSCSI-based storage arrays that were discovered in the subnet. If you select Manual Discovery, then the list contains only the arrays whose IP addresses were entered. You can add additional arrays to the list by clicking the Add button on this screen. You can also remove the arrays from this list by using the Remove button. You can click Blink Array to start the blinking of the array's front panel LED in order to locate the array physically and ensure it is the array you intend to configure. Click Stop Blinking to stop the blinking of the array before you proceed. Select the array by clicking the radio button of the corresponding storage array and then click Next. 6 Enter the name of the storage array and the password. If you want to set a new password for the array, select Set Password and then enter the new password in the New Password and Confirm New Password fields. Click Next to continue. 7 Select the IP protocol (IPv4/IPv6) to be used by the management port. Also, for each protocol, select whether the configuration of the management port IP addresses is to be done manually or automatically. For more information, see the online help. Click Next to continue after you has finished selecting the protocols and the configuration method. 40 Post Installation Tasks
-
 1
1 -
2
-
3
-
4
-
5
-
6
-
7
-
8
-
9
-
10
-
11
-
12
-
13
-
14
-
15
-
16
-
17
-
18
-
19
-
20
-
21
-
22
-
23
-
24
-
25
-
26
-
27
-
28
-
29
-
30
-
31
-
32
-
33
-
34
-
 35
35 -
 36
36 -
 37
37 -
 38
38 -
 39
39 -
 40
40 -
 41
41 -
 42
42 -
 43
43 -
 44
44 -
 45
45 -
46
-
47
-
48
-
49
-
50
-
51
-
52
-
53
-
54
-
55
-
56
-
57
-
58
-
59
-
60
-
61
-
62
-
63
-
64
-
65
-
66
-
67
-
68
-
69
-
70
-
71
-
72
-
73
-
74
-
75
-
76
-
77
-
78
-
79
-
80
-
81
-
82
 |
 |
