Dell Precision 530 Service Manual - Page 60
Slide the drive/bracket assembly into the drive bay until both drive, bracket tabs snap securely
 |
View all Dell Precision 530 manuals
Add to My Manuals
Save this manual to your list of manuals |
Page 60 highlights
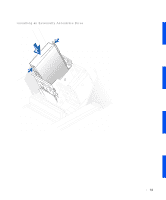
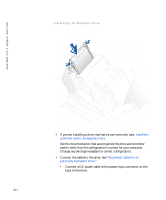
www.dell.com | support.dell.com NOTE: If you are not replacing an existing drive and the new drive does not have bracket rails attached, install the extra rail set that is located inside your computer in an empty drive bay. Attaching Bracket Rails for an Externally Accessible Drive drive bracket rails (2) screws (4) 7 Slide the drive/bracket assembly into the drive bay until both drive bracket tabs snap securely into place (see the following figure). 60
-
 1
1 -
2
-
3
-
4
-
5
-
6
-
7
-
8
-
9
-
10
-
11
-
12
-
13
-
14
-
15
-
16
-
17
-
18
-
19
-
20
-
21
-
22
-
23
-
24
-
25
-
26
-
27
-
28
-
29
-
30
-
31
-
32
-
33
-
34
-
35
-
36
-
37
-
38
-
39
-
40
-
41
-
42
-
43
-
44
-
45
-
46
-
47
-
48
-
49
-
50
-
51
-
52
-
53
-
54
-
 55
55 -
 56
56 -
 57
57 -
 58
58 -
 59
59 -
 60
60 -
 61
61 -
 62
62 -
 63
63 -
 64
64 -
 65
65 -
66
-
67
-
68
-
69
-
70
-
71
-
72
-
73
-
74
-
75
-
76
-
77
-
78
-
79
-
80
-
81
-
82
-
83
-
84
-
85
-
86
-
87
-
88
-
89
-
90
-
91
-
92
-
93
-
94
-
95
-
96
-
97
-
98
-
99
-
100
-
101
-
102
-
103
-
104
-
105
-
106
-
107
-
108
-
109
-
110
-
111
-
112
-
113
-
114
-
115
-
116
-
117
-
118
-
119
-
120
-
121
-
122
-
123
-
124
-
125
-
126
 |
 |

60
www.dell.com | support.dell.com
NOTE:
If you are not replacing an existing drive and the new drive does
not have bracket rails attached, install the extra rail set that is located
inside your computer in an empty drive bay.
Attaching Bracket Rails for an Externally Accessible Drive
7
Slide the drive/bracket assembly into the drive bay until both drive
bracket tabs snap securely into place (see the following figure).
bracket rails (2)
screws (4)
drive