Dell Precision 530 Service Manual - Page 86
Chassis Intrusion, Integrated, Devices, Sound, Integrated Devices, Network Interface Card - sound card
 |
View all Dell Precision 530 manuals
Add to My Manuals
Save this manual to your list of manuals |
Page 86 highlights
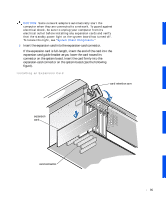
www.dell.com | support.dell.com 7 Lower the expansion card retention arm and press it into place, securing the expansion card(s) in the chassis. 8 Connect any cables that should be attached to the card. See the documentation for the card for information about the card's cable connections. NOTICE: Do not route expansion card cables over or behind the expansion cards. Cables routed over the expansion cards can prevent the computer cover from closing properly or cause damage to the equipment. Cables routed toward the rear of the expansion cards can prevent proper airflow from the expansioncard cooling fan. 9 Close the computer cover. 10 Stand the computer upright. 11 Reconnect the computer and devices to their electrical outlets, and turn them on. NOTE: If enabled, the Chassis Intrusion option will cause the following message to be displayed at the next computer start-up: ALERT! Cover was previously removed. Enter system setup and reset the Chassis Intrusion option as described in your User's Guide. 12 If you installed a sound card, perform the following steps: a Enter system setup, clear the security field, select Integrated Devices and change the setting for Sound to Off. b Connect external audio devices to the sound card's connectors. Do not connect external audio devices to the microphone, speaker/headphone, or line-in connectors on the computer back panel (see "Back-Panel Features"). 13 If you installed an add-in network adapter, perform the following steps: a Enter system setup, select Integrated Devices and change the setting for Network Interface Card to Off. b Connect the network cable to the add-in network adapter's connectors. Do not connect the network cable to the integrated connector on the computer back panel (see "Back-Panel Features"). 86
-
 1
1 -
2
-
3
-
4
-
5
-
6
-
7
-
8
-
9
-
10
-
11
-
12
-
13
-
14
-
15
-
16
-
17
-
18
-
19
-
20
-
21
-
22
-
23
-
24
-
25
-
26
-
27
-
28
-
29
-
30
-
31
-
32
-
33
-
34
-
35
-
36
-
37
-
38
-
39
-
40
-
41
-
42
-
43
-
44
-
45
-
46
-
47
-
48
-
49
-
50
-
51
-
52
-
53
-
54
-
55
-
56
-
57
-
58
-
59
-
60
-
61
-
62
-
63
-
64
-
65
-
66
-
67
-
68
-
69
-
70
-
71
-
72
-
73
-
74
-
75
-
76
-
77
-
78
-
79
-
80
-
 81
81 -
 82
82 -
 83
83 -
 84
84 -
 85
85 -
 86
86 -
 87
87 -
 88
88 -
 89
89 -
 90
90 -
 91
91 -
92
-
93
-
94
-
95
-
96
-
97
-
98
-
99
-
100
-
101
-
102
-
103
-
104
-
105
-
106
-
107
-
108
-
109
-
110
-
111
-
112
-
113
-
114
-
115
-
116
-
117
-
118
-
119
-
120
-
121
-
122
-
123
-
124
-
125
-
126
 |
 |
