Denon AVR-1612 Owners Manual - Page 13
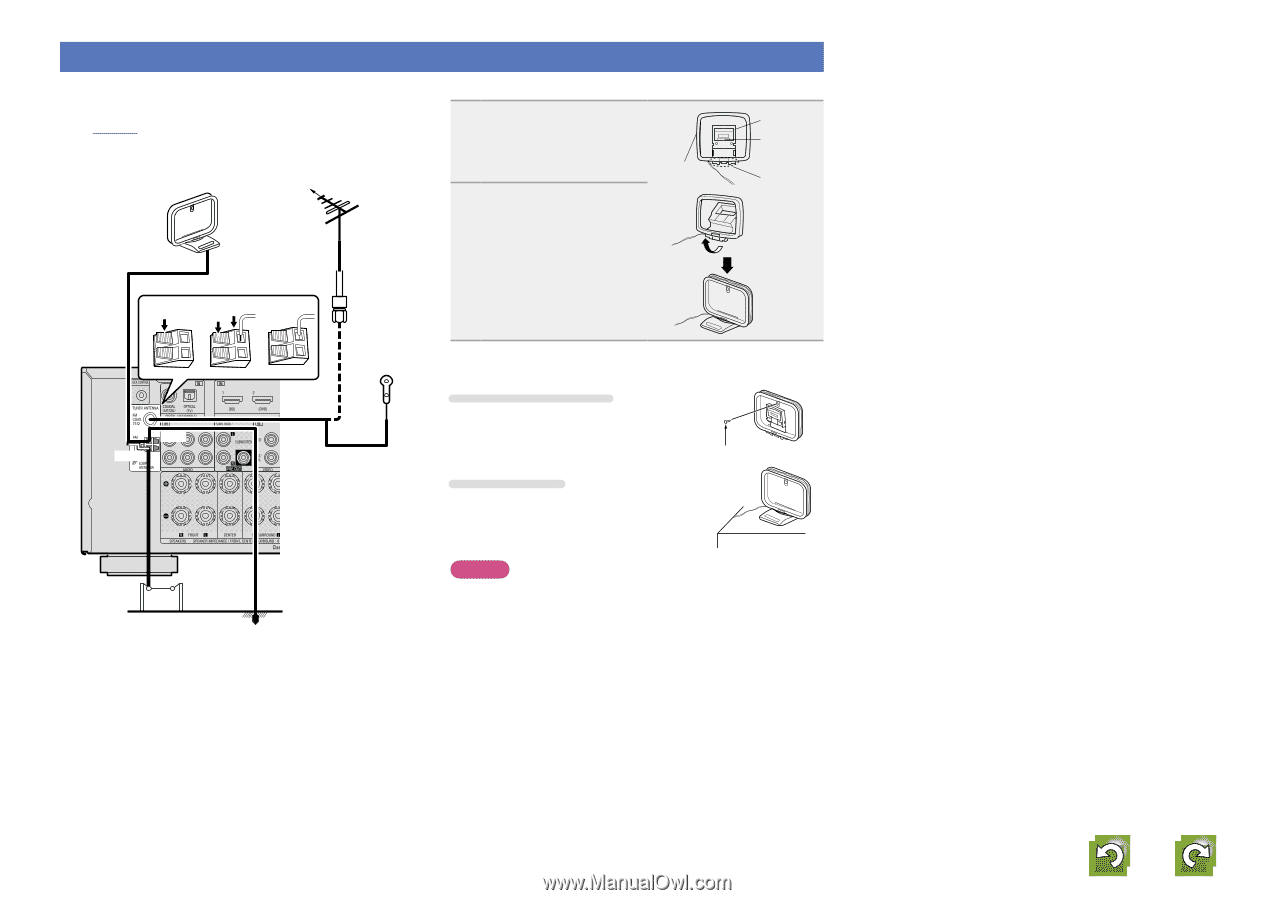
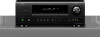
Connecting an antenna, AM loop antenna assembly, Using the AM loop antenna, Suspending on a wall
 |
UPC - 883795002028
View all Denon AVR-1612 manuals
Add to My Manuals
Save this manual to your list of manuals |
Page 13 highlights
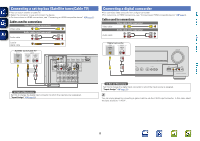
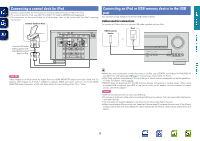
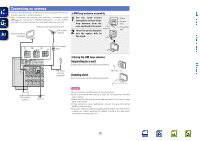
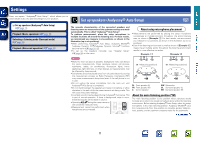
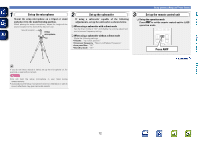
Basic version Advanced version Connecting an antenna • Connect the FM antenna or AM loop antenna supplied with the unit to enjoy listening to radio broadcasts. • After connecting the antenna and receiving a broadcast signal (vpage 25 "Listening to FM/AM broadcasts"), fix the antenna with tape in a position where the noise level becomes minimal. AM loop antenna (supplied) Direction of broadcasting station FM outdoor antenna nnAM loop antenna assembly 1 Put the stand section through the bottom of the loop antenna from the rear and bend it forward. Loop antenna 2 Insert the projecting part into the square hole in the stand. Stand Square hole Projecting part qw e Black White 75 Ω coaxial cable FM indoor antenna (supplied) nnUsing the AM loop antenna Suspending on a wall Suspend directly on a wall without assembling. Nail, tack, etc. Standing alone Use the procedure shown above to assemble. AM outdoor antenna Ground NOTE • Do not connect two FM antennas simultaneously. • Even if an external AM antenna is used, do not disconnect the AM loop antenna. • Make sure the AM loop antenna lead terminals do not touch metal parts of the panel. • If the signal has noise interference, connect the ground terminal (GND) to reduce noise. • If you are unable to receive a good broadcast signal, we recommend installing an outdoor antenna. For details, inquire at the retail store where you purchased the unit. Information 10
-
 1
1 -
2
-
3
-
4
-
5
-
6
-
7
-
 8
8 -
 9
9 -
 10
10 -
 11
11 -
 12
12 -
 13
13 -
 14
14 -
 15
15 -
 16
16 -
 17
17 -
 18
18 -
19
-
20
-
21
-
22
-
23
-
24
-
25
-
26
-
27
-
28
-
29
-
30
-
31
-
32
-
33
-
34
-
35
-
36
-
37
-
38
-
39
-
40
-
41
-
42
-
43
-
44
-
45
-
46
-
47
-
48
-
49
-
50
-
51
-
52
-
53
-
54
-
55
-
56
-
57
-
58
-
59
-
60
-
61
-
62
-
63
-
64
-
65
-
66
-
67
-
68
-
69
-
70
-
71
-
72
-
73
-
74
-
75
-
76
-
77
-
78
-
79
-
80
-
81
-
82
-
83
-
84
-
85
-
86
-
87
-
88
-
89
-
90
-
91
-
92
-
93
-
94
-
95
-
96
-
97
-
98
-
99
-
100
-
101
-
102
 |
 |