Denon DRA 395 Owners Manual
Denon DRA 395 - AV Receiver Manual
 |
UPC - 081757504614
View all Denon DRA 395 manuals
Add to My Manuals
Save this manual to your list of manuals |
Denon DRA 395 manual content summary:
- Denon DRA 395 | Owners Manual - Page 1
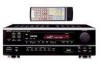
AM-FM STEREO RECEIVER DRA-395 OPERATING INSTRUCTIONS MODE D'EMPLOI B PRECISION AUDIO COMPONENT / STEREO RECEIVER DRA-395 CD PHONO TUNER CDR / TAPE VCR DVD / VDP V.AUX REMOTE SENSOR ON / STANDBY Multi Room Music Entertainment System ZONE 2 ZONE 3 SHIFT DOWN UP PRESET BAND MODE - Denon DRA 395 | Owners Manual - Page 2
user to the presence of important operating and maintenance (servicing) instructions two conditions: (1) This device may not cause harmful interference, and (2) this device must accept any interference received l'eau et la poussière. • Unplug the power cord when not using the set for long periods of - Denon DRA 395 | Owners Manual - Page 3
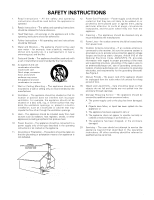
such as radiators, heat registers, stoves, or other appliances (including amplifiers) that produce heat. 10. Power Sources - The appliance should be connected to a power supply only of the type described in the operating instructions or as marked on the appliance. 11. Grounding or Polarization - Denon DRA 395 | Owners Manual - Page 4
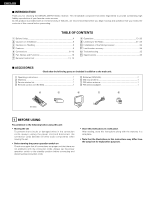
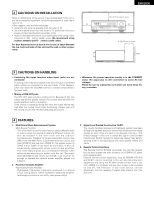
the DENON AM-FM Stereo receiver. This remarkable component has been engineered to provide outstanding high fidelity reproduction of your favorite music sources. As this product is provided with an immense array of features, we recommend that before you begin hookup and operation that you review the - Denon DRA 395 | Owners Manual - Page 5
not only the receiver but can also operate the main functions of a DENON CD player and a cassette deck. External remote control equipment, such as DENON's RC-616 and RC-617, can be connected to this unit. By connecting such equipment and using the RC-894 remote control from a sub room (ZONE 2 or - Denon DRA 395 | Owners Manual - Page 6
outlet is turned on and off in conjunction with the POWER operation switch on the main unit, and when the power is switched between on and standby from the remote control unit. No power is supplied from these outlets when this unit's power is at standby. Never connect equipment whose total capacity - Denon DRA 395 | Owners Manual - Page 7
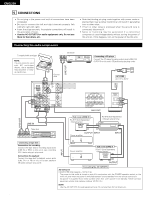
instructions of FM RCOAX. 75 L R L R ZONE 2 R L L ZONE OUT 3 MULTI ROOM R PHONO IN L CD SIGNAL GND DVD/ VDP V. AUX ZONE 2 MULTI ROOM ZONE 3 OUT DVD/ VDP IN V. AUX VCR VCR CDR/ TAPE MONITOR OUT VCR VCR OUT CDR/ TAPE IN VIDEO OUT L AUDIO ROOM TO ROOM (REMOTE CONTROL - Denon DRA 395 | Owners Manual - Page 8
FM COAX. 75 ZONE 2 R L ZONE OUT 3 MULTI ROOM R PHONO IN CD SIGNAL GND DVD/ VDP V. AUX ZONE 2 MULTI ROOM ZONE 3 OUT DVD/ VDP IN V. AUX VCR VCR CDR/ TAPE MONITOR OUT VCR VCR OUT CDR/ TAPE IN VIDEO OUT L AUDIO ROOM TO ROOM (REMOTE CONTROL connect two FM antennas simultaneously - Denon DRA 395 | Owners Manual - Page 9
stereo power when using two pairs of FM COAX. 75 ZONE 2 R L ZONE OUT 3 MULTI ROOM R PHONO IN CD SIGNAL GND DVD/ VDP V. AUX ZONE 2 MULTI ROOM ZONE 3 OUT DVD/ VDP IN V. AUX VCR VCR CDR/ TAPE MONITOR OUT VCR VCR OUT CDR/ TAPE IN VIDEO OUT L AUDIO ROOM TO ROOM (REMOTE CONTROL - Denon DRA 395 | Owners Manual - Page 10
given in parentheses ( ). @1 @0 !9 !8 !7 !6 !5 !4 !38 !2 !1 B PRECISION AUDIO COMPONENT / STEREO RECEIVER DRA-395 CD PHONO TUNER CDR / TAPE VCR DVD / VDP V.AUX REMOTE SENSOR ON / STANDBY Multi Room Music Entertainment System ZONE 2 ZONE 3 SHIFT DOWN UP PRESET BAND MODE MEMORY - Denon DRA 395 | Owners Manual - Page 11
7 meters/23 feet, but this distance will shorten or operation will become difficult if there are obstacles between the remote control unit and the remote control sensor, if the remote control sensor is exposed to direct sunlight or other strong light, or if operated from an angle. • Neon signs or - Denon DRA 395 | Owners Manual - Page 12
20) STATUS button 20) VIDEO SELECT button 19) CH VOL control buttons 15) OFF POWER ON RANDOM 6 7 8 9 REPEAT DISC SKIP 3 2 CD 1 ON MAIN OFF A / B 6 4 REC 7 3 2 0 TAPE 1 ZONE 2 ON • VOLUME OFF ª ZONE 3 MULTI ROOM ON • VOLUME OFF ª TUNER PHONO V. AUX VCR DVD / VDP - Denon DRA 395 | Owners Manual - Page 13
ZONE 3 MULTI ROOM ON • VOLUME OFF ª TUNER PHONO V. AUX VCR DVD / VDP CD • PHONO DVD / VDP PRESET CDR / TAPE ª CD VCR A SPEAKER B TUNER CDR / TAPE V. AUX DIMMER CH VOL SHIFT STATUS • VIDEO SELECT ª • • PRESET MASTER VOL ª MUTING ª B REMOTE CONTROL the power operation switch - Denon DRA 395 | Owners Manual - Page 14
the program source 1 3 B MAIN OFF 6 7 0 TAPE 1 ZONE 2 ON • VOLUME OFF ª ZONE 3 MULTI ROOM ON source to be played. EX: CD CD CD (Main unit) (Remote control unit) 2 Start playback on the selected component. For operating instructions, refer to the various components' manuals - Denon DRA 395 | Owners Manual - Page 15
ENGLISH Adjusting the CHANNEL LEVEL, TONE, and LOUDNESS control Adjust the channel levels. B 1 Select the channel whose level you want to adjust. CH VOL CH VOL 6 5 1 2, 4 3 1 2 MAIN OFF 6 7 0 TAPE 1 ZONE 2 ON • VOLUME OFF ª ZONE 3 MULTI ROOM ON • VOLUME OFF ª TUNER PHONO V. AUX - Denon DRA 395 | Owners Manual - Page 16
and ZONE 3 ROOM multi-source playback, this unit's MULTI SOURCE output can be controlled with the included remote control unit. The ZONE 2/3 mode cannot be selected from the remote control unit when the main unit is set to the REC OUT mode. With ZONE 2/3 ROOM playback, the this unit and DENON CD - Denon DRA 395 | Owners Manual - Page 17
ENGLISH Multi-Source recording/playback The Multi-Source function allows you to record a source other than the source currently playing or to output its signal to the MULTI ZONE output terminal. [1] Playing one source while recording another (REC OUT mode) B 1 Press the REC OUT button. • REC - Denon DRA 395 | Owners Manual - Page 18
2 OUT terminals can be controlled using the ZONE 2 VOLUME • and ª buttons on the remote control unit. ZONE 2 • VOLUME ª (Remote control unit) DEFAULT SETTING (MULTI VOLUME LEVEL) : - - - dB (MINIMUM) 6 When the MULTI SOURCE function is set to TUNER, the preset channel can be selected using the - Denon DRA 395 | Owners Manual - Page 19
• PRESET MASTER VOL ª MUTING ª B REMOTE CONTROL UNIT RC-894 (Main unit) (Remote control unit) The video source switches as follows each time the button is MUTING (Remote control unit) • Caution: Switching off the power of the unit will cancel the settings. The outputs of ZONE 2 and ZONE 3 - Denon DRA 395 | Owners Manual - Page 20
REMOTE CONTROL UNIT RC-894 (Main unit) (Remote control unit instructions, refer to the component's operating instructions. Simultaneous recording The signals of the source selected with the function selector button are output simultaneously to the CDR/TAPE and VCR REC OUT jacks. If a total of two - Denon DRA 395 | Owners Manual - Page 21
, D1 to D8 and E1 to E8, for a maximum of 40 stations. 4 Channel A1 is tuned in after the auto preset memory operation is completed. NOTES: • If an FM station cannot be preset automatically due to poor reception, use the "Manual tuning" operation to tune in the station, then preset it using the - Denon DRA 395 | Owners Manual - Page 22
the desired band (AM or FM). 4 Press the TUNING UP or DOWN button to tune in the desired station. The frequency changes continuously when the button is held in. NOTE: • When the manual tuning mode is set, FM stereo broadcasts are received in monaural and the "STEREO" indicator turns off. 22 - Denon DRA 395 | Owners Manual - Page 23
ª MUTING ª B REMOTE CONTROL UNIT RC-894 1 2 ENGLISH Preparations: Use the "Auto tuning" or "Manual tuning" operation to tune remote control unit. 3 Press the PRESET UP or DOWN button to select the desired preset channel (1 to 8). DOWN UP PRESET • PRESET ª (Main unit) (Remote control - Denon DRA 395 | Owners Manual - Page 24
all the button settings are reset to the default values (the values set upon shipment from the factory). 11 LAST FUNCTION MEMORY • This unit is equipped with a last function memory which stores the input and output setting conditions as they were immediately before the power is switched off. • The - Denon DRA 395 | Owners Manual - Page 25
from one channel. Positions of instruments reversed during stereo playback. Humming noise produced when record is playing. Howling noise produced when volume is high. Sound is distorted. Volume is weak. This unit does not operate properly when remote control unit is used. Cause • Power cord not - Denon DRA 395 | Owners Manual - Page 26
18 µV • General Power supply: Power consumption: Maximum external dimensions: Weight: AC 120 V, 60 Hz 3.39 A 434 (W) x 147 (H) x 417 (D) mm (17-1/16" x 5-25/32" x 16-7/16") 9.7 kg (21 lbs 6 oz) • Remote control unit (RC-894) Batteries: External dimensions: Weight: R03/AAA Type (two batteries) 64 - Denon DRA 395 | Owners Manual - Page 27
radio FM - AM stéréo DENON. Ce remarquable composant a été fabriqué pour assurer une reproduction haute fidélité remarquable de vos sources musicales câbles de connexion. • Ranger ces instructions dans un endroit sûr Après les avoir lues, ranger ces instructions en même temps que la garantie dans - Denon DRA 395 | Owners Manual - Page 28
amplifiée (PRE OUT) Les prises de sortie préamplifi DENON, peuvent être connectées à cet appareil. La connexion ce dispositif et l'utilisation de la télécommande RC-894 dans une autre pièce (ZONE 2 ou 3) permettent d'activer et de désactiver la sortie de la pièce secondaire, la sélection de la source - Denon DRA 395 | Owners Manual - Page 29
AM FM COAX. 75 PHONO IN CD SIGNAL GND L DVD/ VDP R V. AUX ZONE 2 MULTI ROOM ZONE 3 ZONE 2 VCR VCR LR L OUT VIDEO ZONE CDR/ OUT 3 TAPE IN OUT MULTI ROOM R L AUDIO ROOM TO ROOM (REMOTE CONTROL ée par l'interrupteur de mise sous tension (POWER) situé sur l'unité principale. Ces - Denon DRA 395 | Owners Manual - Page 30
aux instructions d' FM RCOAX. 75 L R L R ZONE 2 R L L ZONE OUT 3 MULTI ROOM R PHONO IN L CD SIGNAL GND DVD/ VDP V. AUX ZONE 2 MULTI ROOM ZONE 3 OUT DVD/ VDP IN V. AUX VCR VCR CDR/ TAPE MONITOR OUT VCR VCR OUT CDR/ TAPE IN VIDEO OUT L AUDIO ROOM TO ROOM (REMOTE CONTROL - Denon DRA 395 | Owners Manual - Page 31
OUT SUB WOOFER FM COAX. 75 ZONE 2 R L ZONE OUT 3 MULTI ROOM R PHONO IN CD SIGNAL GND DVD/ VDP V. AUX ZONE 2 MULTI ROOM ZONE 3 OUT DVD/ VDP IN V. AUX VCR VCR CDR/ TAPE MONITOR OUT VCR VCR OUT CDR/ TAPE IN VIDEO OUT L AUDIO ROOM TO ROOM (REMOTE CONTROL) ANTENNE EXTERIEURE - Denon DRA 395 | Owners Manual - Page 32
PRE OUT SUB WOOFER FM COAX. 75 ZONE 2 R L ZONE OUT 3 MULTI ROOM R PHONO IN CD SIGNAL GND DVD/ VDP V. AUX ZONE 2 MULTI ROOM ZONE 3 OUT DVD/ VDP IN V. AUX VCR VCR CDR/ TAPE MONITOR OUT VCR VCR OUT CDR/ TAPE IN VIDEO OUT L AUDIO ROOM TO ROOM (REMOTE CONTROL) SPEAKER SYSTEMS - Denon DRA 395 | Owners Manual - Page 33
entretien DENON. STEREO RECEIVER DRA-395 CD PHONO TUNER CDR / TAPE VCR DVD / VDP V.AUX REMOTE SENSOR ON / STANDBY Multi Room Music Entertainment System ZONE 2 ZONE ZONE 2, 3 41) !9 Capteur de télécommande (REMOTE SENSOR 34) @0 Témoin d'alimentation 36) @1 Touches de sélection de source - Denon DRA 395 | Owners Manual - Page 34
FRANCAIS 7 UNITE DE TELECOMMANDE En suivant la procédure expliquée ci-dessous, insérer les piles avant d'utiliser la télécommande. Plage d'utilisation de la télécommande B Approx. 7 m/23 pieds 30° 30° B Diriger la télécommande vers le détecteur de télécommande de la manière indiquée sur le - Denon DRA 395 | Owners Manual - Page 35
ZONE 3 MULTI ROOM ON • VOLUME OFF ª TUNER PHONO V. AUX VCR DVD / VDP CD • PHONO DVD / VDP PRESET CDR / TAPE ª CD VCR A SPEAKER B TUNER CDR / TAPE V. AUX DIMMER CH VOL SHIFT STATUS • VIDEO SELECT ª • • PRESET MASTER VOL ª MUTING ª B REMOTE CONTROL UNIT RC-894 Touches POWER - Denon DRA 395 | Owners Manual - Page 36
VOLUME OFF ª ZONE 3 MULTI ROOM ON • VOLUME OFF ª TUNER PHONO V. AUX VCR DVD / VDP CD • PHONO DVD / VDP PRESET CDR / TAPE ª CD VCR A SPEAKER B TUNER CDR / TAPE V. AUX DIMMER CH VOL SHIFT STATUS • VIDEO SELECT ª • • PRESET MASTER VOL ª MUTING ª B REMOTE CONTROL UNIT RC-894 - Denon DRA 395 | Owners Manual - Page 37
MASTER VOL ª MUTING ª B REMOTE CONTROL UNIT RC-894 1 3 FRANCAIS 1 Appuyer sur la touche de la source de programme à reproduire. EX: CD CD CD (Unité principale) (Unité de télécommande) 2 Commencer la lecture sur le composant sélectionné. Pour les instructions d'utilisation, se reporter - Denon DRA 395 | Owners Manual - Page 38
VOLUME OFF ª ZONE 3 MULTI ROOM ON • VOLUME OFF ª TUNER PHONO V. AUX VCR DVD / VDP CD • PHONO DVD / VDP PRESET CDR / TAPE ª CD VCR A SPEAKER B TUNER CDR / TAPE V. AUX DIMMER CH VOL SHIFT STATUS • VIDEO SELECT ª • • PRESET MASTER VOL ª MUTING ª B REMOTE CONTROL UNIT RC-894 - Denon DRA 395 | Owners Manual - Page 39
-616 B DRA-395 SYSTEME D'ENCEINTE-B TELECOMMANDE DE SYSTEME UNIT RC-894 RC-617 TV AMPLIFICATEUR RC-894 (ou TELECOMMANDE PROGRAMMABLE RC-8000) Ligne de commande de SYSTEME DE TELECOMMANDE DE PIECE A PIECE (vendu séparément) Câble de signal MULTI SOURCE AUDIO Câble de signal MULTI SOURCE VIDEO (75 - Denon DRA 395 | Owners Manual - Page 40
s'éteint et le mode REC OUT de cet appareil est annulé. REMARQUES: • Les signaux de la source sélectionnée en mode REC OUT sont également envoyés des bornes de sortie ZONE2 et ZONE3. (Il y a une sortie lorsque ZONE 2 et ZONE 3 sont activées.) • Lorsque le mode REC OUT est réglé et les deux modes - Denon DRA 395 | Owners Manual - Page 41
5 Le niveau de sortie des bornes ZONE 2 OUT peut être contrôlé à l'aide des touches ZONE 2 VOLUME • et ª de la télécommande. ZONE 2 • VOLUME ª (Unité de télécommande) REGLAGE PAR DEFAUT (MULTI VOLUME LEVEL) : - - - dB (MINIMUM) 6 Lorsque MULTI SOURCE (multi-source) fonction est réglée sur TUNER - Denon DRA 395 | Owners Manual - Page 42
ª MUTING ª B REMOTE CONTROL UNIT RC-894 1 Ecoute avec casque B (Unité principale) (Unité de télécommande) La source vidéo change de la mise hors tension de l'appareil permet d'annuler les réglages. Les sorties de ZONE 2 et ZONE 3 ne sont pas coupées. 1 Connecter le casque à la prise casque - Denon DRA 395 | Owners Manual - Page 43
• VIDEO SELECT ª • • PRESET MASTER VOL ª MUTING ª B REMOTE CONTROL UNIT RC-894 1 Affichage du panneau avant • Les descriptions de fonctionnement de Pour les instructions, se rapporter aux instructions d'utilisation de l'appareil. Enregistrement simultané Les signaux de la source sélectionn - Denon DRA 395 | Owners Manual - Page 44
préréglée automatique. 2 VALEUR PAR DEFAUT AUTO TUNER PRESETS A1 ~ A8 B1 ~ B8 C1 ~ C8 D1 ~ D8 E1 ~ E8 REMARQUES: • Si une station FM ne peut pas être automatiquement préréglée à cause d'une mauvaise réception, utiliser l'opération de "Syntonisation manuelle" pour syntoniser la station, puis la pr - Denon DRA 395 | Owners Manual - Page 45
automatique commence, puis s'arrête lorsqu'une station est syntonisée. REMARQUE: • Tout en étant en mode de syntonisation automatique sur la bande FM, le témoin "STEREO" s'allume sur l'affichage lorsqu'une émission stéréo est syntonisée. Aux fréquences ouvertes, le bruit est mis en sourdine et les - Denon DRA 395 | Owners Manual - Page 46
Mémoire préréglée 2 3 1, 4 B ª A SPEAKER B TUNER CDR / TAPE V. AUX DIMMER CH VOL SHIFT STATUS • VIDEO SELECT ª • • PRESET MASTER VOL ª MUTING ª B REMOTE CONTROL UNIT RC-894 2 3 Rappel de stations préréglées 12 B 46 ª A SPEAKER B TUNER CDR / TAPE V. AUX DIMMER CH VOL SHIFT STATUS - Denon DRA 395 | Owners Manual - Page 47
FRANCAIS 10 INITIALISATION DU MICROPROCESSEUR Lorsque l'indication de l'affichage est anormale ou quand l'utilisation de l'appareil ne donne pas les résultats escomptés, le microprocesseur doit être initialisé en suivant la procédure suivante. B 1 Eteindre l'appareil et retirer le cordon CA de la - Denon DRA 395 | Owners Manual - Page 48
le cordon d'alimentation et contacter le revendeur. Problèmes communs se présentant lors de l'écoute de disques compacts, disques, cassettes et d'émissions FM, etc. Symptôme Affichage pas allumé et aucun son n'est produit lorsque l'appareil est allumé. Affichage allumé mais aucun son n'est produit - Denon DRA 395 | Owners Manual - Page 49
FRANCAIS 13 SPECIFICATIONS • Section audio (Amplificateur de puissance) Puissance de sortie nominale: Bornes totale [FM] (Remarque: µV à 75 Ω/ohms, 0 dBf = 1 x 10-15 W) 87,5 MHz à 107,9 MHz 1,4 µV (14,2 dBf) MONO 2,8 µV (20,2 dBf) STEREO 23 µV (38,5 dBf) MONO 80 dB (IHF-A chargée) STEREO 75 - Denon DRA 395 | Owners Manual - Page 50
14-14, AKASAKA 4-CHOME, MINATO-KU, TOKYO 107-8011, JAPAN Telephone: (03) 3584-8111 Printed in China 511 3791 007
-
 1
1 -
 2
2 -
 3
3 -
 4
4 -
 5
5 -
 6
6 -
 7
7 -
8
-
9
-
10
-
11
-
12
-
13
-
14
-
15
-
16
-
17
-
18
-
19
-
20
-
21
-
22
-
23
-
24
-
25
-
26
-
27
-
28
-
29
-
30
-
31
-
32
-
33
-
34
-
35
-
36
-
37
-
38
-
39
-
40
-
41
-
42
-
43
-
44
-
45
-
46
-
47
-
48
-
49
-
50
 |
 |

AM-FM STEREO RECEIVER
DRA
-
395
OPERATING INSTRUCTIONS
MODE D’EMPLOI
VOLUME LEVEL
B
DRA-395
PRECISION AUDIO COMPONENT / STEREO RECEIVER
PHONES
ON / STANDBY
SPEAKER
A
B
TONE
DEFEAT
TREBLE
SELECT
UP
TUNING
MODE
BAND
MEMORY
VIDEO SELECT
DIMMER
STATUS
SHIFT
DOWN
UP
PRESET
DOWN
MASTER VOLUME
UP
DOWN
PHONO
DVD / VDP
VCR
CD
TUNER
V.AUX
ON / STANDBY
REMOTE
SENSOR
ZONE 2
REC OUT
ZONE 3
SELECT
LOUDNESS
BASS
CH VOL
CDR / TAPE
Music Entertainment System
M
ulti Room
ZONE 2
ZONE 3
REC / MULTI
POWER
OFF
ON
RANDOM
DISC SKIP
+
REPEAT
REC
A / B
MAIN
VOLUME
VOLUME
DVD / VDP
VCR
V. AUX
PHONO
TUNER
CD
CDR / TAPE
PHONO
DVD / VDP
CD
VCR
PRESET
SPEAKER
A
B
CDR / TAPE
V. AUX
TUNER
DIMMER
CH VOL
STATUS
VIDEO SELECT
SHIFT
MUTING
MASTER VOL
PRESET
REMOTE CONTROL UNIT
RC-894
B
1
2
2
3
4
3
9
8
7
6
1
0
7
6
ZONE 2
ZONE 3
CD
TAPE
MULTI ROOM
•
ª
•
ª
•
ª
•
ª
•
ª
•
ª
ON
OFF
ON
OFF
ON
OFF
“SERIAL NO.
PLEASE RECORD UNIT SERIAL NUMBER ATTACHED TO
THE REAR OF THE CABINET FOR FUTURE REFERENCE”
2
We greatly appreciate your purchase of this unit.
2
To be sure you take maximum advantage of all the
features this unit has to offer, read these instructions
carefully and use the set properly. Be sure to keep this
manual for future reference should any questions or
problems arise.
“NO. DE SERIE
PRIERE DE NOTER LE NUMERO DE SERIE DE L’APPAREIL
INSCRIT A L’ARRIERE DU COFFRET DE FAÇON A POUVOIR LE
CONSULTER EN CAS DE PROBLEME.”
2
Nous vous remercions pour l’achat de cet appareil.
2
Pour être sûr de profiter au maximum de toutes les
caractéristiques qu’offre cet appareil, lire avec soin ces
instructions et bien utiliser l’appareil. Toujours
conserver ce mode d’emploi pour s’y référer
ultérieurement en cas de question ou de problème.
FOR ENGLISH READERS
PAGE
0
2
~
PAGE
26
POUR LES LECTEURS FRANCAIS
PAGE
2, 27
~
PAGE 49