Electrolux E30DF74TPS Installation Instructions English
Electrolux E30DF74TPS Manual
 |
View all Electrolux E30DF74TPS manuals
Add to My Manuals
Save this manual to your list of manuals |
Electrolux E30DF74TPS manual content summary:
- Electrolux E30DF74TPS | Installation Instructions English - Page 1
Note to the Consumer 1. Keep these instructions with your owner's guide for future reference. 2. When using any appliance generating heat, there are safety precautions you must follow. These precautions are explained in your Use and Care manual. Read your manual carefully. 3. Be sure your appliance - Electrolux E30DF74TPS | Installation Instructions English - Page 2
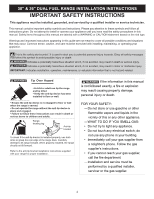
30" & 36" DUAL FUEL RANGE INSTALLATION INSTRUCTIONS IMPORTANT SAFETY INSTRUCTIONS This appliance must be installed, grounded, and serviced by a qualified installer or service technician. This manual contains important safety symbols and instructions. Please pay attention to these symbols and follow - Electrolux E30DF74TPS | Installation Instructions English - Page 3
by an independent test laboratory for use in combination with each other. IMPORTANT INSTRUCTIONS FOR UNPACKING AND INSTALLATION Read and follow the below instructions and precautions for unpacking, installing, and servicing your appliance: • Destroy the carton and plastic bags after unpacking the - Electrolux E30DF74TPS | Installation Instructions English - Page 4
installing the kit be sure to read the L.P. Installation Instructions and follow them carefully when making the installation. • Do not repair or replace any part of the appliance unless specifically recommended in the manuals. All other servicing should be done only by a qualified technician. This - Electrolux E30DF74TPS | Installation Instructions English - Page 5
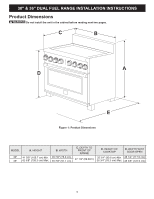
30" & 36" DUAL FUEL RANGE INSTALLATION INSTRUCTIONS Product Dimensions Do not install the unit in the cabinet before reading next two pages. C B A D E Figure 1: Product Dimensions MODEL A. HEIGHT B. WIDTH 30" 41 5/8" (105.7 cm) - Electrolux E30DF74TPS | Installation Instructions English - Page 6
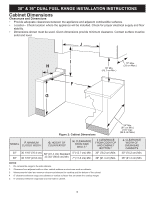
30" & 36" DUAL FUEL RANGE INSTALLATION INSTRUCTIONS Cabinet Dimensions Clearances and Dimensions • Provide adequate clearances between the appliance and adjacent combustible surfaces. • Location - Check location where the appliance will be installed. Check - Electrolux E30DF74TPS | Installation Instructions English - Page 7
connections and grounding may result in electric shock, damage to the appliance, personal injury, fire or death. Center Line of Range Follow instructions for the type of installation you have Figure 3: Cabinet construction 1.1 Installation: Cabinet on Both Sides 1. If range will be installed with - Electrolux E30DF74TPS | Installation Instructions English - Page 8
30" & 36" DUAL FUEL RANGE INSTALLATION INSTRUCTIONS 3 Power Supply Cord Recommended Wall Outlet Installation Locations different power cord to the appliance. If the wall outlet is not sufficient to support the requirements of this appliance, it is the responsibility of the consumer to have - Electrolux E30DF74TPS | Installation Instructions English - Page 9
this appliance and is located on the lower REAR (back side) panel of the range. Before installing the kit be sure to read the L.P. Installation Instructions and follow them carefully when making the installation. For LP/Propane gas, the regulator must be set for 10"(25.4 cm) water column (2.5 kPa - Electrolux E30DF74TPS | Installation Instructions English - Page 10
INSTRUCTIONS 5 Connect Fuel Supply 5.1 Fuel Supply Connection This appliance must be installed, grounded, and serviced by a qualified installer or service range from the gas supply piping system by closing its individual manual shutoff valve during any pressure testing of the gas supply piping - Electrolux E30DF74TPS | Installation Instructions English - Page 11
30" & 36" DUAL FUEL RANGE INSTALLATION INSTRUCTIONS 6 Install the Oven Racks 6.1 30" Models - Ladder Rack Supports To aid installation of the porcelain oven rack supports, apply a thin layer of cooking oil to all the prongs of the supports as shown in Figure 12. 6.2 30" Models - Glide Racks The - Electrolux E30DF74TPS | Installation Instructions English - Page 12
" & 36" DUAL FUEL RANGE INSTALLATION INSTRUCTIONS 6.3 36" Models - Ladder Rack Supports 1. Remove the thumb screws located on the glide tracks. Repeat for the top set of glides. Figure 17: Ladder rack supports 3. Replace the screws removed in Step 1. Figure 19: Installing glide racks The glide - Electrolux E30DF74TPS | Installation Instructions English - Page 13
30" & 36" DUAL FUEL RANGE INSTALLATION INSTRUCTIONS 7 Level the Range Level the range and set cooktop height before installation in the cut-out opening (if applicable). 3. Level the range, if necessary, by - Electrolux E30DF74TPS | Installation Instructions English - Page 14
wall when the range is moved. • Do not operate the range without the anti-tip device in place and engaged. • Failure to follow these instructions can result in death or serious burns to children and adults. Range leveling leg Anti-tip bracket 8.1 Locate the Bracket Using the Template Bracket may - Electrolux E30DF74TPS | Installation Instructions English - Page 15
30" & 36" DUAL FUEL RANGE INSTALLATION INSTRUCTIONS 8.2 Drill Pilot Holes and Fasten Bracket Drill a 1/8" pilot hole where screws are to be located. If bracket is to be mounted to the wall, drill - Electrolux E30DF74TPS | Installation Instructions English - Page 16
30" & 36" DUAL FUEL RANGE INSTALLATION INSTRUCTIONS 9 Install Burner Assemblies To prevent flare-ups use the cooktop with all burner caps properly installed. 9.1 Standard Sealed Burners Place a burner cap on each burner - Electrolux E30DF74TPS | Installation Instructions English - Page 17
30" & 36" DUAL FUEL RANGE INSTALLATION INSTRUCTIONS 9.3 Check Ignition on Surface Burners Operation of electric igniters should be checked after range and supply line connectors have been carefully checked for leaks and - Electrolux E30DF74TPS | Installation Instructions English - Page 18
the model and serial numbers ready. (Figure 31). Figure 31: Model, serial number location Before You Call for Service Read the Avoid Service Checklist and operating instructions in your Owner's Guide. It may save you time and expense. The list includes common occurrences that are not the result of - Electrolux E30DF74TPS | Installation Instructions English - Page 19
utilizar cualquier aparato que genere calor hay algunas precauciones que deberá seguir. Estas precauciones se detallan en su manual de uso y cuidados. Lea atentamente su manual. 3. Asegúrese de que su dispositivo sea instalado y conectado a tierra por un instalador cualificado o técnico de servicio - Electrolux E30DF74TPS | Installation Instructions English - Page 20
mismo. No trate de instalar ni hacer funcionar su producto antes de leer las precauciones de seguridad de este manual. Las indicaciones de seguridad en este manual llevan un símbolo de ADVERTENCIA o PRECAUCIÓN en función del tipo de riesgo. Las advertencias e instrucciones importantes que aparecen - Electrolux E30DF74TPS | Installation Instructions English - Page 21
INSTRUCCIONES DE INSTALACIÓN DE ESTUFA DE COMBUSTIBLE DUAL DE 30" Y 36" ADVERTENCIA • Peligro de peso excesivo: Son necesarias dos o más personas para mover e instalar la estufa. No seguir esta instrucción puede provocar lesiones de espalda o de otro tipo. • Almacenamiento dentro o sobre el - Electrolux E30DF74TPS | Installation Instructions English - Page 22
licencia de Massachusetts. Al utilizar un conector de gas flexible, no deberá superar los 3 pies (36 pulgadas) de longitud. Deberá instalarse una válvula manual de gas con manija tipo "T" en la línea de suministro de gas al dispositivo. CONVERSIÓN A GAS LP Este electrodoméstico permite la conversi - Electrolux E30DF74TPS | Installation Instructions English - Page 23
INSTRUCCIONES DE INSTALACIÓN DE ESTUFA DE COMBUSTIBLE DUAL DE 30" Y 36" Dimensiones del producto ADVERTENCIA No instale la unidad en el armario antes de leer las dos páginas siguientes. C B A D E Figura 1: Dimensiones del producto MODELO 30" 36" A. ALTO 41 5/8" (105,7 cm) Mín. 42 5/8" (108,3 - Electrolux E30DF74TPS | Installation Instructions English - Page 24
INSTRUCCIONES DE INSTALACIÓN DE ESTUFA DE COMBUSTIBLE DUAL DE 30" Y 36" Dimensiones del armario Separaciones y dimensiones • Deje una separación adecuada entre el electrodoméstico y las superficies combustibles adyacentes. • Ubicación: compruebe la ubicación en la que se instalará el electrodomé - Electrolux E30DF74TPS | Installation Instructions English - Page 25
INSTRUCCIONES DE INSTALACIÓN DE ESTUFA DE COMBUSTIBLE DUAL DE 30" Y 36" 1 Construcción del armario ATENCIÓN Para eliminar riesgo de quemaduras o incendio por contacto con las unidades de la superficie caliente, no deje espacio de almacenamiento en armarios sobre la estufa. Si hay espacio de - Electrolux E30DF74TPS | Installation Instructions English - Page 26
INSTRUCCIONES DE INSTALACIÓN DE ESTUFA DE COMBUSTIBLE DUAL DE 30" Y 36" 3 Cable de la fuente de alimentación Ubicaciones recomendadas para la instalación de tomacorrientes La ubicación sugerida para la tomacorriente se muestra en la Figura 4 para modelos de 30" y en la Figura 5 para modelos de 36". - Electrolux E30DF74TPS | Installation Instructions English - Page 27
INSTRUCCIONES DE INSTALACIÓN DE ESTUFA DE COMBUSTIBLE DUAL DE 30" Y 36" 4 Requisitos del suministro de combustible Esta unidad está diseñada para operar con columna de agua de 4"(10,16 cm) con presión de colector de gas natural de (1,0 kPa). Un regulador de presión convertible se conecta al - Electrolux E30DF74TPS | Installation Instructions English - Page 28
psig (columna de agua de 3,5 kPa o 14" (35,56 cm)). 3. Aísle la estufa del sistema de tuberías de suministro de gas cerrando la válvula manual de cierre individual durante las pruebas del sistema de tuberías de suministro de gas a presiones iguales o inferiores a 1/2 psig (columna de agua de 3,5 kPa - Electrolux E30DF74TPS | Installation Instructions English - Page 29
INSTRUCCIONES DE INSTALACIÓN DE ESTUFA DE COMBUSTIBLE DUAL DE 30" Y 36" 6 Instale las rejillas de horno 6.1 Modelos de 30" - Soportes de rejilla en escalera Para ayudar en la instalación de los soportes de rejillas de horno de porcelana, aplique una ligera capa de aceite de cocinar a todos los - Electrolux E30DF74TPS | Installation Instructions English - Page 30
INSTRUCCIONES DE INSTALACIÓN DE ESTUFA DE COMBUSTIBLE DUAL DE 30" Y 36" 6.3 Modelos de 36" - Soportes de rejilla en escalera 1. Saque los tornillos de pulgar situados a cada lado de la cavidad del horno (ver Figura 16). Figura 16: Tornillo de pulgar de rejilla de escalera 2. Coloque las rejillas de - Electrolux E30DF74TPS | Installation Instructions English - Page 31
INSTRUCCIONES DE INSTALACIÓN DE ESTUFA DE COMBUSTIBLE DUAL DE 30" Y 36" 7 Nivele la estufa Nivele la estufa y ajuste la altura de la cubierta antes de la instalación en la abertura recortada (en su caso). 3. En su caso, nivele la estufa ajustando las cuatro patas niveladoras con una llave inglesa - Electrolux E30DF74TPS | Installation Instructions English - Page 32
INSTRUCCIONES DE INSTALACIÓN DE ESTUFA DE COMBUSTIBLE DUAL DE 30" Y 36" 8 Instale el soporte antivuelco ADVERTENCIA Para reducir el riesgo de vuelco del aparato, este debe fijarse al suelo mediante el soporte antivuelco adecuadamente instalado con sus tornillos, incluidos con la estufa. Estas - Electrolux E30DF74TPS | Installation Instructions English - Page 33
INSTRUCCIONES DE INSTALACIÓN DE ESTUFA DE COMBUSTIBLE DUAL DE 30" Y 36" 8.2 Perfore los orificios y fije el soporte Perfore un orificio piloto de 1/8" donde vayan a situarse los tornillos. Si se va a montar el soporte en la pared, taladre un orificio piloto con un ángulo aproximado de 20°. Si se va - Electrolux E30DF74TPS | Installation Instructions English - Page 34
INSTRUCCIONES DE INSTALACIÓN DE ESTUFA DE COMBUSTIBLE DUAL DE 30" Y 36" 9 Instale los conjuntos de quemador ATENCIÓN Para evitar explosiones, utilice la cubierta con todas las tapas de los quemadores adecuadamente instaladas. 9.1 Quemadores sellados estándar Coloque una tapa de quemador en cada - Electrolux E30DF74TPS | Installation Instructions English - Page 35
INSTRUCCIONES DE INSTALACIÓN DE ESTUFA DE COMBUSTIBLE DUAL DE 30" Y 36" 9.3 Compruebe la ignición en los quemadores de la superficie Compruebe el funcionamiento de los encendedores después de haber comprobado cuidadosamente si hay pérdidas en los conectores de la línea de suministro y de conectar - Electrolux E30DF74TPS | Installation Instructions English - Page 36
INSTRUCCIONES DE INSTALACIÓN DE ESTUFA DE COMBUSTIBLE DUAL DE 30" Y 36" 10 Compruebe el funcionamiento del horno 11 Después de la instalación Cuando se han completado todas las conexiones Consulte la guía de uso y cuidados incluida con la estufa para ver las instrucciones de funcionamiento y de - Electrolux E30DF74TPS | Installation Instructions English - Page 37
support antibasculement fourni avec l'appareil ménager doit être installé. 4. Observer tous les codes et règlements applicables. 5. S'assurer de laisser ces instructions avec le consommateur. Remarque importante pour le consommateur 1. Conserver ces instructions avec votre guide de service. Imprim - Electrolux E30DF74TPS | Installation Instructions English - Page 38
service. Ce manuel contient des symboles et des instructions de sécurité importants. Veuillez porter attention à ces symboles et suivre toutes les instructions les instructions importantes qui apparaissent dans ce guide ne ère Support antirenversement Pour vérifier si le support anti-renversement - Electrolux E30DF74TPS | Installation Instructions English - Page 39
pour déplacer et installer la cuisinière. Ne pas suivre ces instructions peut causer des blessures au dos ou autres blessures. • Rangement les pieds de mise à niveau, les panneaux, les couvre-fils, les supports/vis antibasculement, ou toute autre pièce de l'appareil. Installation appropriée - - Electrolux E30DF74TPS | Installation Instructions English - Page 40
CUISINIÈRE BI-ÉNERGIE 30 po & 36 po INSTRUCTIONS D'INSTALLATION INSTRUCTIONS SPÉCIALES POUR LES APPAREILS INSTALLÉS DANS L'ÉTAT DU MASSACHUSETTS INSTRUCTIONS IMPORTANTES POUR LE SERVICE ET L'ENTRETIEN Cet appareil peut être installé uniquement dans l'État du Massachusetts par un plombier autorisé - Electrolux E30DF74TPS | Installation Instructions English - Page 41
CUISINIÈRE BI-ÉNERGIE 30 po & 36 po INSTRUCTIONS D'INSTALLATION Dimensions du produit Ne pas installer l'unité dans la carrosserie avant d'avoir lu les deux prochaines pages. C B A D E Figure 1 : Dimensions du produit MODÈLE A. HAUTEUR B. - Electrolux E30DF74TPS | Installation Instructions English - Page 42
CUISINIÈRE BI-ÉNERGIE 30 po & 36 po INSTRUCTIONS D'INSTALLATION Dimensions de la carrosserie Dégagements et dimensions • S'assurer d'avoir des dégagements adéquats entre l'appareil et les surfaces combustibles adjacentes. • Emplacement - Vérifier l'emplacement où l'appareil - Electrolux E30DF74TPS | Installation Instructions English - Page 43
centrale de la cuisinière 3. Installer les supports antibasculement (voir « Installer le support antibasculement »). 2 Exigences électriques Risque de mis à la terre et entretenu par un technicien qualifié. Suivre les instructions pour Aux États-Unis, installer en conformité avec le National Fuel - Electrolux E30DF74TPS | Installation Instructions English - Page 44
CUISINIÈRE BI-ÉNERGIE 30 po & 36 po INSTRUCTIONS D'INSTALLATION 3 Cordon d'alimentation Emplacements recommandés pour d'alimentation différent à l'appareil. Si la prise murale n'est pas suffisante pour supporter les exigences de cet appareil, il est de la responsabilité du consommateur d'avoir la - Electrolux E30DF74TPS | Installation Instructions English - Page 45
et est située sur le panneau ARRIÈRE inférieur (côté arrière) de la cuisinière. Avant d'installer la trousse, s'assurer de lire les Instructions d'installation PL et les suivre méticuleusement lors de l'installation. Pour le gaz PL/Propane, le régulateur doit être réglé pour une pression d'admission - Electrolux E30DF74TPS | Installation Instructions English - Page 46
RE BI-ÉNERGIE 30 po & 36 po INSTRUCTIONS D'INSTALLATION 5 Connecter l'alimentation en combustion 5.1 Connexion de l'alimentation en combustion Cet appareil doit être installé, mis à la terre et entretenu par un installateur qualifié ou par un technicien de service. Ne pas trop serrer les connexions - Electrolux E30DF74TPS | Installation Instructions English - Page 47
30 po & 36 po INSTRUCTIONS D'INSTALLATION 6 Installer les grilles du four 6.1 Modèles 30 po - Supports latéraux de grilles Pour faciliter l'installation des supports de grilles du four en porcelaine, appliquer une mince couche d'huile à cuisson à toutes les dents des supports tel qu'illustré dans - Electrolux E30DF74TPS | Installation Instructions English - Page 48
ÈRE BI-ÉNERGIE 30 po & 36 po INSTRUCTIONS D'INSTALLATION 6.3 Modèles 36 po - Supports latéraux de grilles 1. Enlever les vis four sur les rails de glissement. Répéter pour les glisseurs du haut. Figure 17 : Supports Grille latérale 3. Remettre les vis enlevées dans l'Étape 1. 6.4 Modèles 36 - Electrolux E30DF74TPS | Installation Instructions English - Page 49
CUISINIÈRE BI-ÉNERGIE 30 po & 36 po INSTRUCTIONS D'INSTALLATION 7 Mettre la cuisinière de niveau Mettre de niveau la cuisinière et définir la hauteur de la surface de cuisson avant l'installation dans l' - Electrolux E30DF74TPS | Installation Instructions English - Page 50
essayez doucement de faire basculer la cuisinière vers l'avant. Lorsque le support est correctement installé, la cuisinière ne doit pas basculer vers l'avant. Reportez-vous aux instructions d'installation du support anti-renversement fournies avec la cuisinière pour vous assurer que l'installation - Electrolux E30DF74TPS | Installation Instructions English - Page 51
30 po & 36 po INSTRUCTIONS D'INSTALLATION 8.2 Percer des trous de guidage et serrer le support Percer un trou de guidage de 1/8 po là où les vis sont situées. Si un support doit être monté au mur, percer un trou de guidage à un angle vers le bas d'environ 20°. Si le support doit être monté sur - Electrolux E30DF74TPS | Installation Instructions English - Page 52
CUISINIÈRE BI-ÉNERGIE 30 po & 36 po INSTRUCTIONS D'INSTALLATION 9 Installer les assemblages de brûleur Pour empêcher les embrasements utiliser la surface de cuisson avec tous les couvercles de brûleur installés - Electrolux E30DF74TPS | Installation Instructions English - Page 53
CUISINIÈRE BI-ÉNERGIE 30 po & 36 po INSTRUCTIONS D'INSTALLATION 9.3 Vérifier l'allumage sur les brûleurs de surface Le fonctionnement des allumeurs électriques devrait être vérifié après que la cuisinière et les connecteurs - Electrolux E30DF74TPS | Installation Instructions English - Page 54
). Figure 31 : Emplacement du numéro de modèle et de série Avant d'appeler pour du service Lire la Liste de vérification pour éviter le service et les instructions de fonctionnement dans votre Guide du propriétaire. Ceci peut vous sauver du temps et des dépenses. La liste inclut les circonstances - Electrolux E30DF74TPS | Installation Instructions English - Page 55
- Electrolux E30DF74TPS | Installation Instructions English - Page 56
-
 1
1 -
 2
2 -
 3
3 -
 4
4 -
 5
5 -
 6
6 -
 7
7 -
8
-
9
-
10
-
11
-
12
-
13
-
14
-
15
-
16
-
17
-
18
-
19
-
20
-
21
-
22
-
23
-
24
-
25
-
26
-
27
-
28
-
29
-
30
-
31
-
32
-
33
-
34
-
35
-
36
-
37
-
38
-
39
-
40
-
41
-
42
-
43
-
44
-
45
-
46
-
47
-
48
-
49
-
50
-
51
-
52
-
53
-
54
-
55
-
56
 |
 |
1
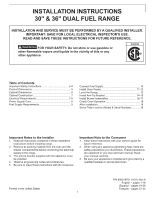
INSTALLATION INSTRUCTIONS
30" & 36" DUAL FUEL RANGE
P/N 809018701 (1611) Rev.A
English – pages 1-18
Español – pages 19-36
Français – pages 37-54
Printed in the United States
Table of Contents
Important Safety Instructions
.......................................
2-4
Product Dimensions
.......................................................
5
Cabinet Dimensions
.......................................................
6
Cabinet Construction
......................................................
7
Electrical Requirements
...............................................
7-8
Power Supply Cord
.........................................................
8
Fuel Supply Requirements
.............................................
9
Connect Fuel Supply
....................................................
10
Install Oven Racks
...................................................
11-12
Level the Range
...........................................................
13
Install Anti-Tip Bracket
.............................................
14-15
Install Burner Assemblies
........................................
16-17
Check Oven Operation
.................................................
18
After Installation
............................................................
18
Serial Plate Location (Model & Serial Number)
............
18
Important Notes to the Installer
1.
Read all instructions contained in these installation
instructions before installing range.
2.
Remove all packing material from the oven and the
drawer compartments before connecting the electrical
supply to the range.
3.
The anti-tip bracket supplied with the appliance must
be installed.
4.
Observe all governing codes and ordinances.
5.
Be sure to leave these instructions with the consumer.
INSTALLATION AND SERVICE MUST BE PERFORMED BY A QUALIFIED INSTALLER.
IMPORTANT: SAVE FOR LOCAL ELECTRICAL INSPECTOR'S USE.
READ AND SAVE THESE INSTRUCTIONS FOR FUTURE REFERENCE.
FOR YOUR SAFETY: Do not store or use gasoline or
other flammable vapors and liquids in the vicinity of this or any
other appliance.
Canada
Important Note to the Consumer
1.
Keep these instructions with your owner's guide for
future reference.
2.
When using any appliance generating heat, there are
safety precautions you must follow. These precautions
are explained in your Use and Care manual. Read
your manual carefully.
3.
Be sure your appliance is installed and grounded by a
qualified installer or service technician.