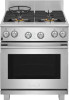
Electrolux E30DF74TPS Installation Instructions English - Page 11
Install the Oven Racks
 |
View all Electrolux E30DF74TPS manuals
Add to My Manuals
Save this manual to your list of manuals |
Page 11 highlights
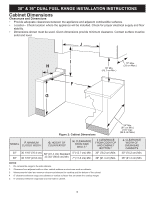
30" & 36" DUAL FUEL RANGE INSTALLATION INSTRUCTIONS 6 Install the Oven Racks 6.1 30" Models - Ladder Rack Supports To aid installation of the porcelain oven rack supports, apply a thin layer of cooking oil to all the prongs of the supports as shown in Figure 12. 6.2 30" Models - Glide Racks The glide racks install like other oven racks. The glide rack stop (Figure 15) must be inside the ladder support for the rack to slide in and out properly. Figure 12: Ladder rack supports - oil areas 1. Hold the oven rack support at a slight angle and insert prongs into the holes at the top of the oven cavity (Figure 13). 2. Lift the rack into the top holes, aligning the bottom prongs with the bottom holes (Figure 13). Figure 15: Glide rack stop Place the oven rack on the rack supports. Tilt the back of the rack upward slighly to get the stop into place inside the ladder rack. Slide the oven rack back into place Be sure to slide the rack all the way in so that the back of the rack stops by meeting the vertical support of the ladder rack. To prevent possible damage to the oven, do not attempt to close the oven door until all oven racks are fully positioned inside the oven cavity. Figure 13: Ladder rack supports - top prongs 3. Once the upper prongs are in place, hold the oven rack support flush with the oven side and insert the bottom prongs into the bottom holes (Figure 14). 4. Slide the bottom prongs down into the lower holes. Some force may be required to set the rack into place (Figure 14). Figure 14: Ladder rack supports - bottom prongs 11
-
 1
1 -
2
-
3
-
4
-
5
-
 6
6 -
 7
7 -
 8
8 -
 9
9 -
 10
10 -
 11
11 -
 12
12 -
 13
13 -
 14
14 -
 15
15 -
 16
16 -
17
-
18
-
19
-
20
-
21
-
22
-
23
-
24
-
25
-
26
-
27
-
28
-
29
-
30
-
31
-
32
-
33
-
34
-
35
-
36
-
37
-
38
-
39
-
40
-
41
-
42
-
43
-
44
-
45
-
46
-
47
-
48
-
49
-
50
-
51
-
52
-
53
-
54
-
55
-
56
 |
 |
